-
manualzz.com
- Entertainment & hobby
- Musical instruments
- Synthesizer
Инструкции и Руководства для Yamaha PSR-S670.
Мы нашли 10
инструкции доступные для бесплатного скачивания:
Инструкция по применению, Инструкция по установке, Инструкция по эксплуатации, Руководство пользователя, Техническая спецификация
Yamaha PSR-S670 User manual
Бренд:
Yamaha
Категория:
Synthesizer
Размер:
1 MB
Страниц:
98
Язык(и):
Чешский, Датский, Немецкий, Английский, Испанский, Финский, Французский, Венгерский, Индонезийский, Итальянский, Японский, Корейский, Голландский, no, Польский, Португальский, Румынский, Русский, Шведский, Турецкий, Вьетнамский, zh
Открыть в новой вкладке
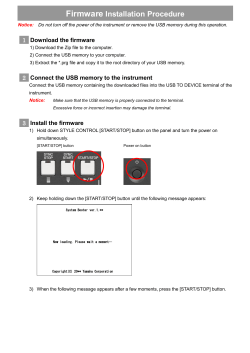
Yamaha Firmware Installation Guide for PSR-S670
Бренд:
Yamaha
Размер:
172 KB
Страниц:
3
Язык(и):
Чешский, Датский, Немецкий, Английский, Испанский, Финский, Французский, Венгерский, Индонезийский, Итальянский, Корейский, Голландский, no, Польский, Португальский, Румынский, Русский, Шведский, Турецкий, Вьетнамский, zh
Открыть в новой вкладке

Yamaha PSR-S670 Data List
Бренд:
Yamaha
Размер:
1 MB
Страниц:
70
Язык(и):
Чешский, Датский, Немецкий, Английский, Испанский, Финский, Французский, Венгерский, Индонезийский, Итальянский, Японский, Корейский, Голландский, no, Польский, Португальский, Румынский, Русский, Шведский, Турецкий, Вьетнамский, zh
Открыть в новой вкладке

Yamaha PSR-S670 Owner’s Manual
Бренд:
Yamaha
Размер:
3 MB
Страниц:
108
Язык(и):
Чешский, Датский, Немецкий, Английский, Испанский, Финский, Французский, Венгерский, Индонезийский, Итальянский, Корейский, Голландский, no, Польский, Португальский, Румынский, Русский, Шведский, Турецкий, Вьетнамский, zh
Открыть в новой вкладке
-
Contents
-
Table of Contents
-
Troubleshooting
-
Bookmarks
Quick Links
Digital Workstation
Clavier Arrangeur Professionnel
Estación de Trabajo Digital
Owner’s Manual
Mode d’emploi
Manual de instrucciones
Thank you for purchasing this Yamaha Digital Workstation!
We recommend that you read this manual carefully so that you can fully take advantage of the
advanced and convenient functions of the instrument. We also recommend that you keep this
manual in a safe and handy place for future reference.
Before using the instrument, be sure to read «PRECAUTIONS» on pages 5–6.
Merci d’avoir choisi ce Clavier Arrangeur Professionnel Yamaha !
Nous vous conseillons de lire attentivement ce mode d’emploi afin de tirer pleinement profit
des fonctions avancées et très utiles de votre instrument. Nous vous recommandons
également de garder ce manuel à portée de main pour toute référence ultérieure.
Avant d’utiliser l’instrument, lisez attentivement la section « PRÉCAUTIONS
D’USAGE » aux pages 5 et 6.
Le damos las gracias por adquirir esta Estación de Trabajo Digital de Yamaha.
La lectura detenida de este manual le permitirá disfrutar de las útiles y avanzadas
funciones del instrumento. Recomendamos guardar el manual en un lugar seguro y
accesible, para futuras consultas.
Antes de utilizar el instrumento, lea las «PRECAUCIONES», en las páginas 5 y 6.
English
Français
Español
EN
FR
ES
Summary of Contents for Yamaha PSR-S670
Синтезаторы Yamaha PSR-S670 — инструкция пользователя по применению, эксплуатации и установке на русском языке. Мы надеемся, она поможет вам решить возникшие у вас вопросы при эксплуатации техники.
Вы можете скачать инструкцию к Yamaha PSR-S670 по ссылке ниже, если не хотите ждать загрузки. Если остались вопросы, задайте их в комментариях после инструкции.
«Загружаем инструкцию», означает, что нужно подождать пока файл загрузится и можно будет его читать онлайн. Некоторые инструкции очень большие и время их появления зависит от вашей скорости интернета.
Полезные видео
Остались вопросы?
Не нашли свой ответ в руководстве или возникли другие проблемы? Задайте свой вопрос в форме ниже с подробным описанием вашей ситуации, чтобы другие люди и специалисты смогли дать на него ответ. Если вы знаете как решить проблему другого человека, пожалуйста, подскажите ему


Часто задаваемые вопросы

Как посмотреть инструкцию к Yamaha PSR-S670?
Необходимо подождать полной загрузки инструкции в сером окне на данной странице или скачать кликнув по специальной кнопке.
Руководство на русском языке?
Все наши руководства представлены на русском языке или схематично, поэтому вы без труда сможете разобраться с вашей моделью
Как можно распечатать инструкцию?
Скачайте ее по специальной кнопке над формой чтения на ваше устройства и отправьте на печать.
This Reference Manual explains advanced features of the PSR-S670.
Please read the Owner’s Manual first, before reading this Reference Manual.
Digital Workstation
Reference Manual
EN
Manual Development Department
© 2015 Yamaha Corporation
Published 05/2015 PO-A0
2 PSR-S670 Reference Manual
Table of Contents
1Voices 3
Voice Types (Characteristics) ………..………..………….……… 3
Selecting GM, XG and GM2 Voices………..………….……….. 4
Making Detailed Settings for Harmony/Arpeggio …………... 5
Pitch-Related Settings …….………….……….………….………... 6
Editing Parameters Assigned to the LIVE CONTROL
Knobs.………….………..………….……….…………..………….…… 9
Editing Voices (Voice Set) ……………….………….………..…. 12
Disabling Automatic Selection of Voice Sets
(Effects, etc.)………..………..………….……….………….………. 16
Changing detailed Voice settings (Touch Response,
Sustain, Mono/Poly)………..………….……….………….………. 17
Adding New Contents—Expansion Packs…………..……… 18
2Styles 20
Chord Fingering Types …………..……….………….…………... 21
Style Playback Related Settings …..………….………….……. 23
Memorizing Original Settings to One Touch Setting …….. 25
Creating/Editing Styles (Style Creator) ………..………….…. 26
3Songs43
Editing Music Notation (Score) Settings …………….………. 43
Editing Lyrics/Text Display Settings…………….……….……. 45
Using the Auto Accompaniment Features with Song
Playback ……………………….……….………….………..………… 46
Song Playback Related Parameters (Guide Function,
Channel settings, Repeat settings) ……….………….……….. 47
Creating/Editing Songs (Song Creator) ……….……….……. 50
4 USB Audio Player/Recorder 56
5 Multi Pads 56
Creating Multi Pads (Multi Pad Creator) …………….………. 56
Editing Multi Pads …………….………….…………..……….……. 58
6 Music Finder 60
Creating a Set of Favorite Records…..………….………..….. 60
Editing Records.………….………..………….………….……….... 61
Saving the Records as a Single File …………..………….….. 63
7Registration Memory 64
Editing the Registration Memory…….………….……….…….. 64
Disabling Recall of Specific Items (Freeze) ………..………. 65
Calling Up Registration Memory Numbers in Order
(Registration Sequence) …………….………….………..………. 66
8 Mixing Console 69
Editing VOL/VOICE Parameters …………………….……….... 69
Editing FILTER Parameters .………….……….………….…….. 70
Editing TUNE Parameters.………….………..………….………. 71
Editing EFFECT Parameters ……………..……….………….... 72
Editing MEQ (Master Equalizer) Parameters…………….... 75
Editing Master Compressor (CMP) Parameters ………….. 76
Block Diagram…………….………..………….……….………….... 78
9 Connections 79
Footswitch/Foot Controller Settings ..………….……….…….. 79
MIDI Settings …………………..……….………….………..………. 82
Connecting with an iPhone/iPad via Wireless LAN..…….. 88
10 Function 90
UTILITY………..………….……….………….………….………..….. 90
SYSTEM ……………….………..………….……….………….…….. 94
Index 97
Each chapter in this Reference Manual corresponds to the relevant chapters in the Owner’s Manual.
• The illustrations and LCD screens as shown in this manual are for instructional purposes only, and may appear somewhat dif-
ferent from those on your instrument.
• The “Data List” and “iPhone/iPad Connection Manual” documents can be downloaded from the Yamaha website:
http://download.yamaha.com/
• The company names and product names in this manual are the trademarks or registered trademarks of their respective compa-
nies.
Using the PDF manual
• To quickly jump to items and topics of interest, click on the desired items in the “Bookmarks” index to the left
of the main display window. (Click the “Bookmarks” tab to open the index if it is not displayed.)
• Click the page numbers that appear in this manual to go directly to the corresponding page.
• Select “Find” or “Search” from the Adobe Reader “Edit” menu and enter a keyword to locate related informa-
tion anywhere in the document.
NOTE The names and positions of menu items may vary according to the version of Adobe Reader being used.
1
1
PSR-S670 Reference Manual 3
Voices
Voices
Contents
Voice Types (Characteristics) . . . . . . . . . . . . . . . . . . . . . . . . . . . . . . . . . . . . . . . . . . . . . . . . . . . . . 3
Selecting GM, XG and GM2 Voices . . . . . . . . . . . . . . . . . . . . . . . . . . . . . . . . . . . . . . . . . . . . . . . . . 4
Making Detailed Settings for Harmony/Arpeggio . . . . . . . . . . . . . . . . . . . . . . . . . . . . . . . . . . . . . 5
Pitch-Related Settings . . . . . . . . . . . . . . . . . . . . . . . . . . . . . . . . . . . . . . . . . . . . . . . . . . . . . . . . . . . 6
• Fine-tuning the Pitch of the Entire Instrument . . . . . . . . . . . . . . . . . . . . . . . . . . . . . . . . . . . . . . . . 6
• Scale Tuning. . . . . . . . . . . . . . . . . . . . . . . . . . . . . . . . . . . . . . . . . . . . . . . . . . . . . . . . . . . . . . . . . . 7
• Changing the Part Assignment of the TRANSPOSE Buttons . . . . . . . . . . . . . . . . . . . . . . . . . . . . 8
Editing Parameters Assig ned to the LIVE CONTROL Knobs . . . . . . . . . . . . . . . . . . . . . . . . . . . . 9
Editing Voices (Voice Set) . . . . . . . . . . . . . . . . . . . . . . . . . . . . . . . . . . . . . . . . . . . . . . . . . . . . . . . 12
• Editable Parameters in the VOICE SET Displays. . . . . . . . . . . . . . . . . . . . . . . . . . . . . . . . . . . . . .13
Disabling Automatic Selection of Voice Sets (Effects, etc.) . . . . . . . . . . . . . . . . . . . . . . . . . . . . 16
Changing detailed Voice settings (Touch Response, Sustain, Mono/Poly) . . . . . . . . . . . . . . . 17
Adding New Contents—Expansion Packs . . . . . . . . . . . . . . . . . . . . . . . . . . . . . . . . . . . . . . . . . . 18
• Installing the Expansion Pack data from the USB Flash Drive. . . . . . . . . . . . . . . . . . . . . . . . . . . .18
• Uninstalling the Expansion Pack data . . . . . . . . . . . . . . . . . . . . . . . . . . . . . . . . . . . . . . . . . . . . . .18
• Saving the Instrument Info File to the USB Flash Drive . . . . . . . . . . . . . . . . . . . . . . . . . . . . . . . . .19
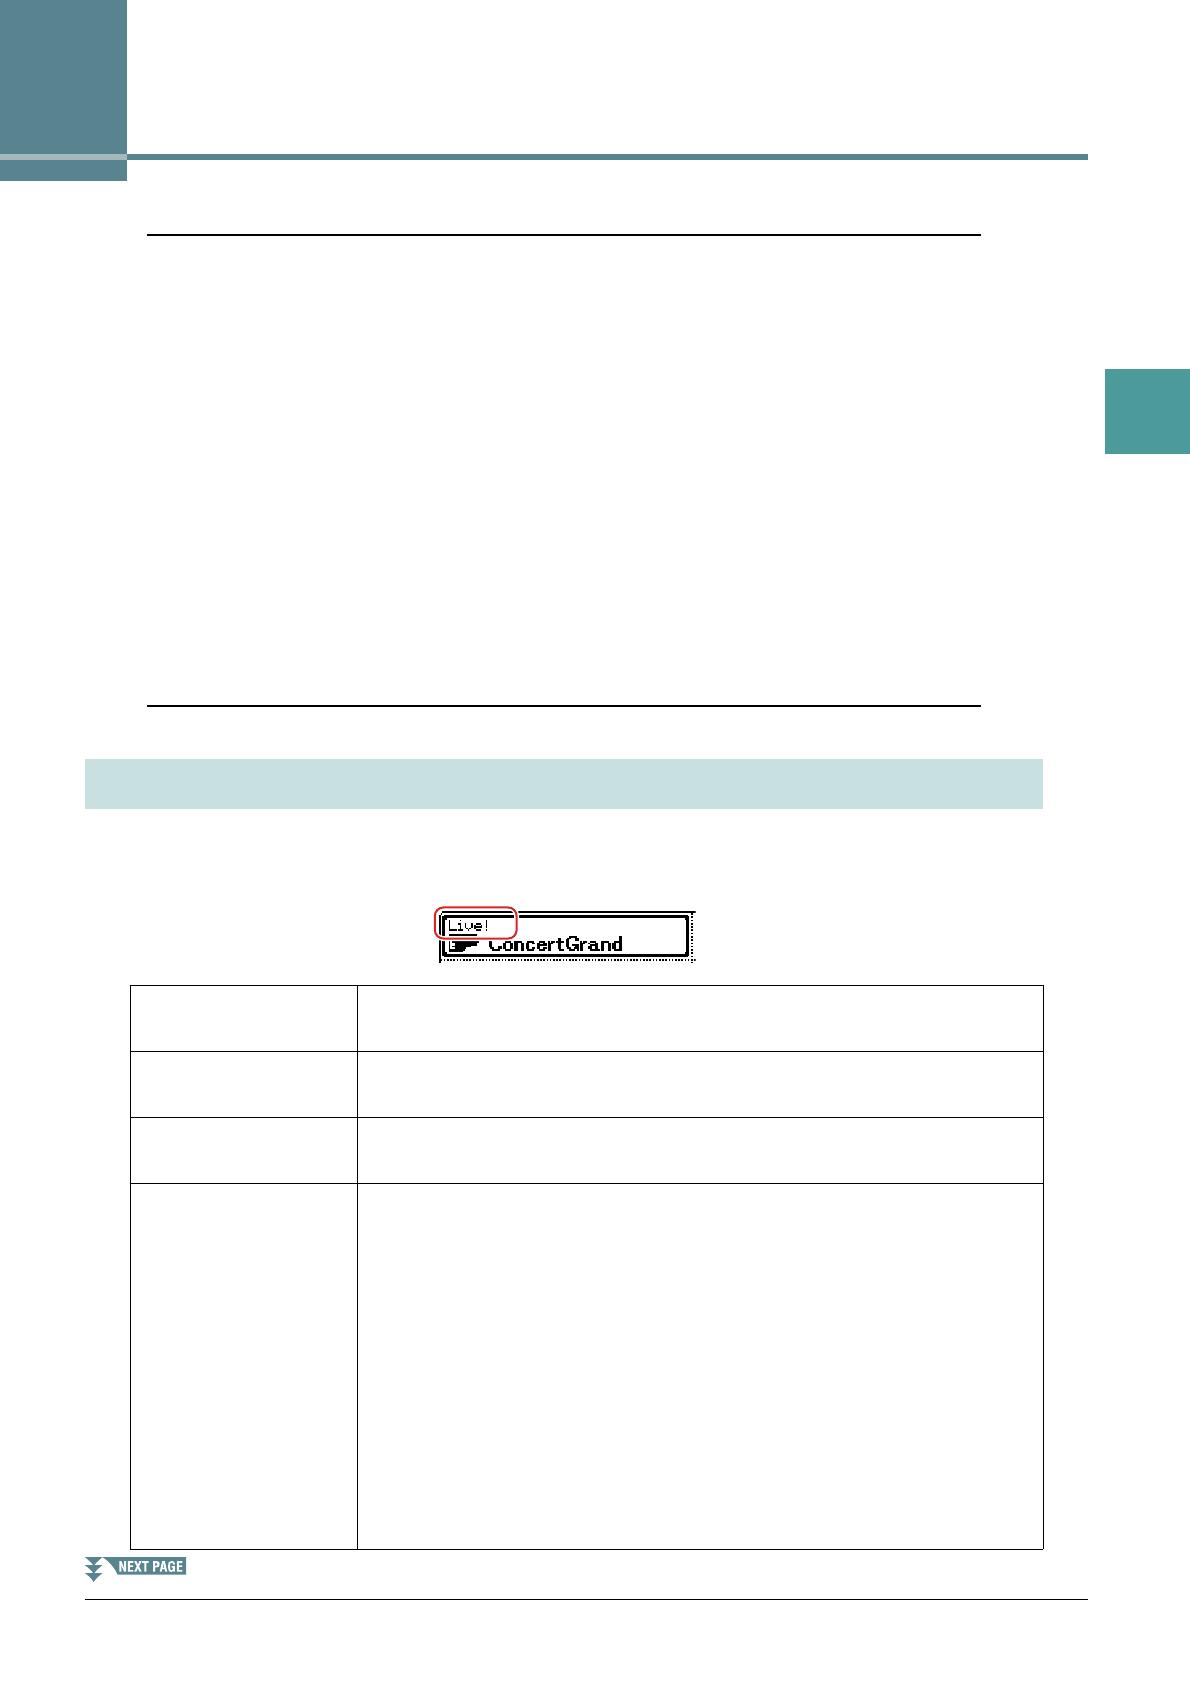
The particular type of Voice is indicated at the upper left of the Voice name in the Voice Selection display.
The defining characteristics of these Voices and their performance advantages are described below.
Voice Types (Characteristics)
Live! These acoustic instrument sounds were sampled in stereo, to produce a truly
authentic, rich sound—full of atmosphere and ambience.
Cool! These Voices use sophisticated programming to capture the dynamic textures
and subtle nuances of electric instruments.
Sweet! These acoustic instrument sounds also benefit from Yamaha’s sophisticated
technology—and feature a finely detailed and natural sound.
MegaVoice These Voices make special use of velocity switching. Each velocity range (the
measure of your playing strength) has a completely different sound.
For example, a guitar MegaVoice includes the sounds of various performance
techniques. In conventional instruments, different Voices having those sounds
would be called up via MIDI and played in combination to achieve the desired
effect. However, now with MegaVoices, a convincing guitar part can be played
with just a single Voice, using specific velocity values to play the desired
sounds. Because of the complex nature of these Voices and the precise veloci-
ties need to play the sounds, they’re not intended for playing from the key-
board. They are, however, very useful and convenient when creating MIDI
data—especially when you want to avoid using several different Voices just for
a single instrument part.
Actual sound maps for the MegaVoices are provided in the “Mega Voices
Map” in the Data List on the website.
4 PSR-S670 Reference Manual
1
Voices
NOTE MegaVoices are not compatible with other instrument models. For this reason, any Song or Style you’ve created on this instrument using these Voices
will not sound properly when played back on the instruments which do not have these types of Voices.
NOTE MegaVoices sound differently depending on keyboard range, velocity, touch, etc. Hence, if you turn on the [HARMONY/ARPEGGIO] button, change the
transpose setting or change the Voice Set parameters, unexpected or undesired sounds may result.
For a list of preset Voices of this instrument, refer to the “Voice List” in the Data List on the website.
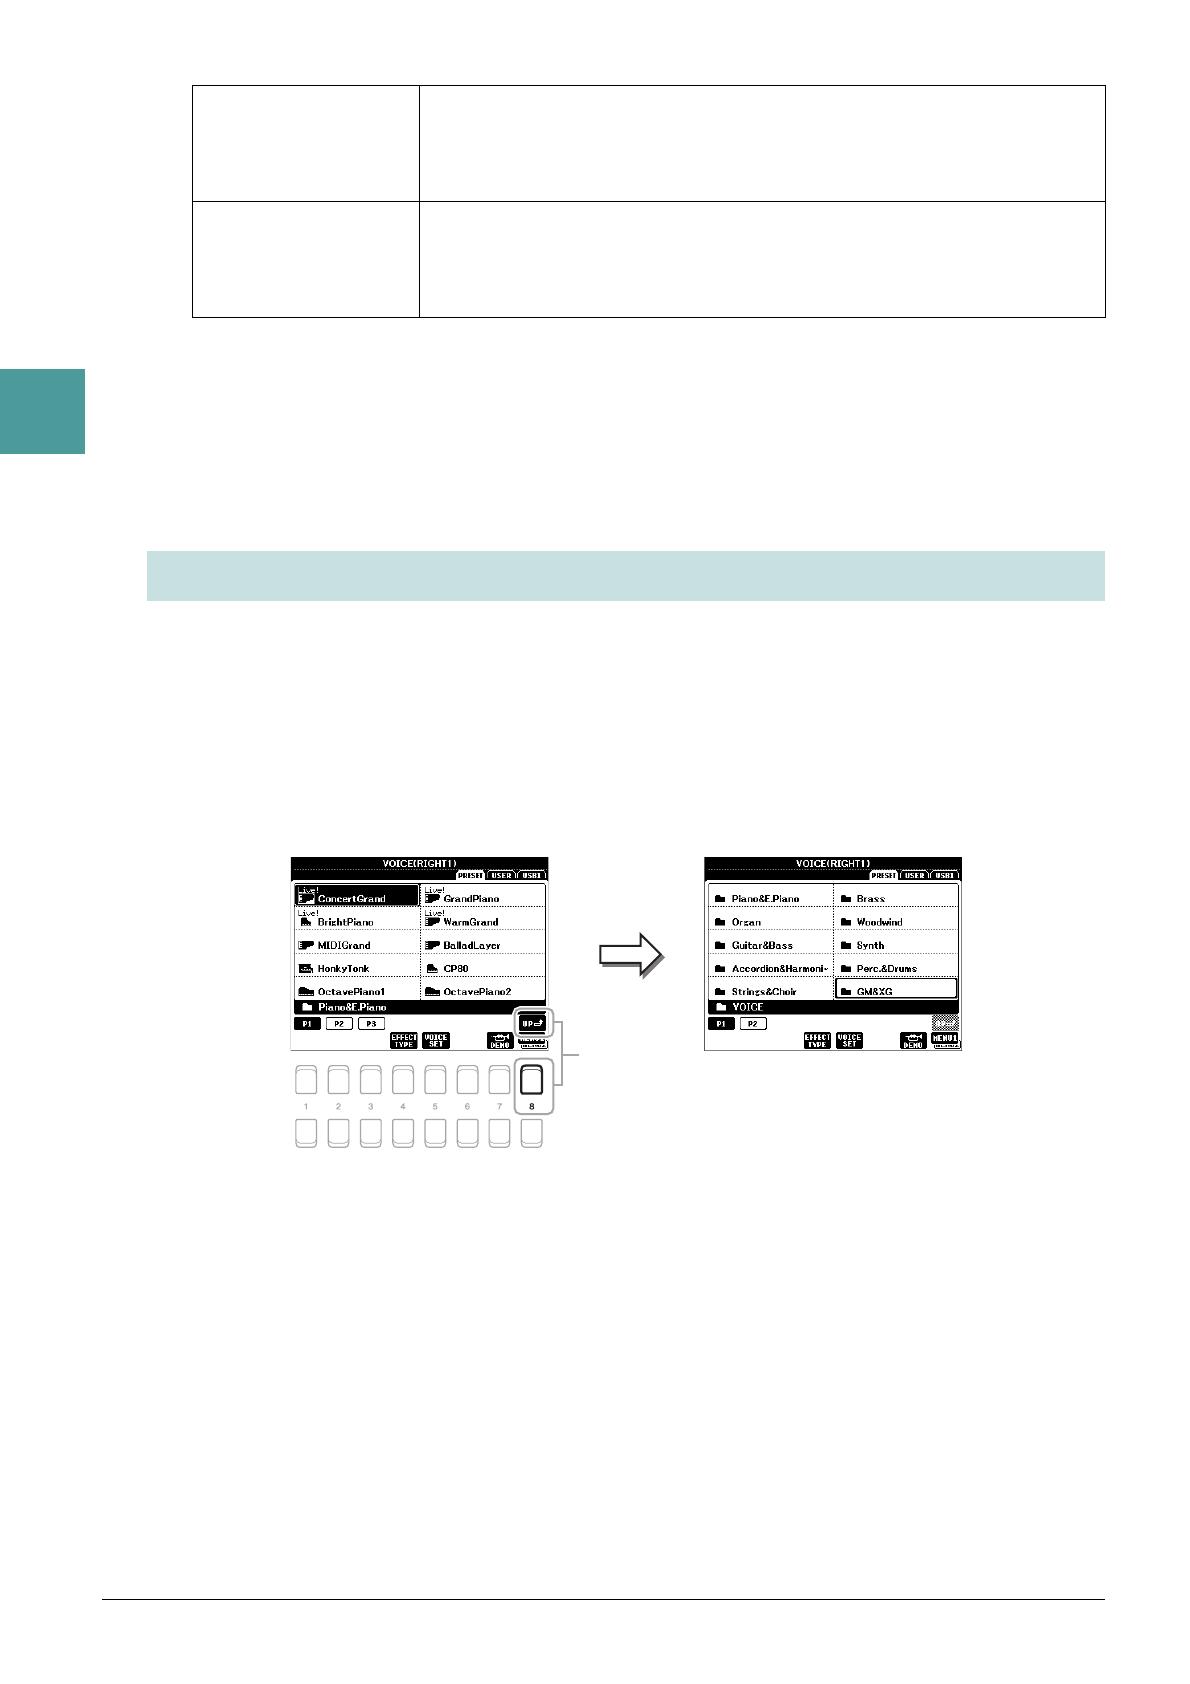
This instrument features Voices provided specially for XG/GM compatibility. These Voices cannot be called
up directly from the VOICE category selection buttons. However, they can be called up as described below.
1 Press one of the VOICE category selection buttons (other than the [EXPANSION/
USER] button) to call up the Voice Selection display.
2 Press the [8 ] (UP) button to call up the Voice categories.
3 Use the Cursor buttons [][][E][F] to select the “GM&XG” (P1) or “GM2” (P2)
folder, then press the [ENTER] button.
4 Use the Cursor buttons [][][E][F] to select the desired Voice category folder, then
press the [ENTER] button.
5 Use the Cursor buttons [][][E][F] to select the desired Voice, then press the
[ENTER] button.
Drums Various drum and percussion sounds are assigned to individual keys, letting
you play the sounds from the keyboard. For information about what sound is
assigned to each key, refer to the “Drum/SFX Kit List” in the Data List on the
website.
SFX Various special effect sounds and percussion sounds are assigned to individual
keys, letting you play the sounds from the keyboard. For information about
what sound is assigned to each key, refer to the “Drum/SFX Kit List” in the
Data List on the website.
Selecting GM, XG and GM2 Voices
PSR-S670 Reference Manual 5
1
Voices
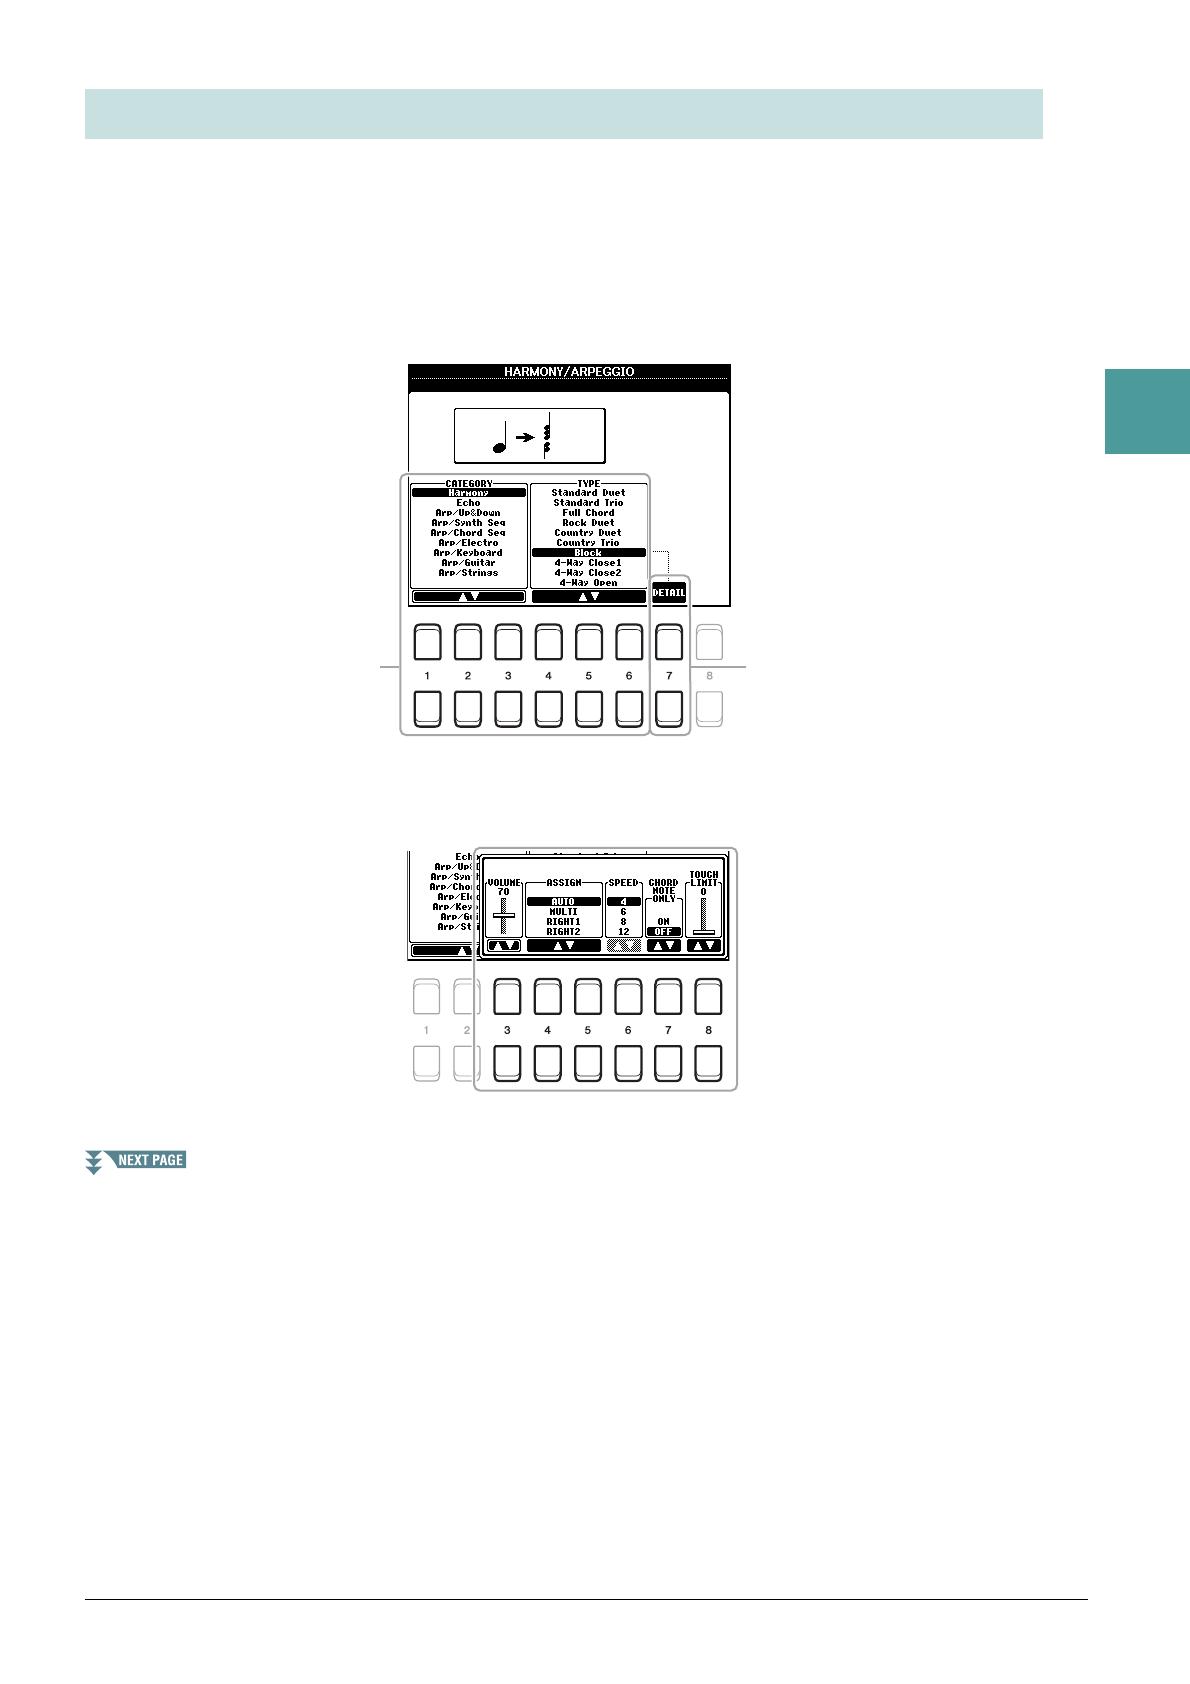
This lets you make detailed settings, including volume level.
1 Call up the operation display.
[FUNCTION] TA B [E] MENU 1 Cursor buttons [][][E][F] HARMONY/ARPEGGIO
[ENTER]
2 Select the desired Harmony/Arpeggio category and type by using the [1 ]–[6 ]
buttons.
3 Use the [7 ] (DETAIL) buttons to call up the detailed setting window.
4 Use the [3 ]–[8 ] buttons to make various Harmony/Arpeggio settings.
Making Detailed Settings for Harmony/Arpeggio
6 PSR-S670 Reference Manual
1
Voices
When any one of the Arpeggio types is selected, only the parameters indicated by “*” in the list below can
be set. None of the parameters in the list below are available when the Harmony category “Multi Assign”
type is selected.
NOTE The settings for the Arpeggio Quantize function and the Arpeggio Hold function can be made on the display called up via [FUNCTION] TAB [E]
MENU 1 Cursor buttons [][][E][F] UTILITY [ENTER] TAB [E ][F] CONFIG 2 (page 92).
Fine—tuning the Pitch of the Entire Instrument
You can fine-tune the pitch of the entire instrument such as keyboard, Style and Song parts (except the
keyboard part played by the Drum Kit or SFX Kit Voices, and audio playback)—a useful feature when
playing the PSR-S670 along with other instruments or CD music.
1 Call up the operation display.
[FUNCTION]
TAB [
E
] MENU 1
Cursor buttons
[][][E][F]
MASTER TUNE/SCALE TUNE
[ENTER]
TAB [
E
] MASTER TUNE
2 Use the [4 ]/[5 ] buttons to set the tuning in 0.2 Hz steps.
Press both [] and [] buttons (of 4 or 5) simultaneously to reset the value to the factory setting of 440.0
Hz.
[3 ] VOLUME* Determines the volume level of the Harmony/Arpeggio notes generated
by the Harmony/Arpeggio function.
NOTE When you are using certain Voices, such as Organ Voices, in which the TOUCH SENSE DEPTH is
set to 0 in the VOICE SET display (page 16), the volume does not change.
[4 ]/
[5 ]
ASSIGN* Determines the keyboard part to which the effect is assigned.
AUTO: Applies the effect to the part (RIGHT 1/2) for which PART ON/
OFF is on. If the Harmony/Echo category is selected, the RIGHT 1
part is given priority over the RIGHT 2 part when both parts are on.
MULTI: This parameter is available when the Harmony/Echo category is
selected. When both parts are on, the note played on the keyboard is
sounded by the RIGHT 1 part and the harmonies (effect) are divided to
the RIGHT 1 and RIGHT 2 parts. When only one part is on, the note
played on the keyboard and effect are sounded by that part.
RIGHT1, RIGHT2: Applies the effect to the selected part (RIGHT 1 or
RIGHT 2).
[6 ] SPEED This parameter is only available when the “Echo” category (Echo, Trem-
olo, or Trill) is selected. It determines the speed of the Echo, Tremolo, and
Trill effects.
[7 ] CHORD NOTE
ONLY
This parameter is only available when the “Harmony” category is
selected. When this is set to “ON,” the Harmony effect is applied only to
the note (played in the right-hand section of the keyboard) that belongs to
a chord played in the chord section of the keyboard.
[8 ] TOUCH LIMIT It determines the lowest velocity value at which the harmony, echo, trem-
olo, or trill will sound. This allows you to selectively apply the harmony
by your playing strength, letting you create harmony accents in the mel-
ody. The harmony, echo, tremolo, or trill effect is applied when you play
the key strongly (above the set value).
Pitch-Related Settings
PSR-S670 Reference Manual 7
1
Voices
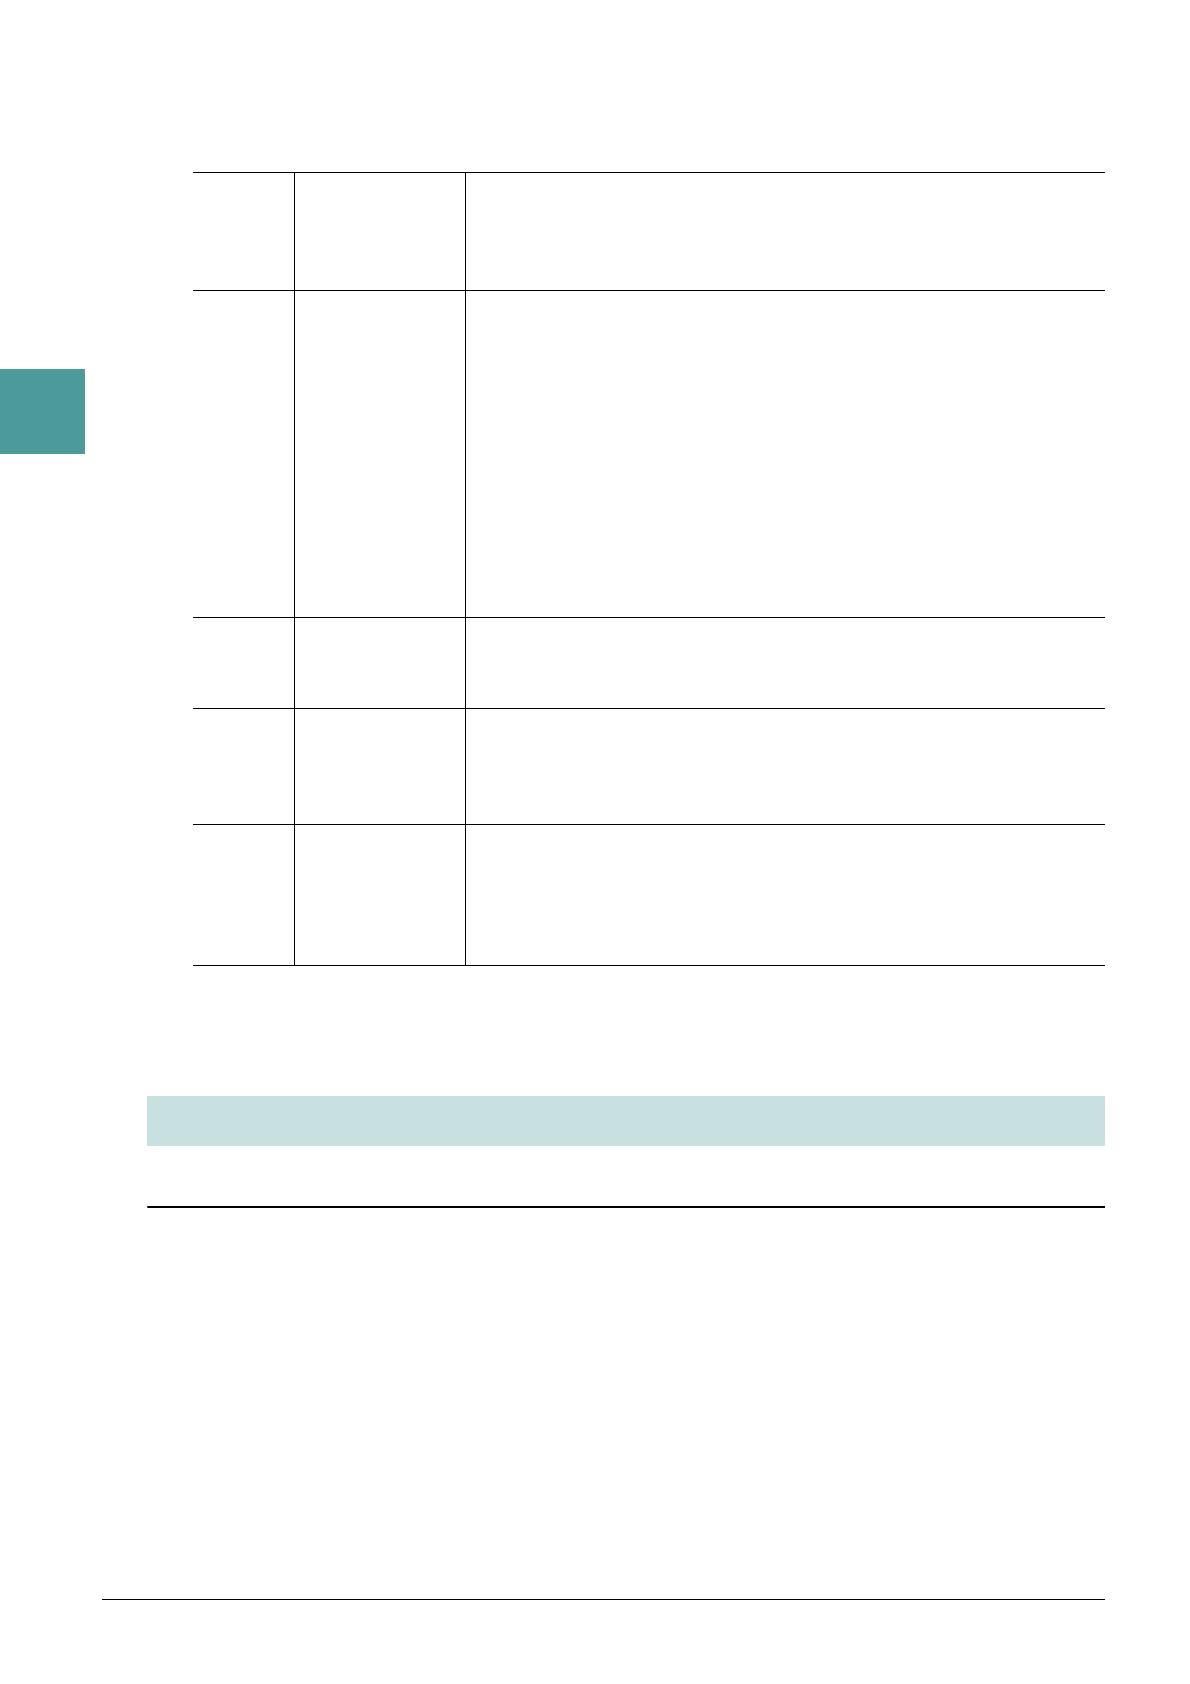
Scale Tuning
You can select various scales for playing in custom tunings for specific historical periods or music genres.
1 Call up the operation display.
[FUNCTION]
TAB [
E
] MENU 1
Cursor buttons
[][][E][F]
MASTER TUNE/SCALE TUNE
[ENTER]
TAB [
F
] SCALE TUNE
2 Use the [1 ] buttons to select the desired scale, then press the [ENTER] button.
Preset Scale types
EQUAL
The pitch range of each octave is divided equally into twelve parts, with each half-
step evenly spaced in pitch. This is the most commonly used tuning in music today.
PURE MAJOR, PURE
MINOR
These tunings preserve the pure mathematical intervals of each scale, especially for
triad chords (root, third, fifth). You can hear this best in actual vocal harmonies—
such as choirs and a cappella singing.
PYTHAGOREAN
This scale was devised by the famous Greek philosopher and is created from a
series of perfect fifths, which are collapsed into a single octave. The 3rd in this tun-
ing are slightly unstable, but the 4th and 5th are beautiful and suitable for some
leads.
MEAN-TONE
This scale was created as an improvement on the Pythagorean scale, by making the
major third interval more “in tune.” It was especially popular from the 16th century
to the 18th century. Handel, among others, used this scale.
WERCKMEISTER,
KIRNBERGER
This composite scale combines the Werckmeister and Kirnberger systems, which
were themselves improvements on the mean-tone and Pythagorean scales. The
main feature of this scale is that each key has its own unique character. The scale
was used extensively during the time of Bach and Beethoven, and even now it is
often used when performing period music on the harpsichord.
ARABIC1, ARABIC2
Use these tunings when playing Arabic music.
The tuning of each note for
the currently selected scale
is shown.
8 PSR-S670 Reference Manual
1
Voices
3 Change the following settings as necessary.
NOTE To register the Scale Tune settings to Registration Memory, be sure to checkmark the SCALE item in the REGISTRATION MEMORY CONTENTS display
called up via the [MEMORY] button.
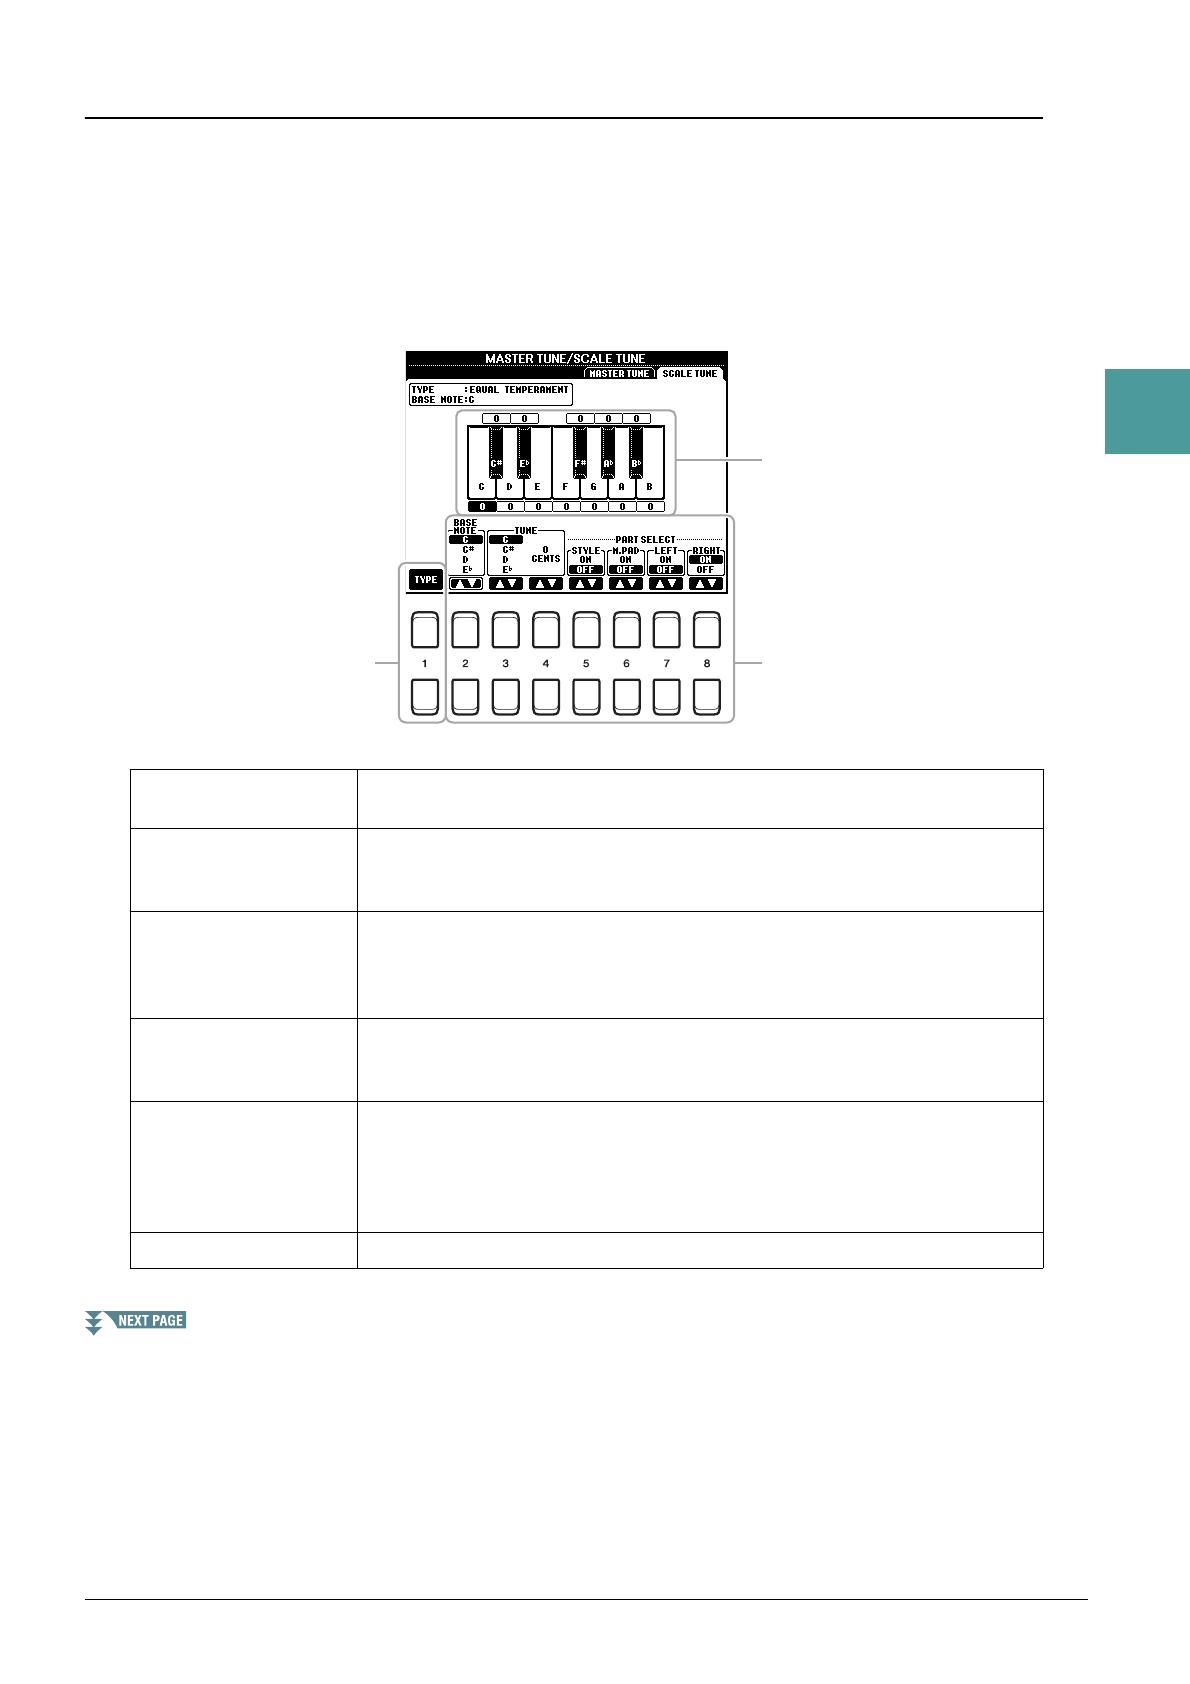
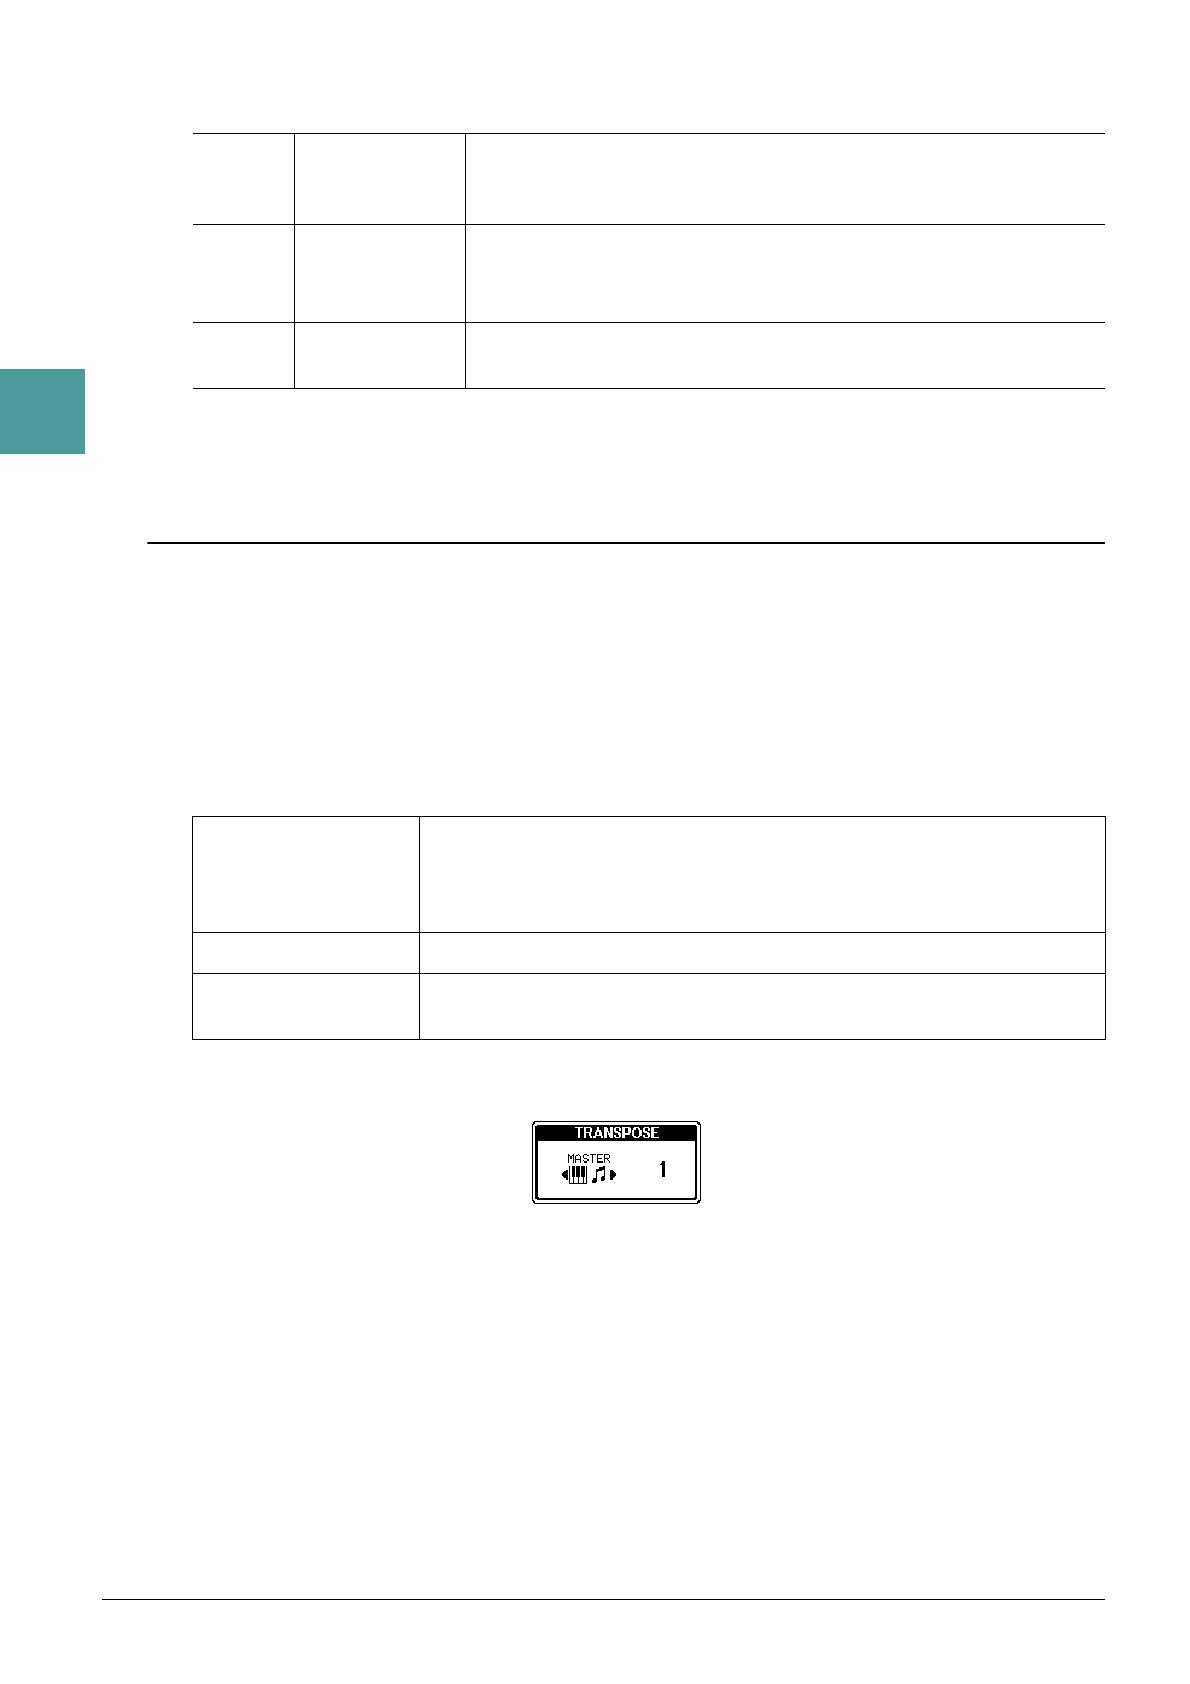
Changing the Part Assignment of the TRANSPOSE Buttons
You can determine to which parts the TRANSPOSE [-]/[+] buttons are applied.
1 Call up the operation display.
[FUNCTION] TAB [ E] MENU 1 Cursor buttons [][][E][F] CONTROLLER [ENTER]
TAB [F] KEYBOARD/PANEL
2 Use the Cursor button [] to select “3 TRANSPOSE ASSIGN.”
3 Press the [4 ]/[5 ] buttons to select the desired part assignment.
The assignment can be confirmed by the pop-up display called up via the TRANSPOSE [-]/[+] buttons.
[2 ] BASE NOTE Determines the base note for each scale. When the base note is changed,
the pitch of the keyboard is transposed, yet maintains the original pitch
relationship between the notes.
[3 ]/
[4 ]
TUNE Select the desired note to be tuned by using the [3 ] buttons and tune
it in cents by using the [4 ] buttons.
NOTE In musical terms a “cent” is 1/100th of a semitone. (100 cents equal one semitone.)
[5 ]–
[8 ]
PART SELECT Determines whether the Scale Tune setting is applied to each part or not.
KEYBOARD The TRANSPOSE [-]/[+] buttons affect the pitch of keyboard played Voices,
Style playback (controlled by the performance in the chord section of the key-
board), and Multi Pad playback (when Chord Match is on, and left-hand chords
are indicated)—but they do not affect Song playback.
SONG The TRANSPOSE [-]/[+] buttons affect only the pitch of Song playback.
MASTER The TRANSPOSE [-]/[+] buttons affect the overall pitch of the instrument,
except audio playback.
PSR-S670 Reference Manual 9
1
Voices
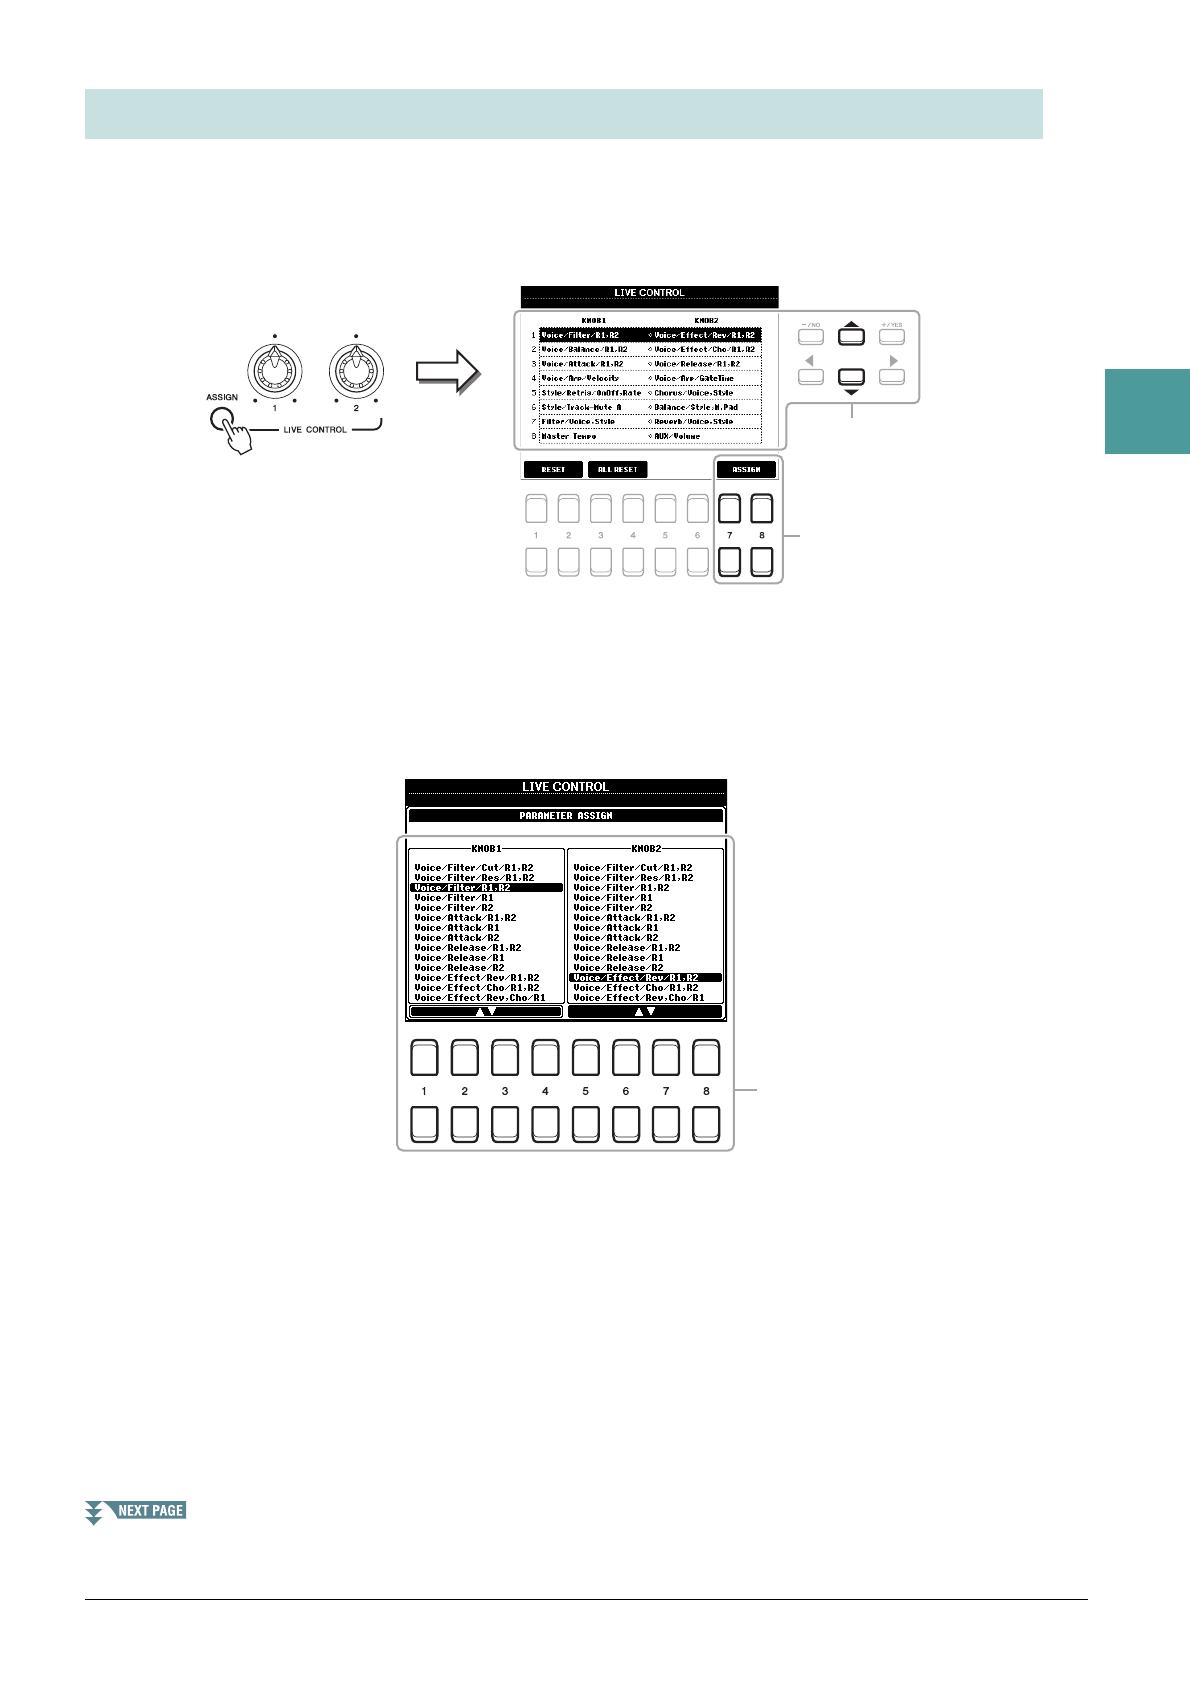
The eight combinations of functions assigned to the LIVE CONTROL knobs are provided by default,
however, you can change the functions as desired from a variety of options.
1 Press the [ASSIGN] button to call up the LIVE CONTROL display.
2 Use the Cursor buttons [][] to select the number (row) of the functions you want to
change.
3 Press one of the [7 ]/[8 ] (ASSIGN) buttons to call up the PARAMETER
ASSIGN window.
4 Use the [1 ]–[4 ] buttons (for knob 1) and the [5 ]–[8 ] buttons (for
knob 2) to select the functions to be assigned.
For information on available functions, see pages 10–11.
5 Press the [EXIT] button to close the PARAMETER ASSIGN window.
6 If necessary, repeat steps 2–5 to change the functions for other numbers.
NOTE The settings here are maintained even when you turn off the power.
NOTE Depending on the panel settings or how you move the knob, you may not notice any change to the parameter value, or the knob may not work properly,
even if you rotate it.
Editing Parameters Assigned to the LIVE CONTROL Knobs
10 PSR-S670 Reference Manual
1
Voices
Assignable Knob Functions
Voice/Filter/Cut/R1,R2 Adjusts the cutoff frequency of the filter for the RIGHT 1 and 2 parts. Rotating
the knob to the right makes the sound brighter.
Voice/Filter/Res/R1,R2 Adjusts the resonance of the filter for the RIGHT 1 and 2 parts. Rotating the
knob to the right makes the sound more pronounced.
Voice/Filter/R1,R2 Adjusts the cutoff frequency of the filter and the resonance for the RIGHT 1
and/or 2 parts to change the timbre or tone of the sound.
Voice/Filter/R1
Voice/Filter/R2
Voice/Attack/R1,R2 Adjusts the length of time until the RIGHT 1 and/or 2 parts reach their maxi-
mum level after the key is played. Rotating the knob to the right increases it.
Voice/Attack/R1
Voice/Attack/R2
Voice/Release/R1,R2 Adjusts the length of time until the RIGHT 1 and/or 2 parts decay to silence
after the key is released. Rotating the knob to the right increases it.
Voice/Release/R1
Voice/Release/R2
Voice/Effect/Rev/R1,R2 Adjusts the Reverb depth for the RIGHT 1 and 2 parts. Rotating the knob to the
right makes it deeper.
Voice/Effect/Cho/R1,R2 Adjusts the Chorus depth for the RIGHT 1 and 2 parts. Rotating the knob to the
right makes it deeper.
Voice/Effect/Rev,Cho/R1 Adjusts both the Reverb depth and Chorus depth for the RIGHT 1 or 2 part.
Rotating the knob to the right makes it deeper.
Voice/Effect/Rev,Cho/R2
Voice/Balance/R1,R2 Adjusts the volume balance between the RIGHT 1 and 2 parts. Rotating the
knob to the left increases the RIGHT 1 volume, while rotating it to the right
increases the RIGHT 2 volume.
Voice/Arp/Velocity Adjusts the volume of Arpeggio. Rotating the knob to the right increases it.
Voice/Arp/GateTime Adjusts the length of each note of Arpeggio. Rotating the knob to the right
increases it.
Voice/Arp/UnitMultiply Adjust the speed of Arpeggio. Rotating the knob to the right makes it faster.
Style/Filter/Cutoff Adjusts the cutoff frequency of the filter for the Style. Rotating the knob to the
right makes the sound brighter.
Style/Filter/Resonance Adjusts the resonance of the filter for the Style. Rotating the knob to the right
makes the sound more pronounced.
Style/Filter/Res,Cutoff Adjusts the cutoff frequency of the filter and the resonance for the Style to
change the timbre or tone of the sound.
Style/Effect/Reverb Adjusts the Reverb depth for the Style. Rotating the knob to the right makes it
deeper.
Style/Effect/Chorus Adjusts the Chorus depth for the Style. Rotating the knob to the right makes it
deeper.
Style/Effect/Rev,Cho Adjusts both the Reverb and Chorus depth for the Style. Rotating the knob to the
right makes it deeper.
Style/Retrig/Rate Adjusts the Style Retrigger length. The first part of the current Style is repeated
in the specified length. Rotating the knob to the right decreases it.
Style/Retrig/OnOff Turns the Style Retrigger function on/off. Rotating the knob to the right turns it
on, while rotating it to the left turns it off.

PSR-S670 Reference Manual 11
1
Voices
Style/Retrig/OnOff,Rate Turns the Style Retrigger function on/off and adjusts its length. Rotating the
knob to the left-most turns the function off; rotating it to the right turns the func-
tion on and decreases the length.
Style/Track-Mute A Turns playback of the Style channels on/off. Rotating the knob to the left-most
position turns on only the Rhythm 2 channel, and the other channels are turned
off. By rotating the knob clockwise from that position, channels are turned on in
the order of Rhythm 1, Bass, Chord 1, Chord 2, Pad, Phrase 1, Phrase 2, and all
channels are turned on when the knob reaches to the right-most position. Turn-
ing the channels on/off lets you easily change the rhythmic feel.
Style/Track-Mute B Turns playback of the Style channels on/off. Rotating the knob to the left-most
position turns on only the Chord 1 channel, and the other channels are turned
off. By rotating the knob clockwise from that position, channels are turned on in
the order of Chord 2, Pad, Bass, Phrase 1, Phrase 2, Rhythm 1, Rhythm 2, and
all channels are turned on when the knob reaches to the right-most position.
Turning on/off the channels lets you easily change the rhythmic feel.
Audio/Volume Controls the Audio playback volume. As you rotate the knob to the right, it
increases.
AUX/Volume Controls the input volume from the [AUX IN] jack. Rotating the knob to the
right increases it.
Balance/Voice,Style Adjusts the volume balance between the Voice and Style playback. Rotating the
knob to the left increases the Style volume, while rotating it to the right
increases the Voice volume.
Balance/Style,M.Pad Adjusts the volume balance between the Style and Multi Pad playback. Rotating
the knob to the left increases the Style volume, while rotating it to the right
increases the Multi Pad volume.
Balance/Audio,AUX Adjusts the volume balance between the Audio playback and sound input from
the [AUX IN] jack. Rotating the knob to the left increases the Audio playback
volume, while rotating it to the right increases the input volume from the [AUX
IN] jack.
Balance/Song,Audio Adjusts the volume balance between the Song and Audio playback. Rotating the
knob to the left increases the Song volume, while rotating it to the right
increases the Audio (USB Audio Player) volume.
Balance/Song,AUX Adjusts the volume balance between the Song playback and sound input from
the [AUX IN] jack. Rotating the knob to the left increases the Song playback
volume, while rotating it to the right increases the input volume from the [AUX
IN] jack.
Balance/MIDI,AudioAUX Adjusts the volume balance between the playback of MIDI data (Song, Style,
Multi Pad) and Audio (USB Audio Player and input from the [AUX IN] jack).
Rotating the knob to the left increases the MIDI volume, while rotating it to the
right increases the Audio volume.
Filter/Voice,Style Adjusts the cutoff frequency of the filter and the resonance for all keyboard
parts and the Style to change the timbre or tone of the sound.
Reverb/Voice,Style Adjusts the Reverb depth for all keyboard parts and the Style. Rotating the knob
to the right makes it deeper.
Chorus/Voice,Style Adjusts the Chorus depth for all keyboard parts and the Style. Rotating the knob
to the right makes it deeper.
Master Tempo Changes the tempo of the currently selected Style or Song. Rotating the knob to
the left makes it slower, while rotating it to the right makes it faster. Setting
range is from 50% of the default tempo value to 150%.
<No Assign> No function is assigned.
12 PSR-S670 Reference Manual
1
Voices
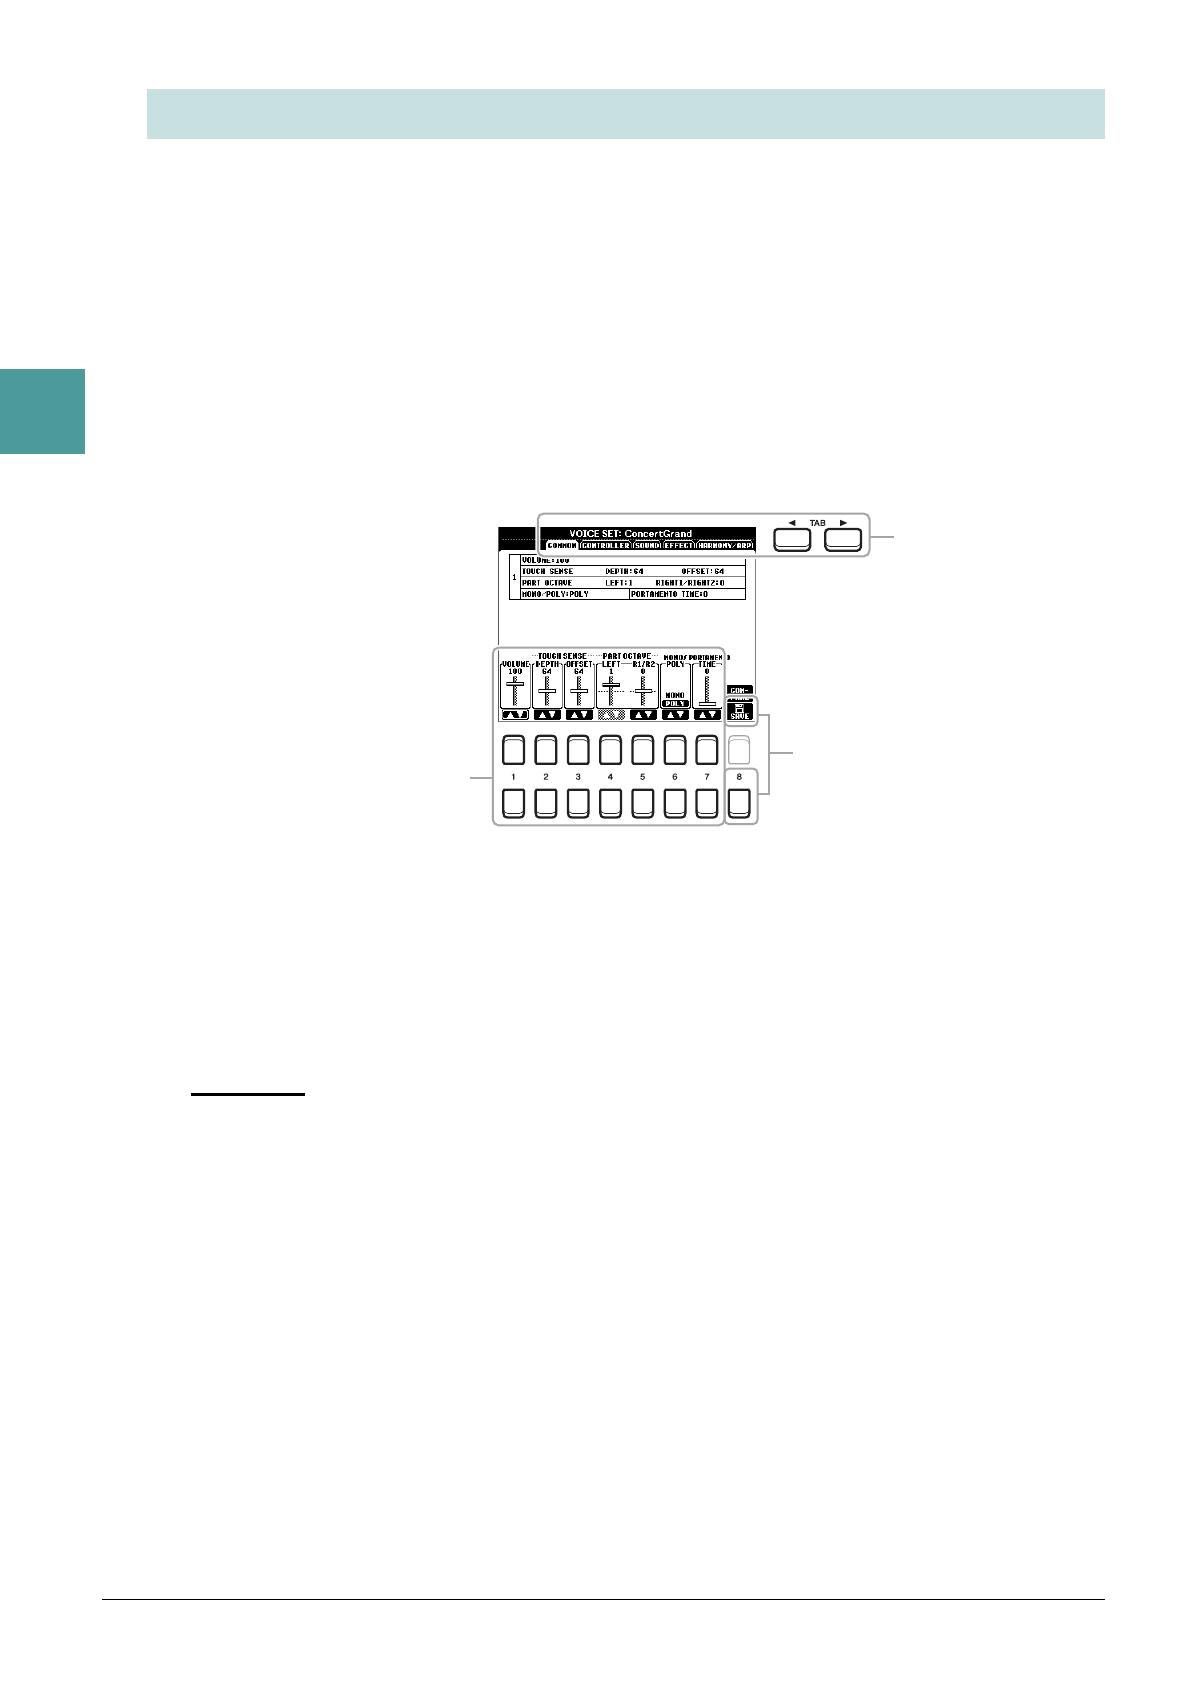
The Voice Set function allows you to create your own Voices by editing some parameters of the existing
Voices. Once you’ve created a Voice, you can save it as a file to internal memory (USER drive) or a USB
flash drive for future recall.
1 Select the desired Voice.
2 In the Voice Selection display, press the [5 ] (VOICE SET) button of MENU 1 to call
up the VOICE SET display.
3 Use the TAB [E][F] buttons to call up the relevant setting page.
For information on the available parameters in each page, see the “Editable Parameters in the VOICE SET
Displays” on page 13.
4 As necessary, use the Cursor buttons [][] to select the item (parameter) to be
edited and edit the Voice by using the [1 ]–[7 ] buttons.
By pressing the [8 ] (COMPARE) button, you can compare the sound of the edited Voice with the
original (unedited) Voice.
5 Press the [8 ] (SAVE) button to save your edited Voice.
For details on the Save operation, refer to “Basic Operations” in the Owner’s Manual.
The settings will be lost if you select another Voice or turn off the power to the instrument without carrying out the Save operation.
Editing Voices (Voice Set)
4
5
PSR-S670 Reference Manual 13
1
Voices
Editable Parameters in the VOICE SET Displays
The Voice Set parameters are organized into five different pages. The parameters in each page are described
separately, below.
NOTE The available parameters differ depending on the Voice.
COMMON Page
[1 ] VOLUME Adjusts the volume of the current edited Voice.
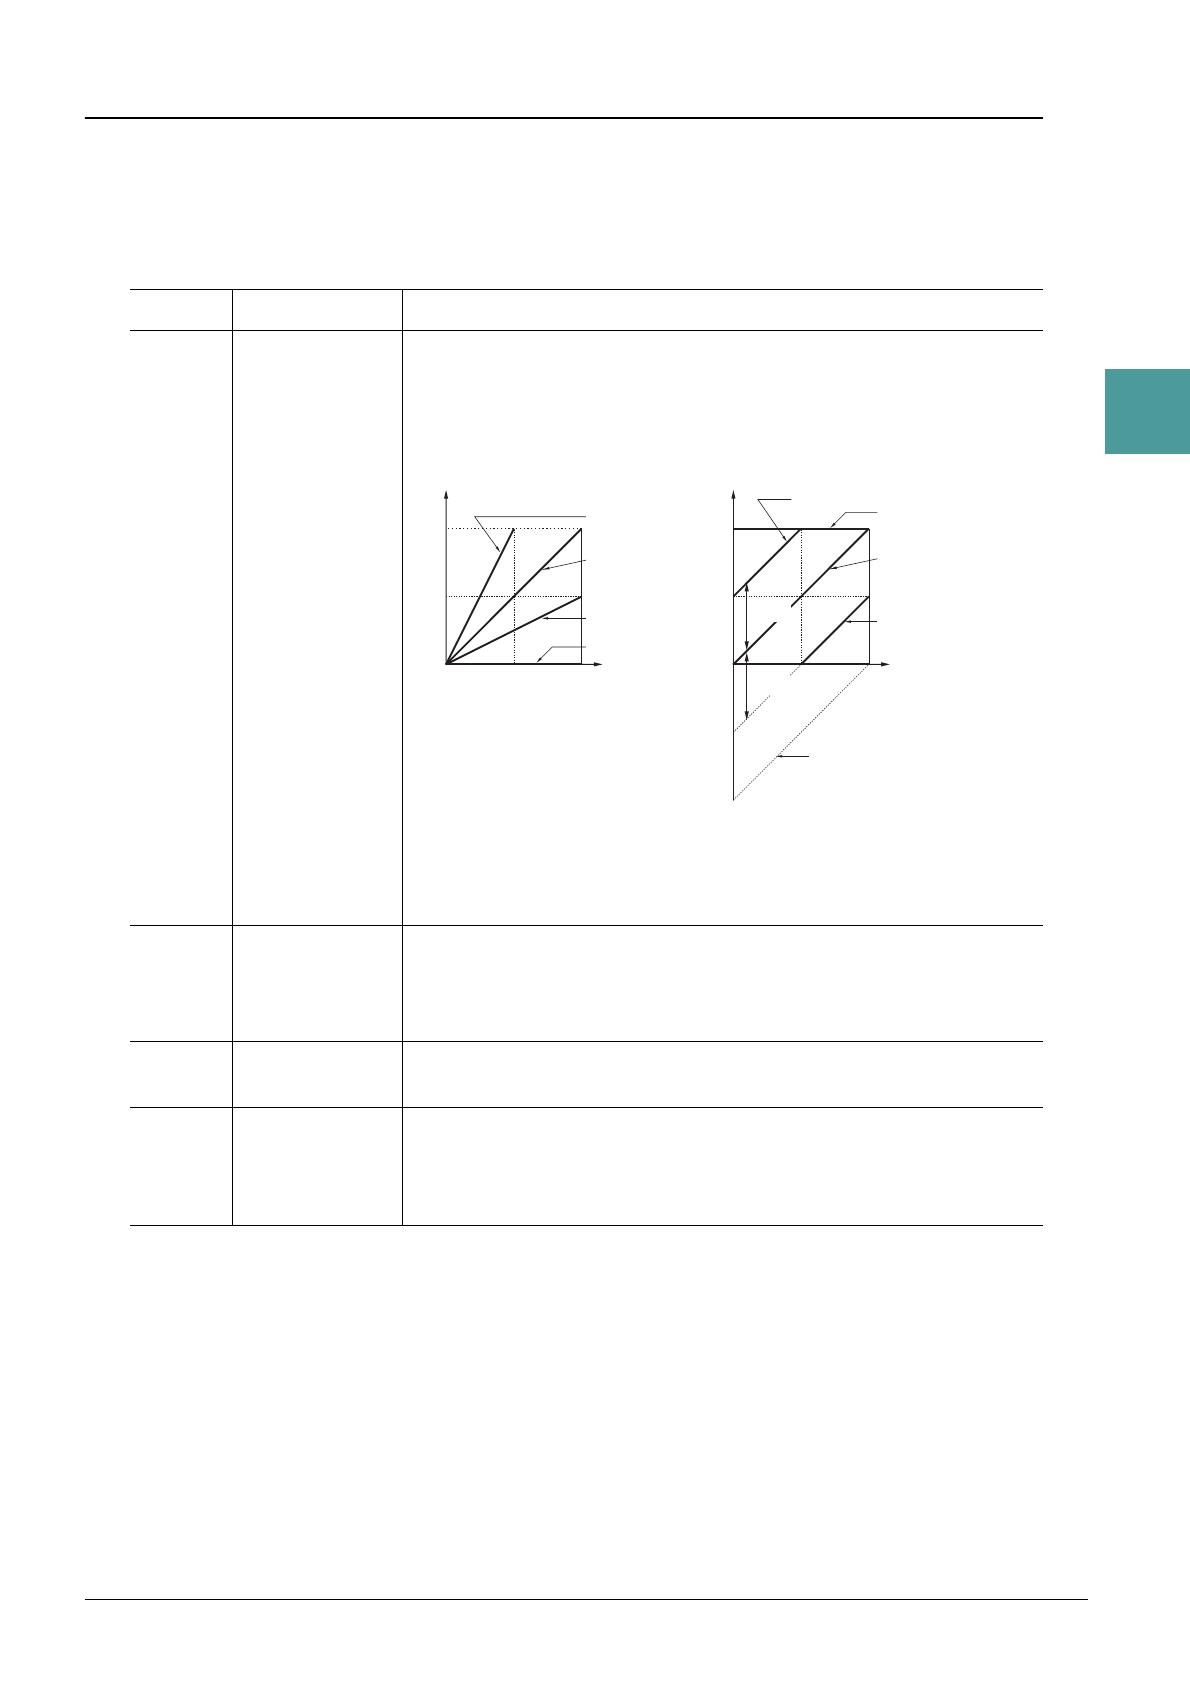
[2 ]/
[3 ]
TOUCH SENSE Adjusts the touch sensitivity (velocity sensitivity), or how greatly the vol-
ume responds to your playing strength.
DEPTH: Determines the velocity sensitivity, or how much the level of the
Voice changes in response to your playing strength (velocity).
OFFSET: Determines the amount by which received velocities are
adjusted for the actual velocity effect.
[4 ]/
[5 ]
PART OCTAVE Shifts the octave range of the edited Voice up or down in octaves. When
the edited Voice is used as any of the RIGHT 1–2 parts, the R1/R2 param-
eter is available; when the edited Voice is used as the LEFT part, the
LEFT parameter is available.
[6 ] MONO/POLY Determines whether the edited Voice is played monophonically (MONO)
or polyphonically (POLY).
[7 ] PORTAMENTO
TIME
Determines the pitch transition time when the edited Voice is set to
MONO above.
NOTE Portamento is a function that creates a smooth transition in pitch from the first note played on the
keyboard to the next.
Actual Velocity for
tone generator
Depth = 127 (twice)
Depth = 64 (normal)
Depth = 32 (half)
Depth = 0
TOUCH SENSE DEPTH
Changes to velocity curve according to
VelDepth (with Offset set to 64)
Received Velocity
(Actual KeyOn speed)
TOUCH SENSE OFFSET
Changes to velocity curve according to
VelOffset (with Depth set to 64)
Actual Velocity for
tone generator
Received Velocity
(Actual KeyOn
speed)
Offset = 96 (+64)
Offset = 127 (+127)
Offset = 64 (normal)
Offset = 32 (-64)
Offset = 0 (-127)
Depends
on offset
Depends
on offset
14 PSR-S670 Reference Manual
1
Voices
CONTROLLER Page
MODULATION
The [MODULATION] wheel can be used to modulate the parameters below as well as the pitch (vibrato).
Here, you can set the degree to which the [MODULATION] wheel modulates each of the following
parameters.
SOUND Page
1 FILTER/EG
• FILTER
Filter is a processor that changes the timbre or tone of a sound by either blocking or passing a specific
frequency range. The parameters below determine the overall timbre of the sound by boosting or cutting a
certain frequency range. In addition to making the sound either brighter or mellower, Filter can be used to
produce electronic, synthesizer-like effects.
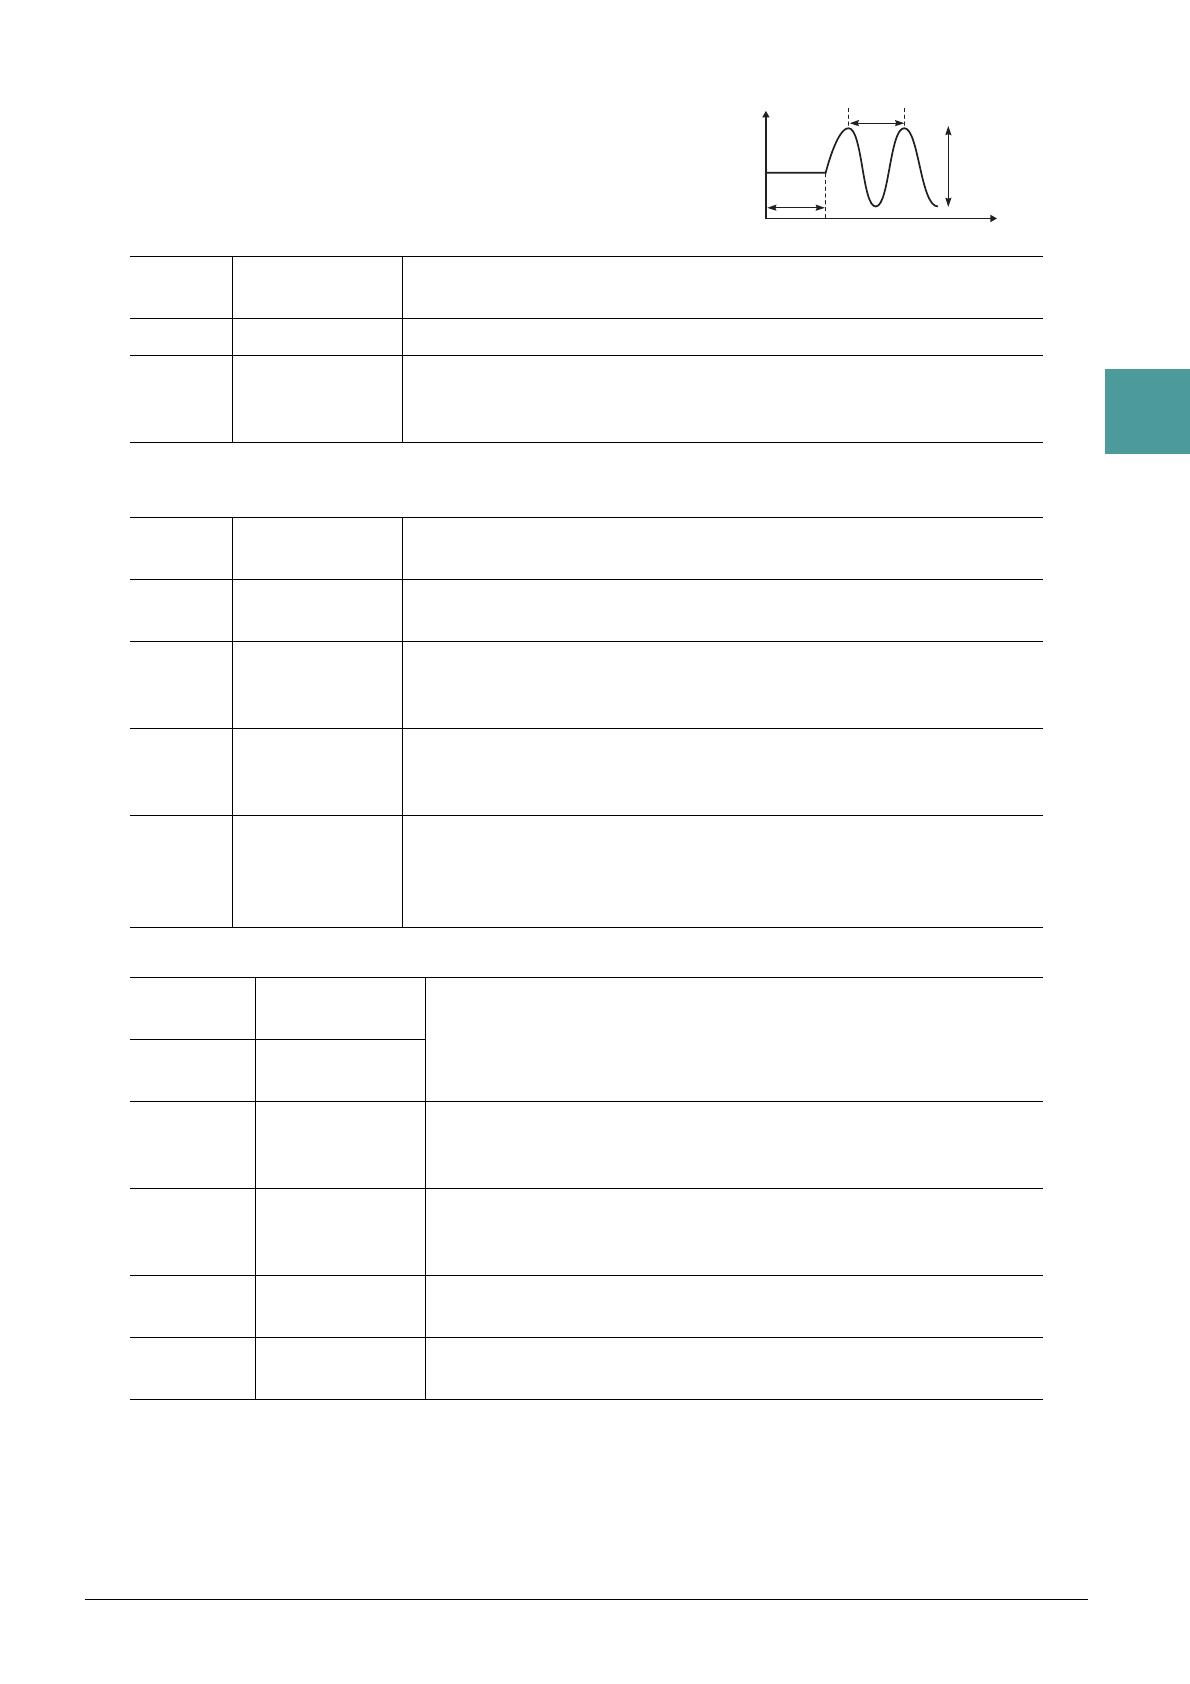
• EG
The EG (Envelope Generator) settings determine how the level of the
sound changes in time. This lets you reproduce many sound
characteristics of natural acoustic instruments—such as the quick
attack and decay of percussion sounds, or the long release of a
sustained piano tone.
[2 ] FILTER Determines the degree to which the [MODULATION] wheel modulates
the Filter Cutoff Frequency. For details about the filter, see below.
[3 ] AMPLITUDE Determines the degree to which the [MODULATION] wheel modulates
the amplitude (volume).
[5 ] LFO PMOD Determines the degree to which the [MODULATION] wheel modulates
the pitch, or the vibrato effect.
[6 ] LFO FMOD Determines the degree to which the [MODULATION] wheel modulates
the Filter modulation, or the wah effect.
[7 ] LFO AMOD Determines the degree to which the [MODULATION] wheel modulates
the amplitude, or the tremolo effect.
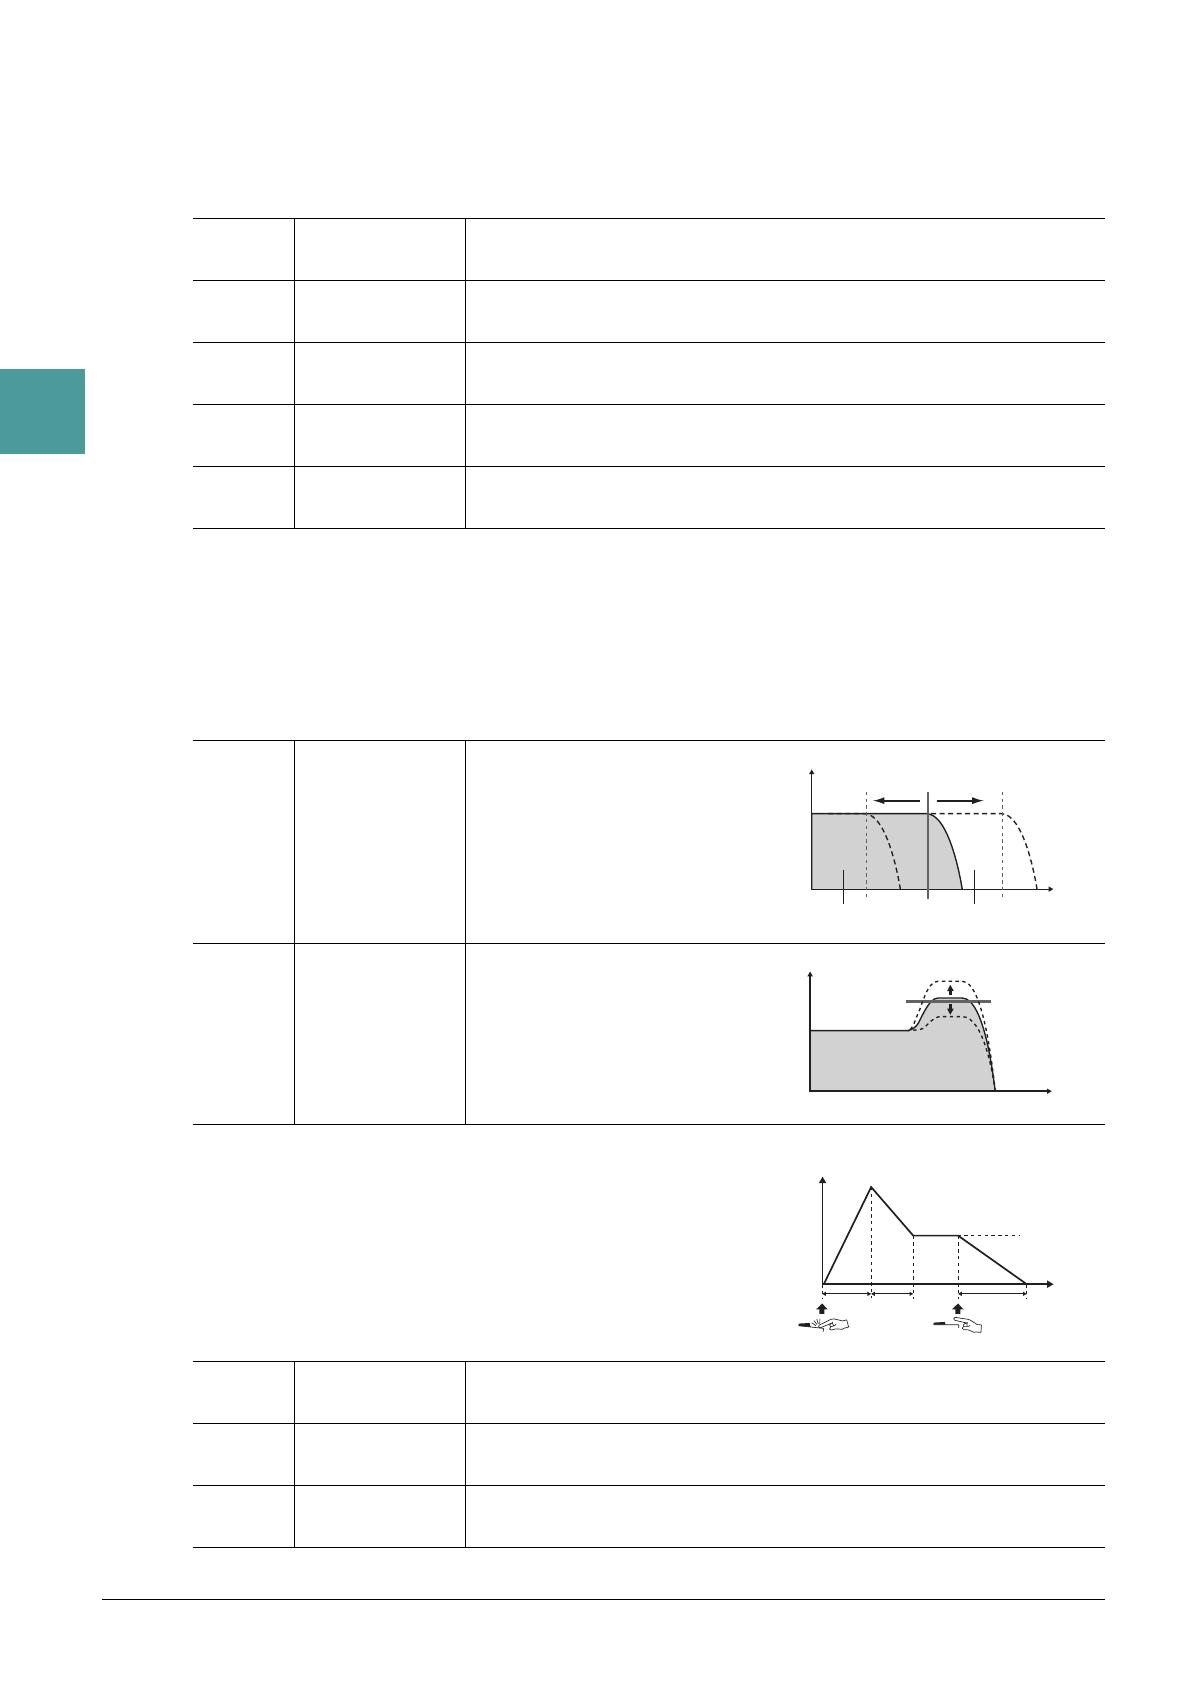
[2 ] BRIGHT.
(Brightness)
Determines the cutoff frequency or
effective frequency range of the fil-
ter (see diagram). Higher values
result in a brighter sound.
[3 ]HARMO.
(Harmonic Con-
tent)
Determines the emphasis given to
the cutoff frequency (resonance),
set in BRIGHT. above (see dia-
gram). Higher values result in a
more pronounced effect.
[4 ] ATTACK Determines how quickly the sound reaches its maximum level after the
key is played. The lower the value, the quicker the attack.
[5 ] DECAY Determines how quickly the sound reaches its sustain level (a slightly
lower level than maximum). The lower the value, the quicker the decay.
[6 ] RELES.
(Release)
Determines how quickly the sound decays to silence after the key is
released. The lower the value, the quicker the decay.
Volume
These frequencies are
“passed” by the filter.
Cutoff
range
Frequency
(pitch)
Cutoff Frequency
Volume
Frequency (pitch)
Resonance
Time
Level
Key on Key off
Sustain
Level
ATTACK DECAY RELEASE
PSR-S670 Reference Manual 15
1
Voices
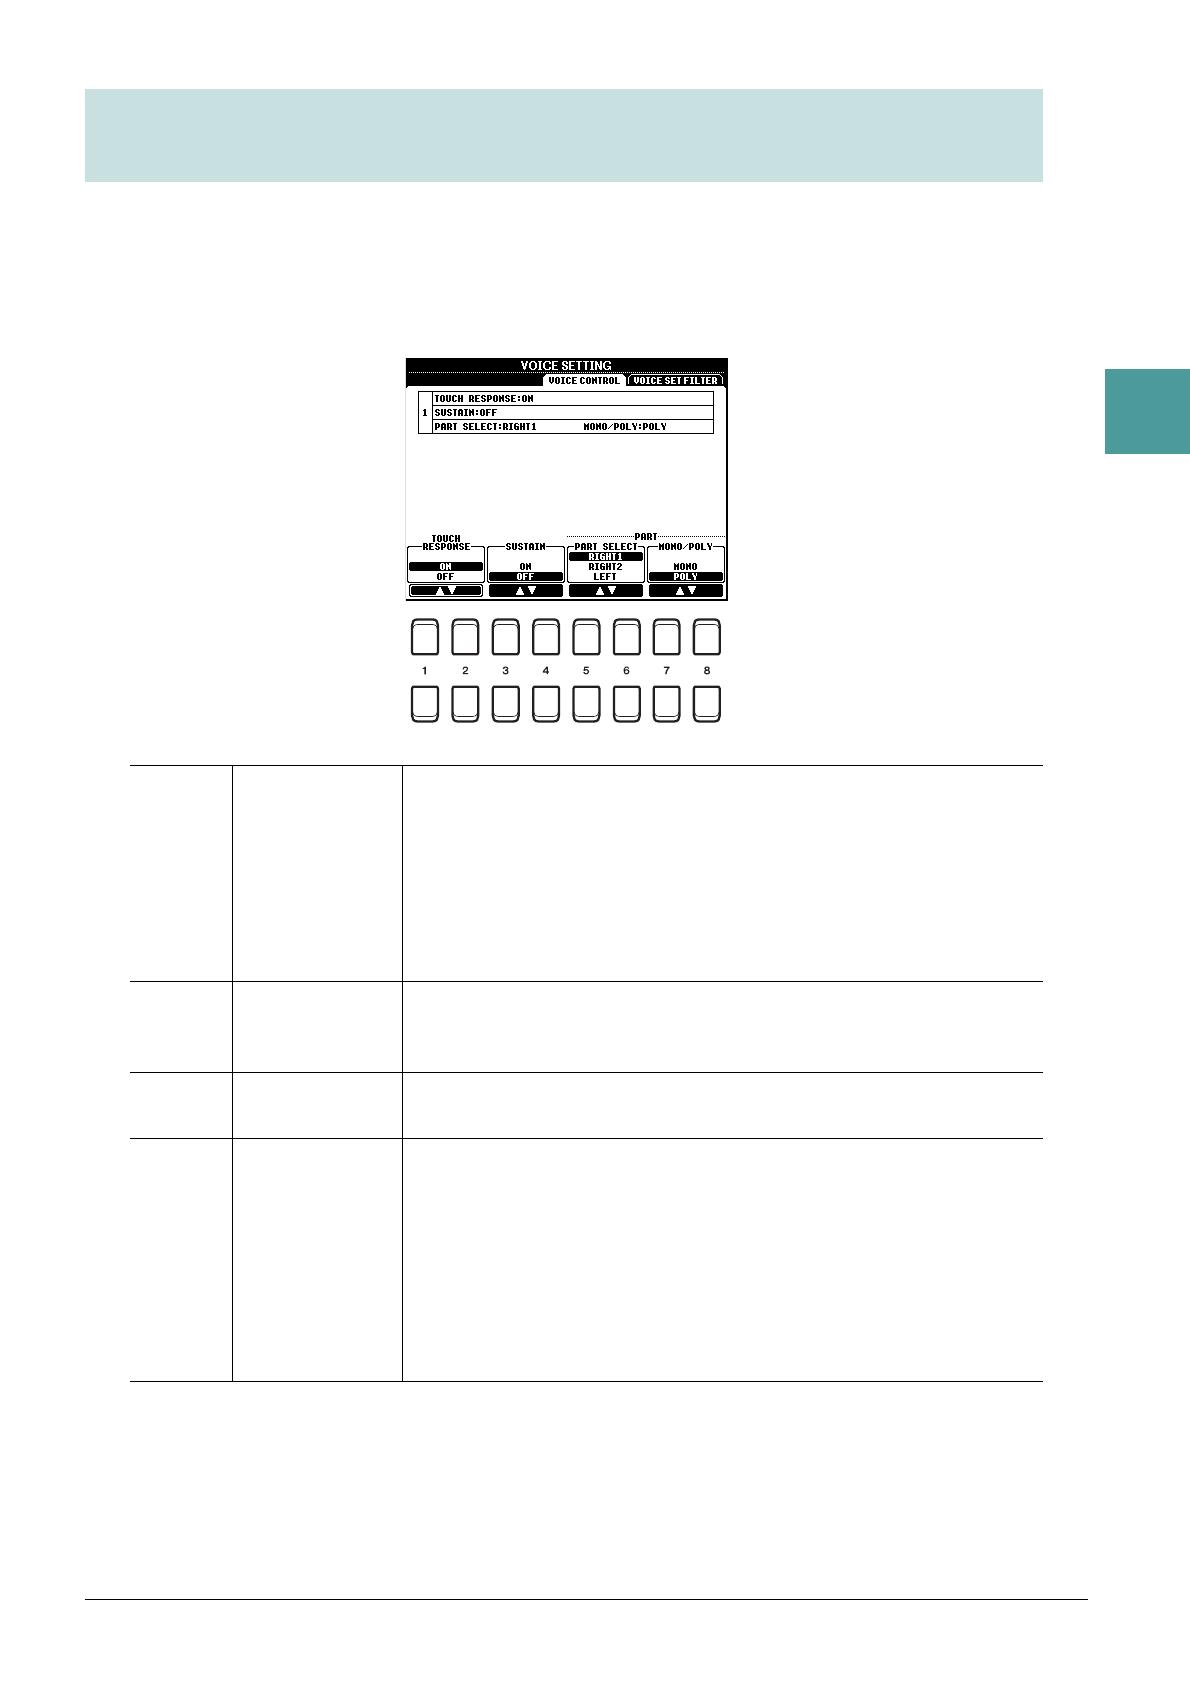
2 VIBRATO
Vibrato is a quavering, vibrating sound effect that is produced by
regularly modulating the pitch of the Voice.
EFFECT Page
1 REVERB DEPTH/CHORUS DEPTH/DSP DEPTH/PANEL SUSTAIN
2 DSP
HARMONY/ARP Page
Same as the display called up via [FUNCTION] TAB [E] MENU 1 Cursor buttons [][][E][F]
HARMONY/ARPEGGIO [ENTER], with the exception of the following points:
• The parameters set via the [7 ] (DETAIL) buttons are shown on the top of the display.
•The [8] (COMPARE) and [8 ] (SAVE) buttons are available (see steps 4–5 on page 12).
[3 ] DEPTH Determines the intensity of the Vibrato effect. Higher settings result in a
more pronounced Vibrato.
[4 ] SPEED Determines the speed of the Vibrato effect.
[5 ] DELAY Determines the amount of time that elapses between the playing of a key
and the start of the Vibrato effect. Higher settings increase the delay of the
Vibrato onset.
[1 ]/
[2 ]
REVERB
DEPTH
Adjusts the reverb depth.
[3 ]/
[4 ]
CHORUS
DEPTH
Adjusts the chorus depth.
[5 ] DSP ON/OFF Determines whether the DSP effect is on or off.
This setting can also be made from the VOICE EFFECT [DSP] button on
the panel.
[6 ] DSP DEPTH Adjusts the DSP depth.
If you want to re-select the DSP type, you can do so in the “2 DSP” menu
explained below.
[7 ] PANEL
SUSTAIN
Determines the sustain level applied to the edited Voice when the sustain
effect is on. The sustain effect is turned on/off from the display below.
[FUNCTION] TA B [E] MENU 1 Cursor buttons [][][E][F]
V
OICE SETTING [ENTER] TAB [E] VOICE CONTROL
[1 ]/
[2 ]
CATEGORY Selects the DSP effect category and type. Select a type after selecting a
category.
[3 ]/
[4 ]
TYPE
[6 ] VARI. ON/OFF Turns the DSP Variation on or off for the selected Voice. This setting
can also be made from the VOICE EFFECT [DSP VARI.] button on the
panel.
[5 ]/
[7 ]
DETAIL Calls up a detailed setting display. Press the [5 ] button for editing
the standard parameter value, and the [7 ] button for editing the
Variation parameter value.
[2 ]
–[4 ]
PARAMETER Selects the DSP variation parameter to be set.
[5 ]
/[6 ]
VALUE Adjusts the value of the DSP variation parameter.

16 PSR-S670 Reference Manual
1
Voices
Each Voice is linked to its default VOICE SET parameter settings. Usually these settings are automatically
called up when a Voice is selected. However, you can also disable this feature by the operation in the relevant
display as explained below. For example, if you want to change the Voice yet keep the same effect, set the
EFFECT parameter to OFF (in the display explained below).
1 Call up the operation display.
[FUNCTION] TAB [E] MENU 1 Cursor buttons [][][E][F] VOICE SETTING [ENTER]
TAB [ F] VOICE SET FILTER
2 Use the Cursor buttons [][] to select a keyboard part.
3 Use the [3 ]–[8 ] buttons to turn each item for the selected Part on or off.
When the button is set to ON, the corresponding parameter settings are called up automatically together
with the Voice selection. For information on which parameters are linked to each item, see below.
Disabling Automatic Selection of Voice Sets (Effects, etc.)
[3 ]/
[4 ]
VOICE Corresponds to the parameter settings of the COMMON, CONTROL-
LER, and SOUND pages.
[5 ]/
[6 ]
EFFECT Corresponds to the parameter settings of 1 and 2 in the EFFECT page.
[7 ]/
[8 ]
HARMONY/
ARPEGGIO
Corresponds to the HARMONY/ARP page.
2
PSR-S670 Reference Manual 17
1
Voices
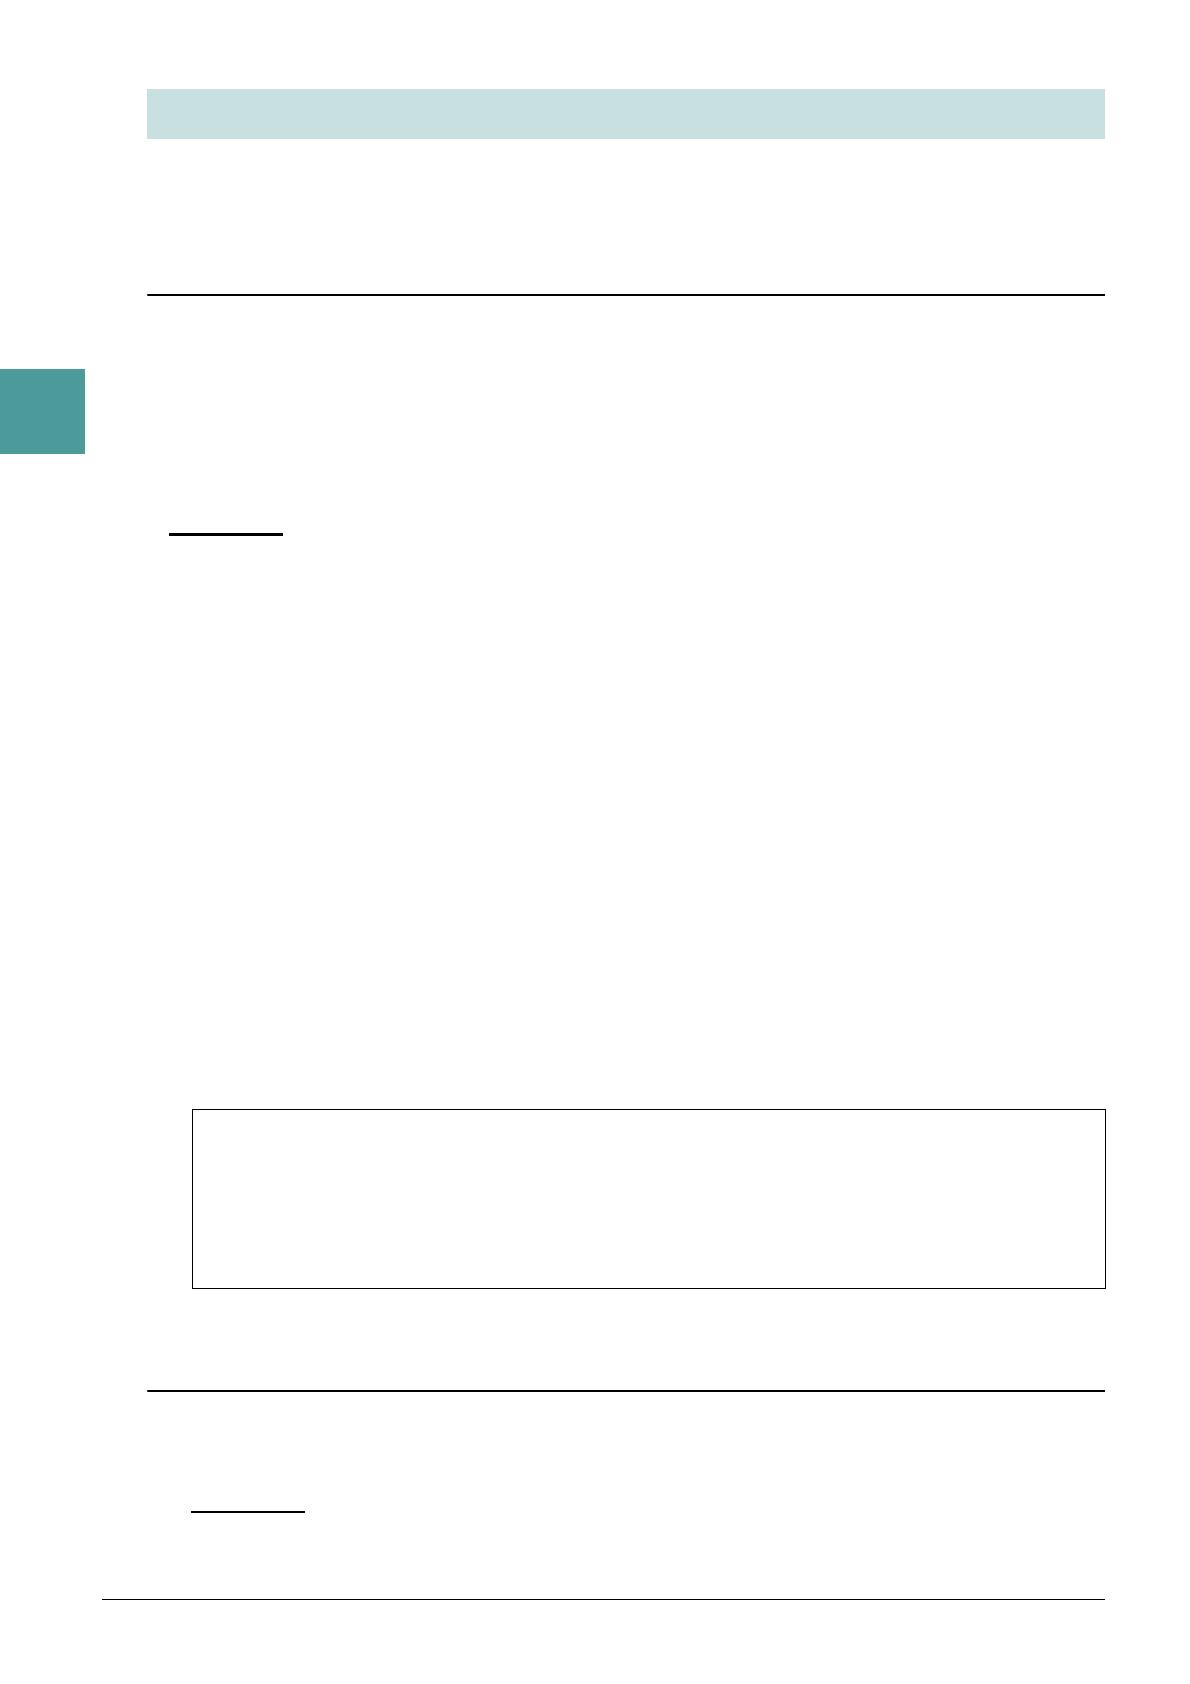
1 Call up the operation display.
[FUNCTION] TA B [E] MENU 1 Cursor buttons [][][E][F] VOICE SETTING [ENTER]
TAB [E] VOICE CONTROL
2 Use the [1 ]–[8 ] buttons to make settings for each parameter.
Changing detailed Voice settings (Touch Response, Sustain,
Mono/Poly)
[1 ]/
[2 ]
TOUCH
RESPONSE
Turns the Touch Response of the keyboard on or off. When this is set to
off, the same volume is produced no matter how strongly or softly you
play the keyboard.
On the display called up via the following operations, you can you can
change the Touch Response type. For details, refer to the Owner’s Man-
ual.
[FUNCTION] TA B [E] MENU 1 Cursor buttons [][][E][F]
CONTROLLER [ENTER] TAB [F] KEYBOARD/PANEL
[3 ]/
[4 ]
SUSTAIN Turns the Sustain function on/off. When this is set to on, all notes played
on the keyboard with right-hand part (RIGHT 1 and 2) have a longer sus-
tain.
[5 ]/
[6 ]
PART SELECT Selects the keyboard part to which the MONO/POLY setting (below) is
applied.
[7 ]/
[8 ]
MONO/POLY Determines whether the Voice of the keyboard part selected above is
played monophonically or polyphonically. When MONO is selected, the
part’s Voice is played monophonically (only one note at the time) with last
note priority, letting you play single, lead sounds such as brass instru-
ments more realistically. Depending on the Voice, Portamento may be
produced when notes are played with legato. When POLY is selected, the
part’s Voice is played polyphonically.
NOTE Portamento is a function that creates a smooth transition in pitch from the first note played on the
keyboard to the next.
18 PSR-S670 Reference Manual
1
Voices
Installing Expansion Packs lets you add a variety of optional Voices and Styles to the “Expansion” folder in
the USER drive.
Installing the Expansion Pack data from the USB Flash Drive
The file which contains the bundled Expansion Packs (“***.ppi” or “***.cpi”) to be installed to the
instrument is referred to as “Pack Installation file.” Only one Pack Installation file can be installed to the
instrument. If you want to install multiple Expansion Packs, bundle the packs together on your computer by
using the “Yamaha Expansion Manager” software. For information on how to use the software, refer to the
accompanying manual.
NOTE To obtain the Yamaha Expansion Manager software and its manuals, access the Yamaha Downloads website:
http://download.yamaha.com/
You will need to restart the instrument after installation has been completed. Make sure to save all data currently being edited beforehand,
otherwise it will be lost.
1 Connect the USB flash drive in which the desired Pack Installation file (“***.ppi” or
“***.cpi”) is saved to the [USB TO DEVICE] terminal.
2 Call up the operation display.
[FUNCTION] TAB [F] MENU 2 Cursor buttons [][][E][F] PACK INSTALLATION
[ENTER]
3 Use the Cursor buttons [][][E][F] to select the desired Pack Installation file.
4 Press the [6 ] (INSTALL) button.
5 Follow the on-display instructions.
This installs the selected Pack data to the “Expansion” folder in the USER drive.
NOTE When a message appears saying the USER memory has no space available, move the file from USER tab to USB tab, then install the file again. For
instructions on moving files, refer to “Basic Operations” in the Owner’s Manual.
Uninstalling the Expansion Pack data
You can uninstall the Expansion Pack data by carrying out the Reset operation for FILES & FOLDERS (see
page 96).
When you reset FILES & FOLDERS, not only the Expansion Pack data, but all other files and folders in the USER drive are deleted.
Adding New Contents—Expansion Packs
Song, Style or Registration Memory containing Expansion Voices or Styles
Song, Style or Registration Memory containing any Expansion Voices or Styles will not sound properly
or cannot be called up, if the Expansion Pack data does not exist in the instrument.
We recommend that you write down the name of the Expansion Pack when you create the data (Song,
Style or Registration Memory) using Expansion Voices or Styles, so that you can easily find and install
the Expansion Pack when necessary.
PSR-S670 Reference Manual 19
1
Voices
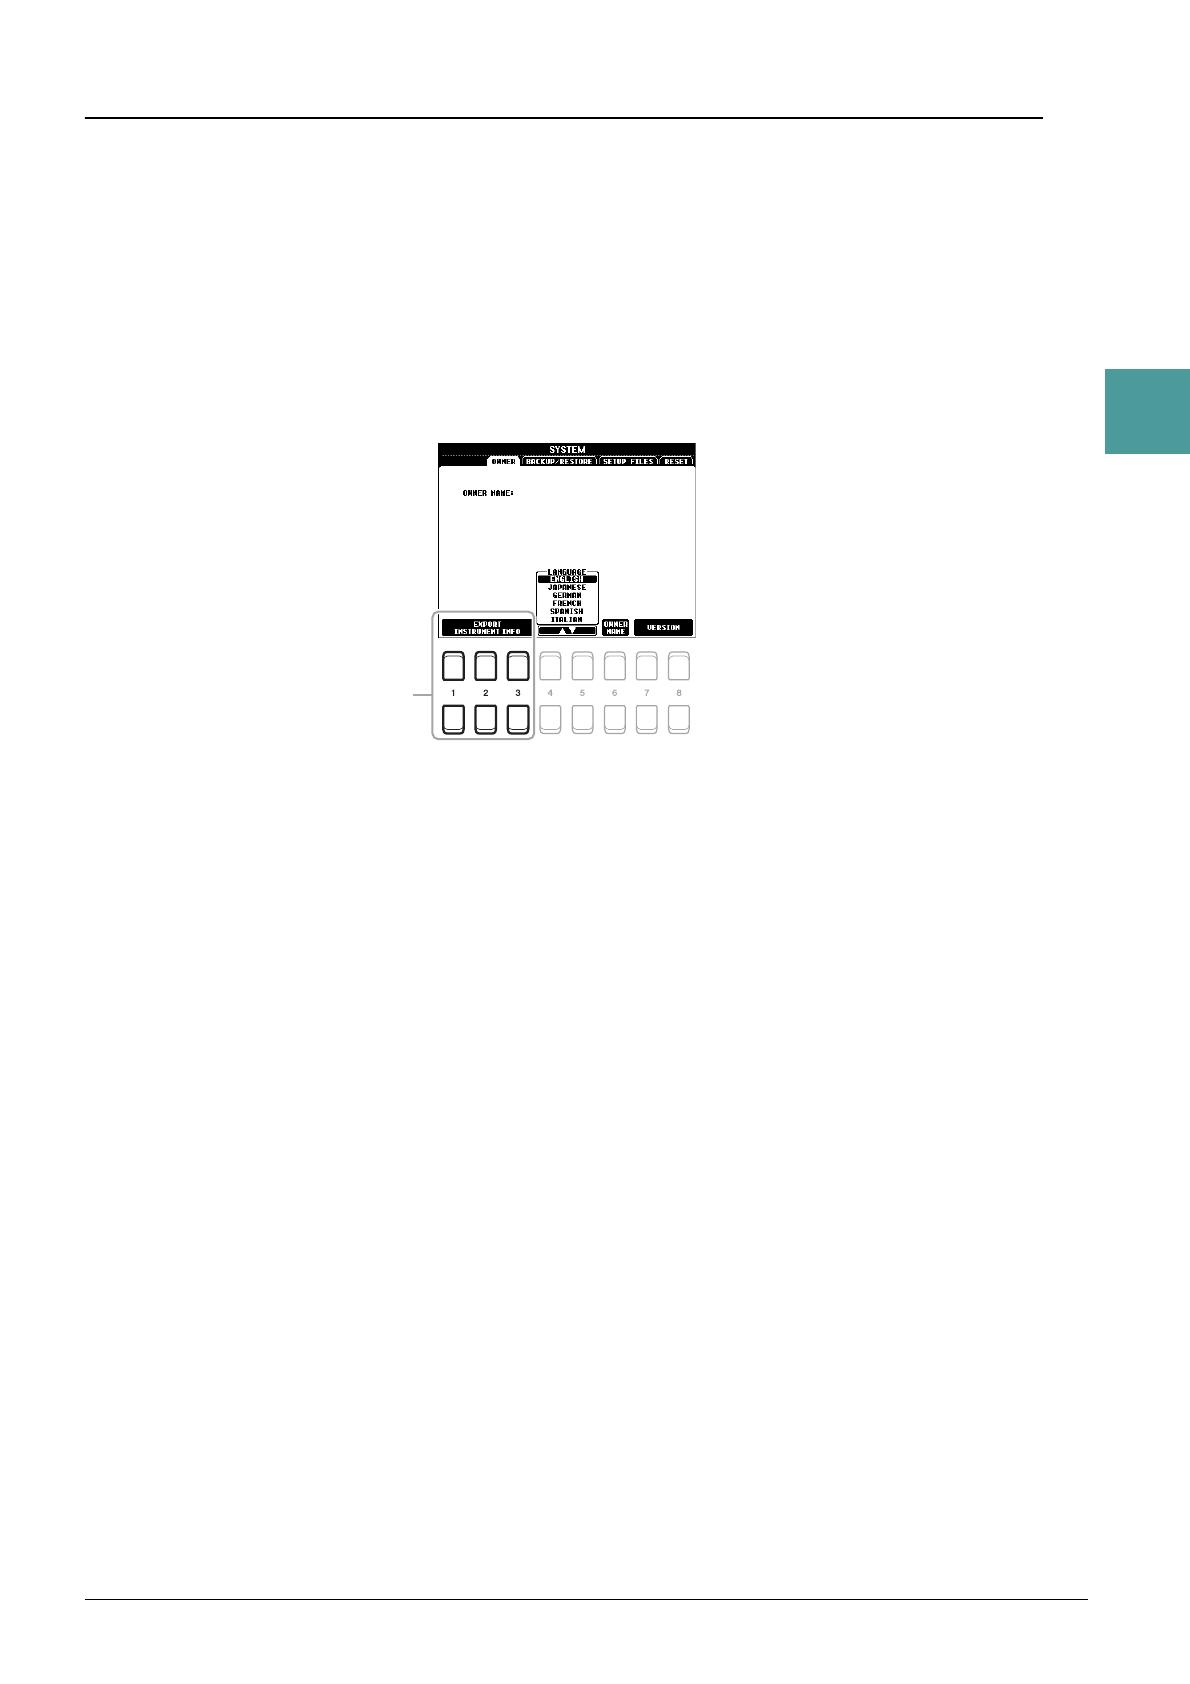
Saving the Instrument Info File to the USB Flash Drive
If you use the “Yamaha Expansion Manager” software to manage the Pack data, you may need to retrieve the
Instrument Info file from the instrument as described below. For information on how to use the software,
refer to the accompanying manual.
1 Connect the USB flash memory to the [USB TO DEVICE] terminal.
NOTE Before using a USB flash drive, be sure to read “Connecting USB Devices” in the Owner’s Manual, chapter 10.
2 Call up the operation display.
[FUNCTION] TA B [F] MENU 2 Cursor buttons [][][E][F] SYSTEM [ENTER] TAB
[E] OWNER
3 Press one of the [1 ]–[3 ] (EXPORT INSTRUMENT INFO) buttons.
4 Follow the on-display instructions.
This saves the Instrument Info file to the root directory in the USB flash drive. The saved file is named
“PSR-S670_InstrumentInfo.n27.”
3
2
2
20 PSR-S670 Reference Manual
Styles
Styles
Contents
Chord Fingering Types . . . . . . . . . . . . . . . . . . . . . . . . . . . . . . . . . . . . . . . . . . . . . . . . . . . . . . . . . .21
• Chord Types Recognized in the Fingered Mode . . . . . . . . . . . . . . . . . . . . . . . . . . . . . . . . . . . . . .22
Style Playback Related Settings . . . . . . . . . . . . . . . . . . . . . . . . . . . . . . . . . . . . . . . . . . . . . . . . . . .23
Memorizing Original Settings to One Touch Setting. . . . . . . . . . . . . . . . . . . . . . . . . . . . . . . . . . .25
Creating/Editing Styles (Style Creator) . . . . . . . . . . . . . . . . . . . . . . . . . . . . . . . . . . . . . . . . . . . . .26
• Basic Procedure for Creating a Style . . . . . . . . . . . . . . . . . . . . . . . . . . . . . . . . . . . . . . . . . . . . . . .26
• Realtime Recording . . . . . . . . . . . . . . . . . . . . . . . . . . . . . . . . . . . . . . . . . . . . . . . . . . . . . . . . . . . .27
• Style Assembly (ASSEMBLY) . . . . . . . . . . . . . . . . . . . . . . . . . . . . . . . . . . . . . . . . . . . . . . . . . . . .31
• Editing the Rhythmic Feel (GROOVE) . . . . . . . . . . . . . . . . . . . . . . . . . . . . . . . . . . . . . . . . . . . . . .33
• Editing Data for Each Channel (CHANNEL) . . . . . . . . . . . . . . . . . . . . . . . . . . . . . . . . . . . . . . . . .34
• Making Style File Format Settings (PARAMETER) . . . . . . . . . . . . . . . . . . . . . . . . . . . . . . . . . . . .36
• Editing the Rhythm Part of a Style (Drum Setup) . . . . . . . . . . . . . . . . . . . . . . . . . . . . . . . . . . . . .40
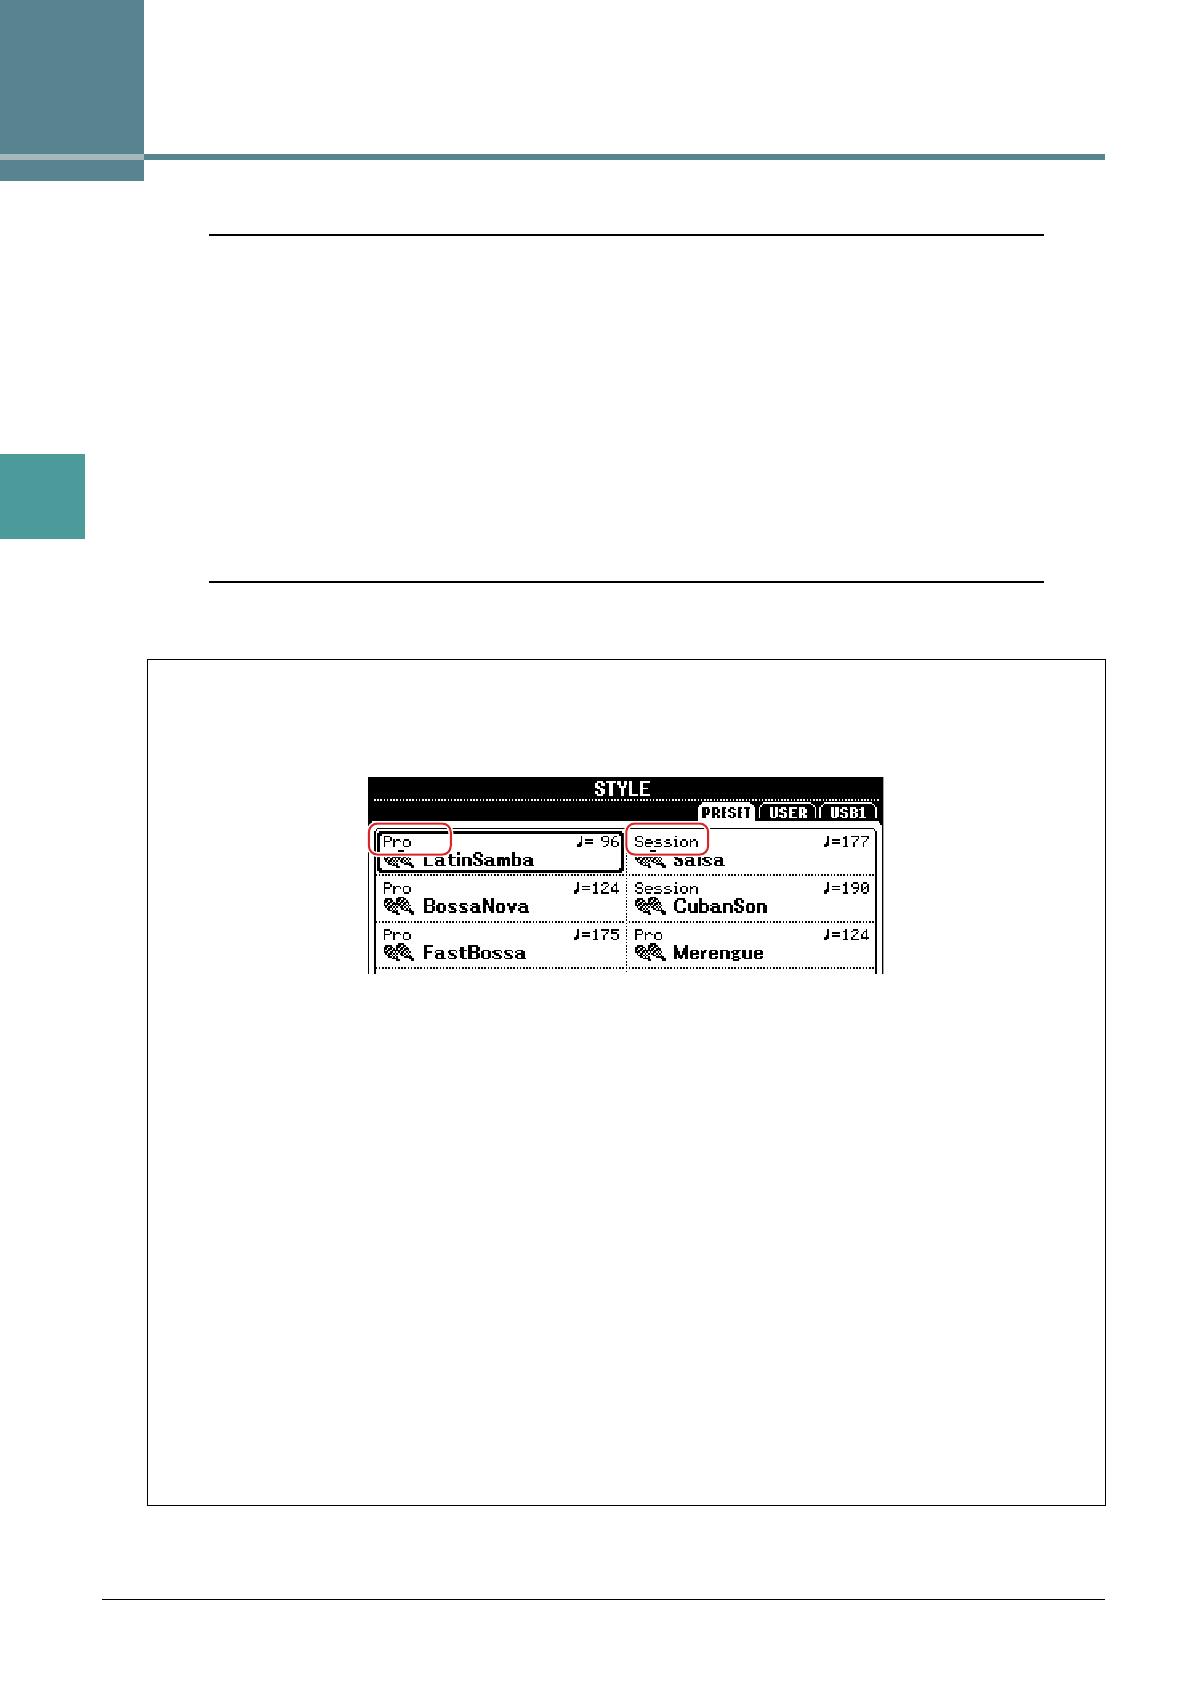
Style Types (Characteristics)
The particular type of Style is indicated at the upper left of the Style name in the Style Selection display. The
defining characteristics of these Styles and their performance advantages are described below.
• Pro: These Styles provide professional and exciting arrangements combined with perfect playability. The
resulting accompaniment exactly follows the chords of the player. As a result, your chord changes and
colorful harmonies are instantly transformed into lifelike musical accompaniment.
• Session: These Styles provide even greater realism and authentic backing by mixing in original chord types
and changes, as well as special riffs with chord changes, with the Main sections. These have been pro-
grammed to add “spice” and a professional touch to your performances of certain songs and in certain
genres. Keep in mind, however, that the Styles may not necessarily be appropriate—or even harmonically
correct—for all songs and for all chord playing. In some cases for example, playing a simple major triad
for a country song may result in a “jazzy” seventh chord, or playing an on-bass chord may result in inap-
propriate or unexpected accompaniment.
• DJ: These Styles can be selected from the category called up via the [DANCE & R&B] button. These con-
tain their own special chord progressions, so you can add chord changes to your performance simply by
changing the root key.
Keep in mind, however, that you cannot specify the chord type, such as major and minor, when using the
DJ Styles.
For the Preset Style List, refer to the Data List on the website.

100
Руководство пользователя PSR-S670
Технические характеристики
Название изделия
Цифровой клавишный инструмент
Размеры/масса
Габариты (Ш x Г x В)
1004 мм x 410 мм x 134 мм
Вес
8,1 кг
Интерфейс
управления
Клавиатура
Количество клавиш
61
Тип
Орган
Реакция на силу нажатия
Высокая 2, высокая 1, средняя, низкая 1, низкая 2
Другие контроллеры
Регулятор высоты звука
Есть
Регулятор модуляции
Есть
Регуляторы
2 (назначаемые)
Экран
Тип
Черно-белый ЖК-дисплей QVGA
Размер
4,3 дюйма
Язык
Английский, немецкий, французский, испанский, итальянский, японский
Панель
Язык
Английский
Тембры
Генерация тона
Технология генерации тона
Стереосэмплирование AWM
Полифония
Число голосов (макс.)
128
Предустановка
Количество тембров
416 тембров + 34 ударных установок /специальных эффектов + 480 тембров XG
Особые тембры
11 мегатембров, 19 тембров Sweet! 28 тембров Cool!, 19 тембров Live!
Совместимость
XG, GS (для воспроизведения композиций), GM, GM2
Партии
Right 1, Right 2 и Left.
Эффекты
Блок реверберации
44 встроенных + 3 пользовательских
Блок хоруса
71 встроенный + 3 пользовательских
Блок DSP
283 встроенных + 10 пользовательских
Главный компрессор
5 встроенных + 2 пользовательских
Основной эквалайзер
5 встроенных + 2 пользовательских
Стили
Предустановка
Количество стилей
230
Особые стили
208 стилей Pro, 12 стилей Session, 10 стилей DJ
Аппликатура
Single Finger (Одним пальцем), Fingered (Традиционная), Fingered On Bass
(Традиционная с басом), Multi Finger (Для игры несколькими пальцами)
AI Fingered (С использованием искусственного интеллекта), Full Keyboard
(Вся клавиатура), AI Full Keyboard (Вся клавиатура с использованием
искусственного интеллекта)
Управление стилем
INTRO x 3, MAIN VARIATION x 4, FILL x 4, BREAK, ENDING x 3
Прочие функции
Поиск песен (макс.)
1200
Настройка в одно касание
4 для каждого стиля
Совместимость
Style File Format (SFF), Style File Format GE (SFF GE)
Композиции (MIDI)
Предустановка
Число встроенных
композиций
4 встроенных сэмпла композиций
Запись
Количество дорожек
16
Объем данных
прибл. 300 Кбайт/композиция
Функция записи
Быстрая запись, Многодорожечная запись
Формат данных
Воспроизведение
SMF (форматы 0 и 1), XF
Запись
SMF (формат 0)
Мультипэды
Предустановка
Количество банков
мультипэдов
179 банка по 4 пэда
Аудио
Audio Link
Есть
Функции
Тембры
Гармонизация
Есть
Арпеджио
Есть
Сустейн на панели
Есть
Монофонический/
полифонический
Есть
Стили
Создание стилей
Есть
Подбор стиля
Есть
Информация OTS
Есть