предисловие
Я хочу изучать латекс этим летом.
Итак, здесь я записываю процесс настройки среды LaTeX и редактора в Windows 10.
1. Введение в LaTeX
(Официальный сайт [1]) [https://www.latex-project.org/]Введение в LaTeX:
LaTeX – A document preparation system
LaTeX is a high-quality typesetting system; it includes features designed for the production of technical and scientific documentation. LaTeX is the de facto standard for the communication and publication of scientific documents. LaTeX is available as free software.
Кроме того,
LaTeX (spelled Lay-tek), is a markup level text editing tool that separates the word formatting from the content entry task. Quite similar to HTML in its formatting, LaTeX is one of the most commonly used text editor in the academia. For people having to deal with scientific papers and publishing, with a lot of mathematical equations thrown into the mix, LaTeX text editors are quite the industry standards. [3]
В то же время официальный сайт уточнил произношение LaTex:
LaTeX is pronounced «Lah-tech» or «Lay-tech» (to rhyme with «blech» or «Bertolt Brecht»). [2]
Два, редактор LaTeX
Сейчас на рынке много редакторов,BeebomРекомендуется 8 простых в использовании редакторов LaTeX [3]:
1)TeXmaker
Открытый исходный код, кроссплатформенная поддержка, проверка орфографии, автозаполнение.
2)Texstudio
Открытый исходный код, кроссплатформенная поддержка, проверка орфографии, автозаполнение.
Этот инструмент разработан на основе исходного кода TeXmaker, поэтому он является расширением первого (например, подсчет слов в статистическом документе, анализ частоты слов).
Вы также можете перетаскивать изображения в документ, это здорово …
3)TeXworks
Открытый исходный код, кроссплатформенная поддержка.
основан на исходном коде TeXshop.
4)ShareLaTex 5)Overleaf 6)Authorea
Нет необходимости устанавливать, редактировать онлайн.
7)Vim with LaTeX-suite
Кроссплатформенная поддержка.
В-третьих, выберите и настройте редактор
Прочитав некоторое время, я наконец решил выбрать TeXstudio.
Теперь начните настраивать TeXstudio [5]:
1) Скачать TeXstudio
Адрес для скачивания:http://texstudio.sourceforge.net/

Рисунок 1 Домашняя страница загрузки TeXstudio
2) Найти руководство пользователя TeXstudio
Руководство пользователя Адрес:
http://texstudio.sourceforge.net/manual/current/usermanual_en.html
3) Установите MikTeX
TeXstudio — это просто редактор, который не включает среду LaTeX, поэтому вам необходимоСкачать MikTeXИ установить (руководство по установке находится по этой ссылке) [6].
4) Установите TeXstudio
Откройте ранее загруженный установочный пакет TeXstudio «texstudio-2.12.10-win-qt5.exe» и установите его по умолчанию.

Рисунок 2 После завершения установки соответствующий значок будет отображаться в строке меню в левом нижнем углу win10
5) Пример демонстрации
После установки MikTeX и TeXstudio создайте новый файл test.tex.
Входные данные:
documentclass{article}
    title{A Test for TeXstudio}
     author {Dale  }
begin{document}
	maketitle
	tableofcontents
	section{Hello China} China is in East Asia.
	subsection{Hello Beijing} Beijing is the capital of China.
	subsubsection{Hello Dongcheng District}
	paragraph{Hello Tian'anmen Square}is in the center of Beijing
	subparagraph{Hello Chairman Mao} is in the center of Tian'anmen Square
end{document}
Нажмите «F5» или двойную стрелку в верхней строке меню, чтобы отобразить документ, соответствующий коду.

Рисунок 3 Скомпилируйте и выполните код
6) Поддержка китайского
Внимательные люди видят, что китайцы в 5) не могут отображаться. Есть два способа отображения китайского (я предпочитаю первый)
1. Во-первых, в верхней строке меню опции-настройки TeXstudio-build. Измените компилятор по умолчанию на XeLaTeX.
Затем вставьте в код текстового файлаusepackage{xeCJK}
Наконец, нажмите F5, чтобы увидеть успешное отображение китайского языка.
(Примечание: я получил ошибку во время первой компиляции и выполнения F5, сообщение было «expl3.sty is not found». Я проверил и не нашел результатов, и, наконец, я перекомпилировал и выполнил его снова, без проблем .)

Рисунок 4 Способ 1
2. Во-первых, в верхней строке меню опции-настройки TeXstudio-build. Измените компилятор по умолчанию на XeLaTeX.
Затем вставьте в код текстового файлаusepackage{fontspec}
setmainfont[Mapping=tex-text]{KaiTi}
Наконец, нажмите F5, чтобы увидеть успешное отображение китайского языка.

Рисунок 5 Метод 2
4. Резюме и будущая работа
Пока что LaTeX и TeXstudio настроены и могут успешно использоваться.
В ближайшие дни я планирую серьезно заняться написанием научных работ с LaTeX.
ссылки
[1] The LaTex project. https://www.latex-project.org/
[2] An introduction to LaTeX. https://www.latex-project.org/about/
[3] 8 Best LaTeX Editors. https://beebom.com/best-latex-editors/
[4] Comparison of TeX editors. https://en.wikipedia.org/wiki/Comparison_of_TeX_editors
[5] TeXstudio: LaTeX made comfortable. http://texstudio.sourceforge.net/
[6] Installing LaTeX + TeXstudio. https://gist.github.com/canton7/1139135
Время на прочтение
3 мин
Количество просмотров 13K
Ниже представлено руководство по установке текстового редактора Sublime Text, с последующим добавлением в него возможности использования системы компьютерной вёрстки LaTeX. В качестве бонуса научим его понимать язык Julia.
Установка MiKTeX
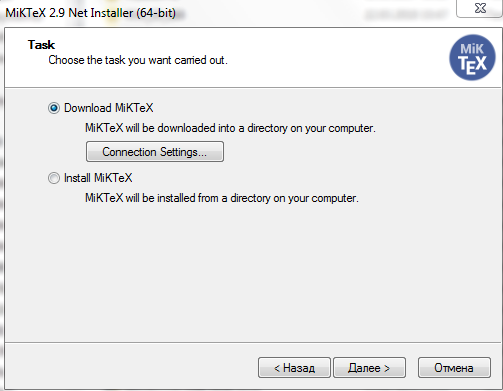
- На сайте откройте вкладку All downloads
- Выберите пункт Net Installer в зависимости от разрядности вашей системы
- Нажмите Download и дождитесь загрузки онлайн-установочника

- Внимательно непрочитав пользовательское соглашение поставьте флажок на пункте Download MiKTeX
- При использовании прокси введите свои надстройки в Connection settings…
- На следующем этапе выберите Complete MiKTeX
- Выбрав сервер (желательно один из верхних российских) и задав директорию, дождитесь загрузки необходимых файлов
- Снова выполните пункт 4, но на этот раз выбрав Install MiKTeX
- После завершения установки, запустите TeXworks через Пуск
- Откройте в нём любой документ формата .tex или создайте новый
- В раскрывающемся меню выберите pdfLaTeX и кликните по расположенному рядом треугольнику в зеленом кружке

Произойдет компиляция и создание PDF-файла. Используя TeXworks можно приступать к полноценной работе, например, используя LaTeX можно весьма эффективно собрать диплом или диссертацию ( Готовые шаблоны)
Гораздо удобнее использовать LaTeX посредством Sublime Text. Помимо удобной подсветки и автозаполнения, здесь можно посмотреть изображение или набираемую формулу не выполняя компиляции, то есть видеть результат во время набора. К слову, в Sublime Text можно набирать (а если добавить соответствующие плагины, то и выполнять) коды программ множества языков программирования и разметок: С/С++, Java, MATLAB, PHP, HTML…
Установка Sublime Text 3
- Скачиваем и устанавливаем Sublime Text 3
- Скачиваем и устанавливаем Sumatra PDF. Эта легковесная программа позволяет просматривать PDF-документы, DJVU, FB2 и т.д.
- Запустив Sublime Text, откройте командную строку нажатием Ctrl+shift+p и начинайте вводить Package Control: Install Package, а когда он появится — щёлкните и дождитесь установки связи с репозиториями
- Если же по каким-то причинам Package Control отсутствует, откройте консоль нажатием *ctrl+` (Ё) и скопируйте туда заклинание на парселтанге, которое можно найти на странице плагина Package Control, нажмите Enter и перезапустите Sublime Text.
- В списке плагинов вводите LaTeXTools и, при появлении его в списке, щёлкните и дождитесь, пока пройдет установка.
- Далее инициируем настройки по умолчанию: Preferences/ Package Settings/ LaTeXTools/ Reset user settings to default, а затем там же Check System
Если все надписи позеленели, значит Sublime Text подружился с Sumatra и LaTeX, и теперь можно создавать или редактировать tex-документы. При нажатии ctrl+В происходит трансляция и, если нет ошибок, открывается свёрстанный PDF. Ctrl+shift+В — выбор типа сборки.

Подробней про LaTeXTools
Найти в сети пособия по LaTeX себе по вкусу не составит труда (Например: Самоучитель, Вики). Также будет полезным использовать онлайн-редактор формул пока команды не отложатся в памяти.
Julia в Sublime Text
В Package Control: Install Package набираем Julia, скачиваем плагин и теперь во вкладке View / Syntax среди прочих языков появилась Джулиа, а значит теперь можно набирать программы на этом языке с подсветкой и греческими буквами (delta + press tab), а также сохранять файлы в формате .jl.
При сохранении файлов будет удобно внутри производить разбиение на модули:
module somename
# functions, variables
# and some things
end
Код набранный в Sublime text и сохраненный в формате .jl можно выполнять в REPL
# указываем путь к файлу
cd("C:\Users\User\Desktop")
# подключаем файл
include("MDPSO.jl")
# теперь доступны все модули и функции
# содержащиеся в каждом из них
PSO.parabol([2,3,5])
На этом окончим небольшое руководство. Всем удобной вёрстки и приятной подсветки!
Обновление от 15.07.2018:
- Локальные дистрибутивы обновлены до последней ревизии.
- Обновлена инструкция настройки и обновления MiKTeX согласно изменениям в Console.
В этой статье мы рассмотрим процесс установки и настройки MiKTeX версии 2.9.
Сперва вам потребуется дистрибутив. Его можно взять с официального сайта или с моего сайта, ссылки на которое даны ниже.
Скачать полный дистрибутив MiKTeX с зеркала:
- для 32 разрядных версий Windows (7 — 10): скачать / зеркало.
- для 64 разрядных версий Windows (7 — 10): скачать / зеркало.
Размер файлов: ~2.9 Гб. На зеркале лежит MiKTeX в редакции Complite с пакетами с русскоязычного CTAN’а (о преимуществах такого CTAN будет сказано ниже).
Далее, запускаем установку (на зеркале это «setup«).
Появляется окно: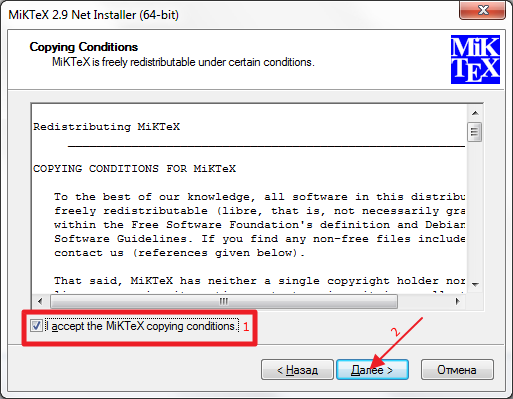 Отмечаем “I accept the MiKTeX copying conditions” (1) и жмём далее (2).
Появляется окно:
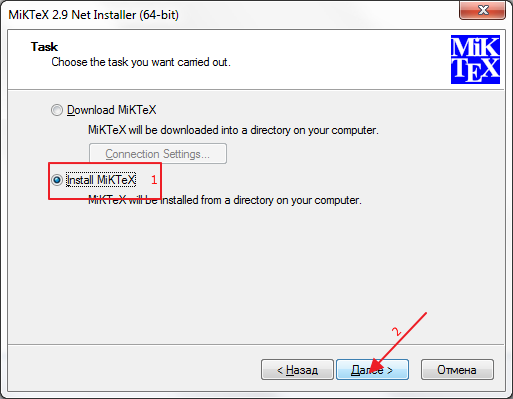 Отмечаем “Install MiKTeX” (1) и жмём далее (2).
Появляется окно:
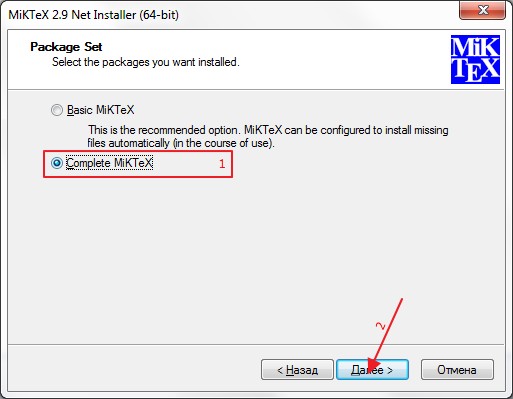
Отмечаем “Complite MiKTeX” (1) и жмём далее (2).
Появляется окно:

Выбираем наиболее подходящий вариант (1). Рассмотрим далее всевозможные варианты:
- Режим «all users» устанавливает программу для всех пользователей на компьютере. Учтите, чтобы установить в этом режиме, необходимо, чтобы программа установки работала с правами администратора. Кроме того, обновление программы должно делаться только в административном режиме. Этот режим полезен тем, кто работает под и/или имеет доступ к учётной записи администратора компьютера.
- Режим «only for user» устанавливает программу только для конкретного пользователя. Учтите, что директория, в которую устанавливается дистрибутив, должна быть полностью доступна для этого пользователя (т.е. он может без повышения прав копировать/удалять любые файлы из папки установки). Этот режим полезен тем, кто не имеет доступа к учётной записи администратора компьютера.
Жмём «Далее» (2), появляется окно:
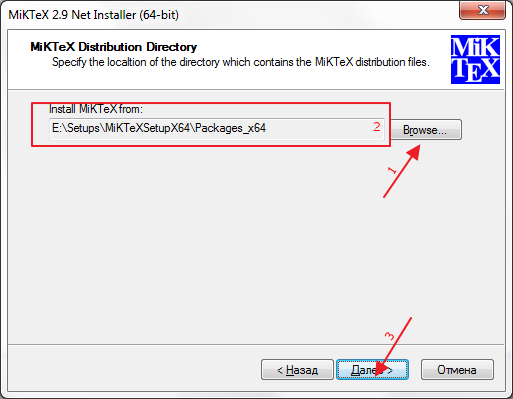
Нажмите “Browse …” (1) и выберете папку, содержащую пакеты (в архивах, скаченных с сайта это «Packages» в директории установщика). В поле (2) должен появится этот путь. Жмём “Далее”. Если папка была выбрана неверно, появится сообщение: “The directory … is not a valid installation source.”. В этом случае убедитесь, что папка выбрана верно.
Появляется окно: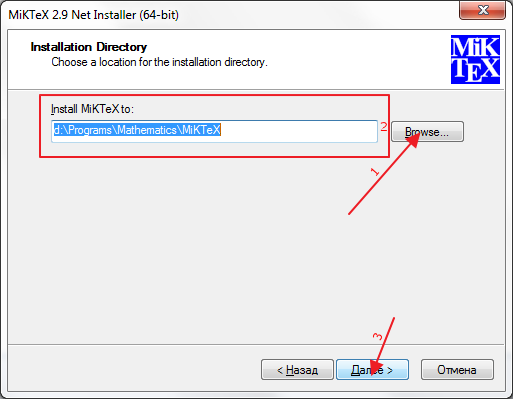 Нажмите “Browse …” (1) и выберете папку, в которую хотим установить MiKTeX (предварительно убедитесь, что в папке нет файлов). Во избежания ошибок рекомендуется устанавливать дистрибутив в папку, удовлетворяющую следующим условиям:
- Она не должна быть на системном жёстком диске.
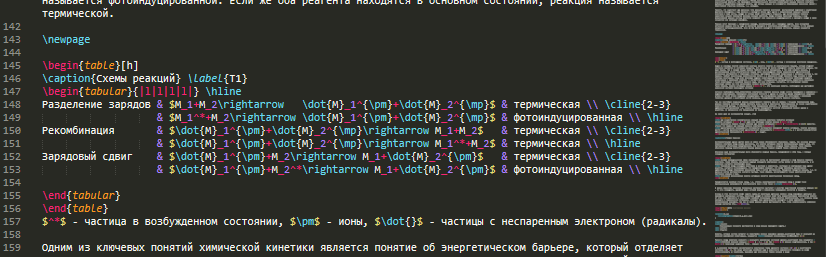
- В пути к ней не должно быть букв, отличных от латиницы (например, папка «D:МатематикаMiKTeX» не лучший вариант для установки, а вот «D:MathMiKTeX» самое то!).
- В пути к ней не должно быть пробелов (например, не стоит называть папку так: «DMiKTeX 2.9», лучше назовите её так: «D:MiKTeX»).
В поле (2) должен появится этот путь. Жмём “Далее”. Появляется окно: 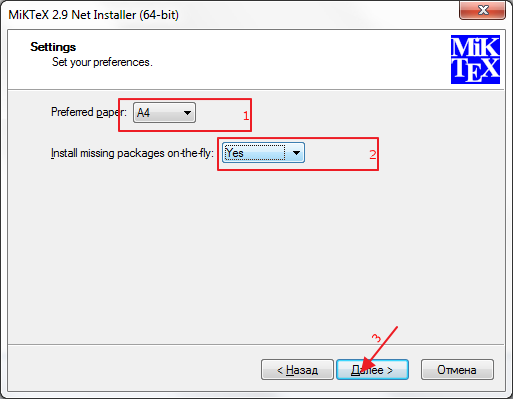 Смотрим, чтобы у “Preferred paper:” (1) было значение “A4”. Если нет Интернета, то “Install missing packages on-the-fly:” (2) проставляем “No”, если интернет лимитированный, то “Ask me first”, а если он безлимитный, то “Yes”. Жмём “Далее” (3).
Появляется окно: 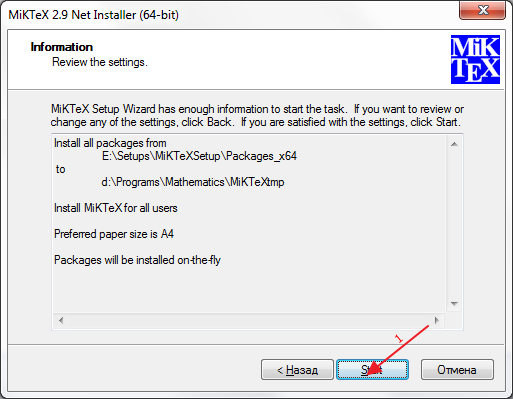 Жмём “Start” (1). Дожидаемся окончания установки и жмём “Далее” и “Готово”.
Итак, мы установили MiKTeX! Далее, его необходимо настроить. Идём в меню “Пуск” –> “Все программы” –> “MiKTeX 2.9”–>”MiKTeX Console”.
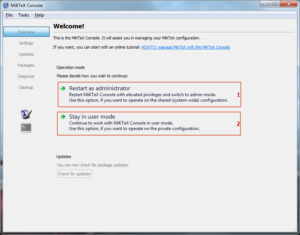
Если вы ставили программу в режиме «all users», то жмём «Restart as administrator» (1), а если в режиме «only for user«, то жмём «Stay in user mode» (2).
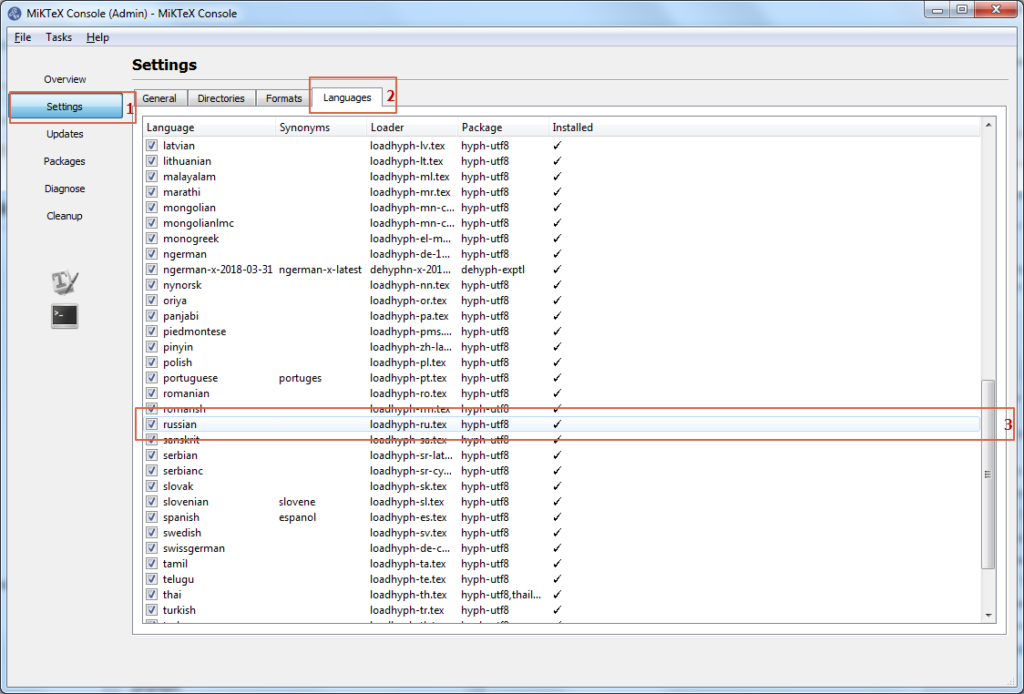
В открывшимся окне переходим в раздел «Settings» (1) и далее на вкладку “Languages” (2). Отмечаем пункт “russian” (3) (для того, чтобы можно было писать русский текст!).
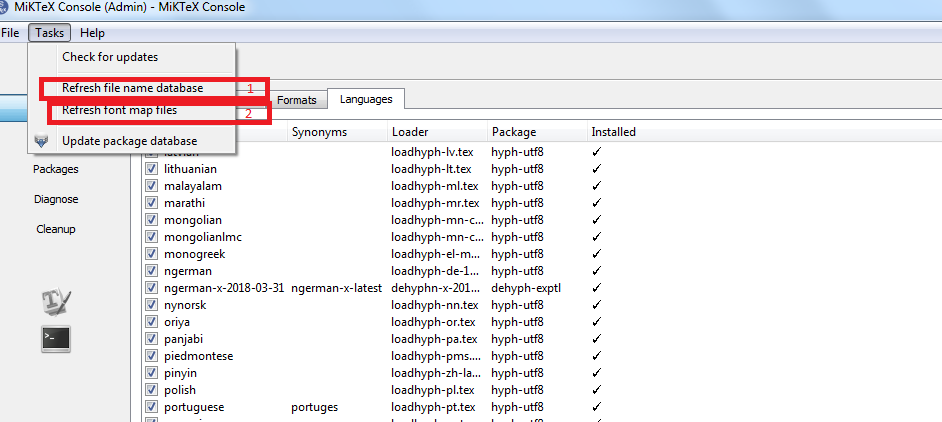
Далее, в меню “Tasks” Последовательно нажимаем “Refresh file name database” (1) и “Refrash font map files” (2). Итак, настройка завершена. Осталось только обновить. Идём в раздел “Updates”.
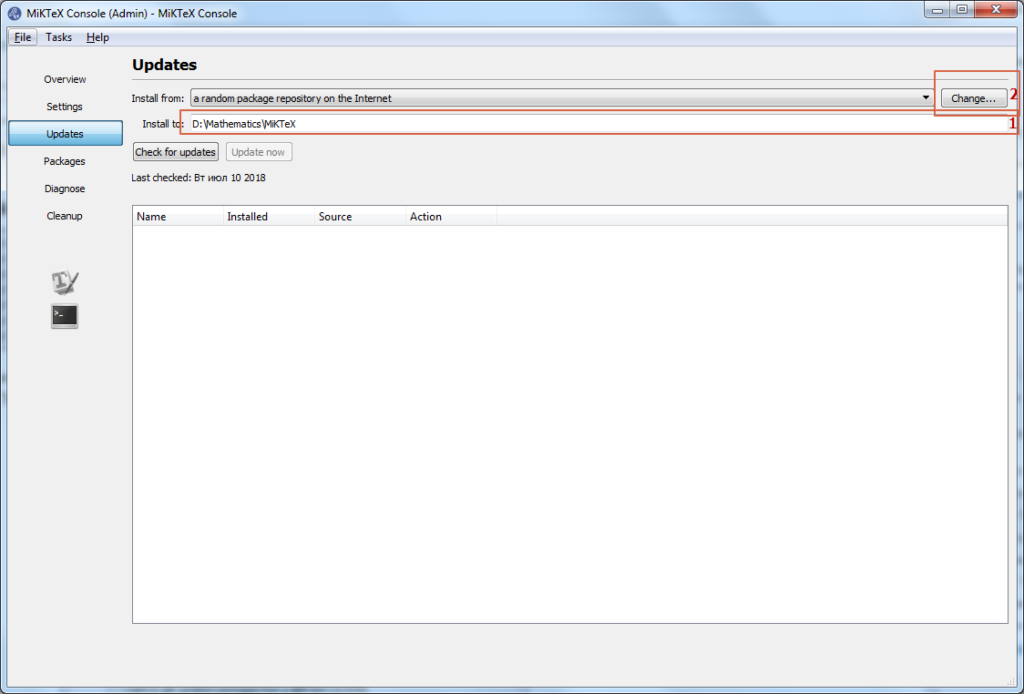
Убеждаемся, что директория прописанная в «Install to» совпадает с директорией установки, и жмём «Change«.
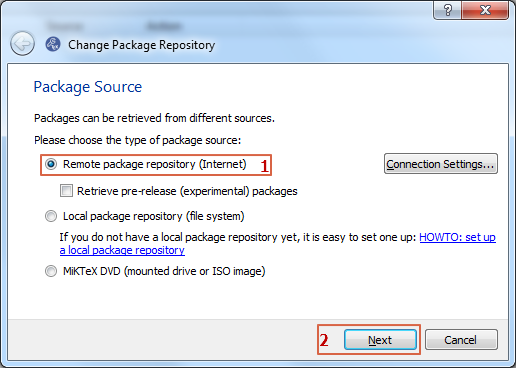
Выбираем “Remote package repository (Internert)” (1) и жмём “Next” (2).
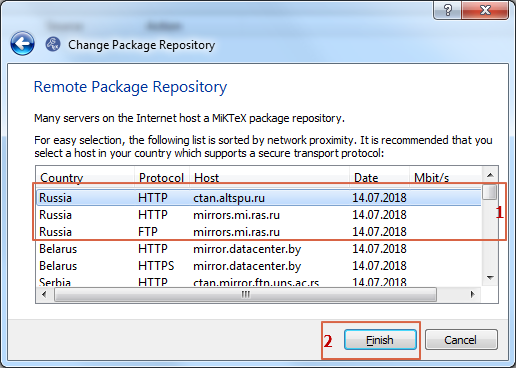
Далее, выбираем CTAN (1). Желательно выбирать русский CTAN, так как там содержаться пакеты, позволяющие использовать русскоязычные функции тангенс (tg) вместо англоязычного варианта (tan). Жмём “Finish” (2).
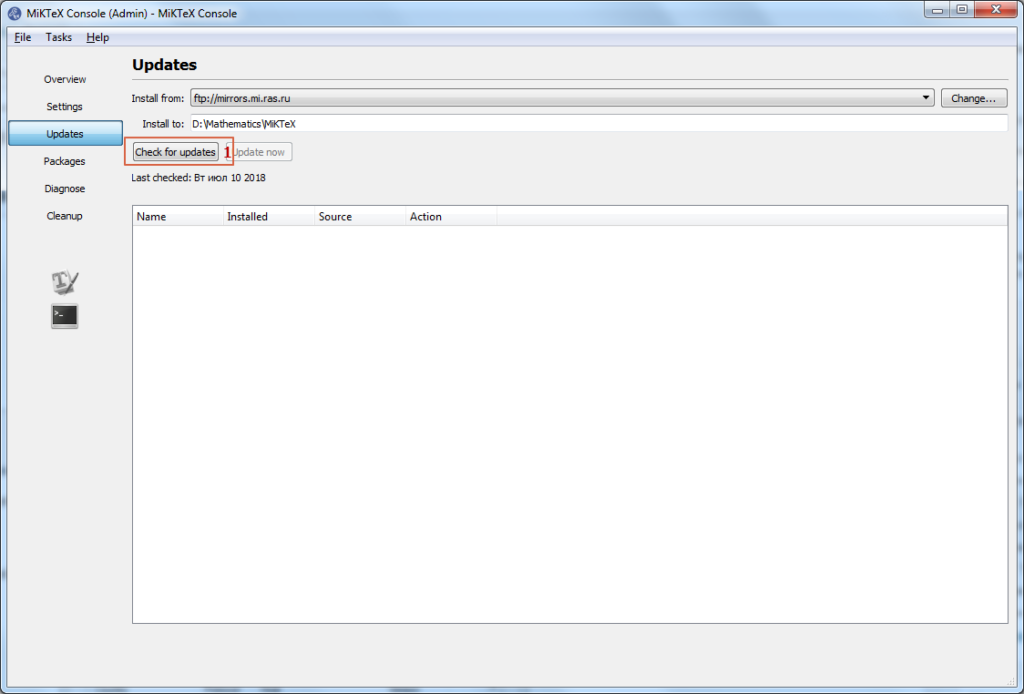
Жмём “Check for updates” (1).
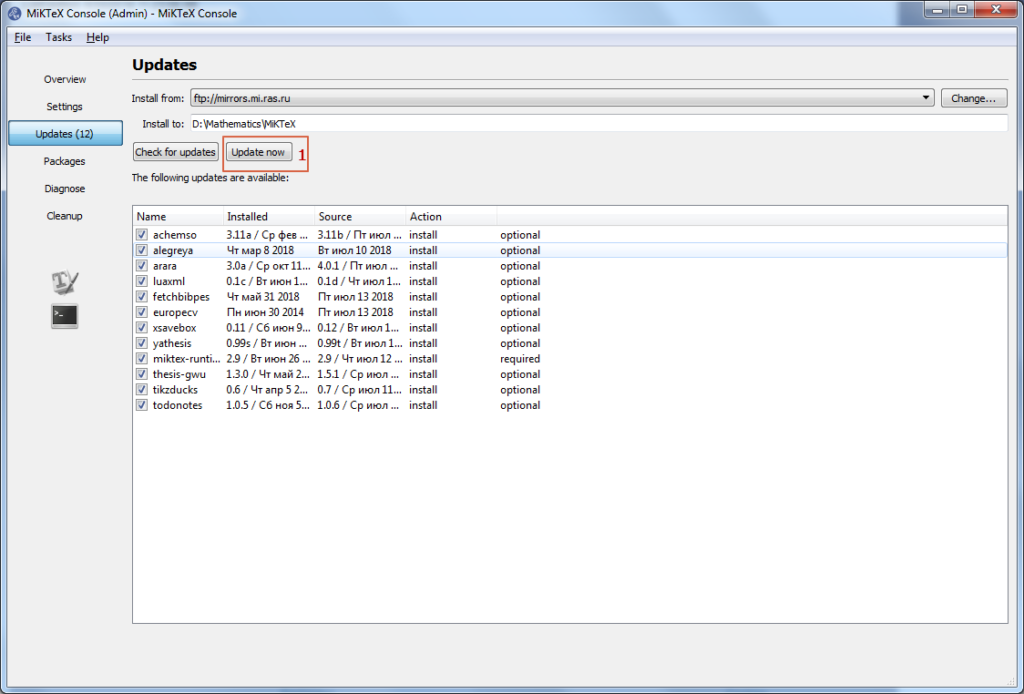
Дождавшись окончания проверки обновлений, жмём «Update now» (1).
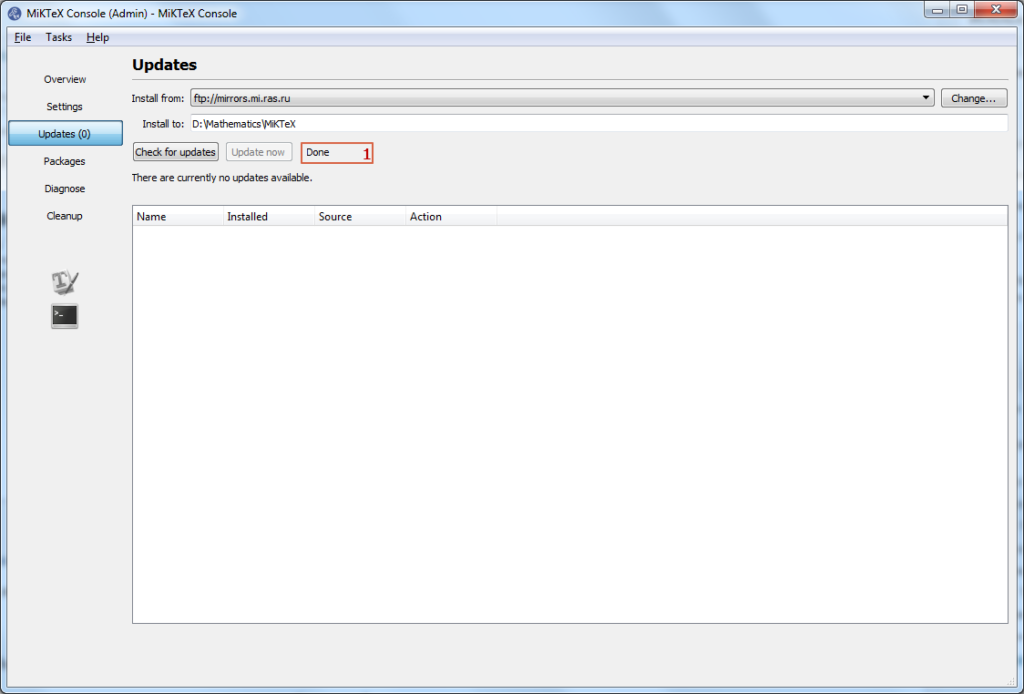
После того, как появится надпись «Done«, приложение можно закрывать.
Итак, MiKTeX установлен и настроен. Рекомендую время от времени повторять проверку обновлений.
Опрос:
![]() Загрузка …
Загрузка …
Информация о записи:
05 октября 2014 в 11:39:47
16 июля 2018 в 08:50:43
Система LaTeX состоит из базовой оболочки и бесчисленного множества пакетов расширения, которые пользователи создали за долгую историю существования системы. MiKTeX — один из самых популярных Windows-дистрибутивов LaTeX. Также распространена система TeX Live, но я не пытался её устанавливать. Установка MiKTeX очень простая, но надо не забыть выставить нужные опции.
Краткая инструкция по установке и настройке
- Скачать установщик здесь. Версия: Net Installer, 32-bit, размер менее 10MB. Установка проходит в два этапа: сначала установщик скачивает все пакеты в директорию, которую Вы ему укажете, а затем уже устанавливает из этой директории.
- Запустить установщик, выбрать «Download MiKTeX», далее «Complete MiKTeX». Это самая полная версия LaTeX, со всеми имеющимися на текущий момент пакетами. Занимает около полутора гигабайт. Если выкачивать из интернета Вы столько не можете, можно выбрать опцию «Basic MiKTeX» (это около 150MB). Далее установщик предложит выбрать из списка сайт, откуда можно скачивать пакеты. Любой подойдёт. Дальше выбор директории, куда скачивать пакеты. Лучше сразу создать на жёстком диске директорию, которую не придётся никуда перемещать. Теперь остаётся подождать, пока установщик скачает все пакеты. Если загрузка прерывается из-за плохой связи, установщик можно спокойно перезапускать любое количество раз: уже скачанные пакеты не будут скачиваться заново.
- Запустить установщик. Выбрать на сей раз «Install MiKTeX» и далее «Basic MiKTeX». Установщик попросит выбрать папку, откуда устанавливать. Нужно указать ему ту самую директорию, куда Вы только что скачали MiKTeX. Дальше шаги установки стандартные, только нужно не забыть отметить: «Install missing packages in the fly: Yes». Это нужно для того, чтобы, если возникает ситуация, когда MiKTeX’у нужен какой-то пакет для компиляции, он устанавливал его по ходу дела и не задавал лишних вопросов.
- Когда MiKTeX установлен, полезно сделать ещё пару настроечных действий. В главном меню выбираем «MiKTeX/Settings(Admin)», и во вкладке «Packages» выбираем «Package repository»: если Вы скачивали «Basic MiKTeX», то «Packages shall be installed from the Internet», а если «Complete MiKTeX», то ту папку, куда вы его скачивали. Далее ниже в древовидном списке ставим галочку напротив Fonts/Outline fonts/cm-super. Это векторные шрифты. Они читаются с экрана гораздо лучше стандартных.
- Запускаем из главного меню редактор TeXworks. Не стоит пугаться, что он занимает только половину экрана: при компиляции справа будет отображаться ещё одно окно со скомпилированным документом. В Edit/Preferences/Editor/Editor Defaults выставляем моноширинный шрифт, приятный для глаз и не слишком мелкий. Мои личные предпочтения: Consolas, 13pt. Замечаем, что внизу там же есть параметр Encoding. По умолчанию он выставлен в UTF-8. Рекомендуется все новые документы создавать именно в этой кодировке. Но если Вам прислали документ, а он не открывается нормально, кодировку нужно будет сменить.
- В качестве более продвинутой альтернативы штатному редактору TeXworks я могу порекомендовать бесплатный TeXnicCenter. Он автоматически настраивается при установке на работу с установленным MiKTeX, поддерживает проверку орфографии, работу с юникодом и другие полезные вещи.
MiKTeX установлен. С чего начать?
По большому счёту, LaTeX — это язык программирования. Для тех, кто знаком, например, с HTML, проблем в изучении LaTeX возникнуть не должно, но нужно быть готовым к тому, что без предварительного чтения примеров и мануалов набрать даже простой текст не получится. Начальное ознакомление займёт от 15 минут до двух-трёх часов. Можно руководствоваться свободно доступной книгой С. М. Львовского Набор и вёрстка в пакете LaTeX или текстом К. В. Воронцова LaTeX2ε в примерах. Когда понадобятся специфические знания, можно обращаться с знакомым и коллегам: благо, среди них почти наверняка найдётся хотя бы один знаток TeX’а.
MiKTeX 1.20e Manual
Copyright © 1996--1999 Christian Schenk
Node:Top,
Next:Introduction,
Previous:(dir),
Up:(dir)
MiKTeX Manual, revision 1.20e
This help file documents MiKTeX 1.20e.
- Introduction: What is MiKTeX?
- 1.20e: What’s new in the latest release?
- Installing: Installing MiKTeX.
- Configuring: Configuring MiKTeX.
- TeX: Non-standard TeX features.
- TeXifying: The MiKTeX Compiler Driver.
- Manual Pages: Manual pages for various programs.
- Index: Index.
Node:Introduction,
Next:1.20e,
Previous:Top,
Up:Top
What is MiKTeX?
- Features: Basic Features and Components.
- Getting: How to get MiKTeX.
- Project Page: The MiKTeX Project Page.
- Mailing Lists: The MiKTeX mailing lists.
- Documentation: MiKTeX related documentation.
Node:Features,
Next:Getting,
Previous:Introduction,
Up:Introduction
MiKTeX Features
MiKTeX is a free TeX distribution for Windows. Its main features
are:
- Native Windows implementation with support for long file names.
- On-the-fly generation of missing fonts.
- TDS (TeX directory structure) compliant.
- Open Source.
- Advanced TeX compiler features:
- TeX can insert source file information (aka source specials)
into the DVI file. This feature can improve Editor/Previewer
interaction. - TeX can read compressed input files.
- The input encoding can be changed via TCX tables.
- TeX can insert source file information (aka source specials)
- Previewer features:
- Supports graphics (PostScript, BMP, WMF, …)
- Supports colored text (through color specials)
- Supports PostScript fonts
- Supports TrueType fonts
- Understands HyperTeX (
html:) specials - Understands source (
src:) specials - Customizable magnifying glasses
- MiKTeX is network friendly:
- integrates well into a heterogeneous TeX environment
- supports UNC file names
- supports multiple TEXMF directory trees
- uses a file name database for efficient file access
- Setup Wizard can be run unattended
The MiKTeX distribution consists of the following applications:
- TeX 3.14159:
The classic TeX compiler. - e-TeX 2.1:
A feature-extended version of TeX. - Yap 0.97:
The MiKTeX DVI previewer. - pdfTeX 0.14d:
Creates PDF files from TeX documents. - dvipdfm 0.12.6e:
Converts DVI files into PDF documents. - Omega 1.8:
An enhanced version of TeX with support for 16-bit character sets. - METAFONT 2.718:
Converts font specifications into raster fonts. - MetaPost 0.641:
Converts picture specifications into PostScript commands. - dvips 5.86:
Converts DVI files into PostScript. - MakeIndex 2.12:
Composes indexes. - BibTeX 0.99c:
Composes bibliographies. - Standard LaTeX Packages:
AMS-LaTeX, Babel, PSNFSS, … - TeXinfo, PSutils, …:
Lots of utilities.
Node:Getting,
Next:Project Page,
Previous:Features,
Up:Introduction
How to get MiKTeX
MiKTeX Distribution
The MiKTeX distribution is archived in the CTAN1 directory
systems/win32/miktex/.
You can use one of the following URLs to download MiKTeX:
ftp://ftp.dante.de/tex-archive/systems/win32/miktex/
ftp://ftp.tex.ac.uk/tex-archive/systems/win32/miktex/
ftp://ctan.tug.org/tex-archive/systems/win32/miktex/
Other Packages
Here is a list of other packages you should take into consideration:
- Aladdin Ghostscript (http://www.cs.wisc.edu/~ghost/aladdin/index.html)
- Ghostscript is an interpreter for the PostScript language. The DVI
previewer Yap uses Ghostscript to display EPS graphics. - Adobe Acrobat Reader (http://www.adobe.com/prodindex/acrobat/readstep.html)
- A PDF viewer.
- WinEdt (http://www.winedt.com)
- WinEdt is a shareware TeX editor/shell. It cooperates with MiKTeX
with respect to forward and inverse DVI search (see Source Specials). - ActivePerl (http://www.activestate.com)
- ActivePerl is an implementation of Perl for the Windows platform. A few
MiKTeX utilities (e.g.psmerge) are Perl scripts. You should
install Perl if you want to use these utilities.
Node:Project Page,
Next:Mailing Lists,
Previous:Getting,
Up:Introduction
The MiKTeX Project Page
You can visit the MiKTeX Project Page for information about new releases, patches and so on.
Node:Mailing Lists,
Next:Documentation,
Previous:Project Page,
Up:Introduction
The MiKTeX Mailing List
MiKTeX Mailing List
There is a discussion list for MiKTeX. To join this list, send an
e-mail to <miktex-request@dsts.dk> which contains the word
subscribe as the first line in the message body.
This list is archived at www.egroups.com.
Node:Documentation,
Previous:Mailing Lists,
Up:Introduction
Documentation
The MiKTeX Manual (which you are reading right now)
concentrates on documenting MiKTeX specific features.
Other MiKTeX related documentation includes:
- Frequently Asked Questions
- Lists answers to frequently asked questions.
- Tips & Tricks
- Lists useful tips.
Shortcuts to these documents can be found in the Start Menu
(see Start Menu).
Node:1.20e,
Next:Installing,
Previous:Introduction,
Up:Top
What’s new in MiKTeX 1.20e?
Updated Packages
- Dvipdfm 0.12.6e; now includes the utility
dvipdft(imbed
thumbnail images). - Texinfo 4.0
- LaTeX <1999/06/01>, Babel v3.6z, Hyperref v6.67e
- AMS-LaTeX v2
- pdfTeX 0.14d
- FreeType 1.3 utilities:
getafm,ttf2pfb,ttf2pk,ttf2tfm
New Features
- TeX: the TeX compiler accepts fully qualified file names with spaces,
i.e. it’s now possible to say something like:latex "C:My ThesisThesis.tex". - TeX: new option
--interaction=mode: sets TeX’s
interaction mode (one of:batchmode,nonstopmode,
scrollmode,errorstopmode). - TeX: new option
--quiet: suppresses output unless there are
errors (implies--c-style-errors). - Yap: two new toolbar buttons to control color interpolation of text.
- Yap: emTeX line specials are now supported.
- TeXify: new option
--run-viewer: invokes a viewer on the
resulting.pdf/.dvifile. This option (and some Registry
wizardry) makes it possible to associate.texfiles with a
viewer, i.e. double-clicking a.texfile opens the resulting
.pdf/.dvifile. - TeXify: new option
--viewer-option=option: can be used
to pass option to the viewer. - TeXify: new option
--mkidx-option=option: can be used to
pass option to the index generator. Useful if one wants to specify
MakeIndex style files. - TeXify: new option
--tex-option=option: can be used to
pass option to the (La)TeX compiler. - METAFONT: new option
--screen: enables METAFONT’s online display
(thanks to Wolfgang Kleinschmit who supplied the patches).
Anti Features
- TtH has been removed from the MiKTeX distribution due to license
problems (TtH is not free software).
Node:Installing,
Next:Configuring,
Previous:1.20e,
Up:Top
Installing MiKTeX
- Setup Wizard: Running the Setup Wizard.
- Start Menu: Start Menu items created by the Setup Wizard.
- Directory Tree: Directories created by the Setup Wizard.
- UnInstall: How to remove MiKTeX.
Node:Setup Wizard,
Next:Start Menu,
Previous:Installing,
Up:Installing
Running the Setup Wizard
- If you still have MiKTeX 1.11 installed on you computer, then you
should use the uninstall option of MiKTeX 1.11. - Make sure that you have enough disk space. A complete MiKTeX
installation consumes approximately 40MB of disk space. - It is highly recommended that you login as Administrator, if you’re installing
MiKTeX on a Windows NT computer. - Choose a location for the installation directory, say
c:texmf.
This directory receives the files of the MiKTeX distribution. - You can cause MiKTeX to deposit newly created files (fonts, memory
dumps, filename databases) in a separate directory tree. This directory
tree is called the Local TEXMF Tree. If you decide to create
such a tree, then you must choose a name for its root directory, say
c:localtexmf.Benefits that a local tree provides include the following:
- Fast file search: MiKTeX assumes that only the local tree can receive
new fonts and the like, i.e. MiKTeX can trust in the file name
database when the remaining (non-local) trees are searched for a file. - You can use the local tree for your own additions (macros, fonts).
- Easier updates: You don’t have to worry about future MiKTeX updates,
since the local tree will not be overwritten by the setup program. - You can install the MiKTeX distribution on a read-only media.
- Fast file search: MiKTeX assumes that only the local tree can receive
- Decide whether you want to incorporate a preexisting TEXMF tree. For
example, if you have a TeXLive CD in CDROM drivee:, then it
is possible to includee:texmfin the MiKTeX search path. - Start the MiKTeX Setup Wizard (
setupwiz.exe). You will
presented with the welcome page: - Click
Next>to go to the next page. Enter the name of the
installation directory which you have chosen in step 4: - Click
Next>to go to the next page. Choose the components that
want to install: - Click
Next>to go to the next page. Enter the name of the local
TEXMF directory which you have chosen in step 5 or check the button
No local TEXMF tree, if you don’t need a local tree: - Click
Next>to go to the next page. You are now asked about the
list of additional TEXMF root directories. Enter a semicolon-separated
list of preexisting TEXMF root directories. Check the buttonNo, if you just want to use the TEXMF
preexisting TEXMF directory trees
tree that comes with MiKTeX: - Click
Next>to go to the next page, where you can review the
setup options: - Click
Next>to start the installation process. The selected
components will be copied to the installation folder chosen in step 4.
Eventually you will see the finish page: - Click
Finishto exit the Setup Wizard.


The Setup Wizard does not change the environmental variable PATH,
i.e. you may have to add something like
set PATH=%PATH%;c:texmfmiktexbin
to your autoexec.bat.
- Setup Options: Setup Options.
Node:Setup Options,
Previous:Setup Wizard,
Up:Setup Wizard
Setup Options
Some setup options can be specified on the command-line and/or in a separate
text file named setupwiz.opt.
You can invoke the MiKTeX Setup Wizard with the following
command-line options:
--additional-directory-trees DIRS- Specify additional TEXMF directories.
--allow-unattended-reboot- Allow a reboot in unattended mode.
--dry-run- Simulate the installation process. No files will be installed. The log
file will be written to the temporary directory. --installation-directory DIR- Specify the installation directory.
--help- Show available options and exit.
--no-additional-directory-trees- Prevent MiKTeX from using additional directory trees.
--no-local-directory- Prevent MiKTeX from using a local directory.
--program-folder FOLDER- Specify the MiKTeX program folder.
--unattended- Run Setup Wizard in unattended mode. No user input is required.
Command-line options can also be specified in a text file named
setupwiz.opt. This file must be in the same directory as
setupwiz.exe.
Node:Start Menu,
Next:Directory Tree,
Previous:Setup Wizard,
Up:Installing
Items in the Start menu
The Setup Wizard creates the following Start Menu items:
Shortcuts to documentation files
MiKTeX | Help | Frequently Asked Questions- Opens a Windows Help file which contains answers to frequently asked
questions.
MiKTeX | Help | LaTeX2e Reference- Opens a Windows Help file which contains descriptions for many LaTeX
commands.
MiKTeX | Help | Local Guide- Opens a Windows Help file which contains the MiKTeX Manual.
MiKTeX | Help | Release Notes- Last-minute notes.
MiKTeX | Help | Tips and Tricks- Opens a Windows Help file which contains a list of useful tips.
Shortcuts to the configuration utility (initexmf.exe)
MiKTeX | Maintenance | Create All Format Files- Creates all format files, i.e. runs
initexmf --dump.
MiKTeX | Maintenance | Create LaTeX Format File- Creates the LaTeX format, i.e. runs
initexmf --dump=latex.
MiKTeX | Maintenance | Reconfigure- Creates all format files and refreshes the file name database.
MiKTeX | Maintenance | Refresh File Name Database- Refreshes the file name database.
Shortcuts to GUI-based MiKTeX applications
MiKTeX | Yap- A shortcut to the DVI viewer.
Node:Directory Tree,
Next:UnInstall,
Previous:Start Menu,
Up:Installing
The TEXMF Directory Hierarchy
The setup program creates a TDS-compliant directory structure. This
structure is normally distributed over two physical directory trees:
- The installation directory (usually
c:texmf) contains all
files from the MiKTeX distribution. - The local directory (usually
c:localtexmf) receives all
files that are created on-the-fly.
These directories need not to be on the same drive.
It’s possible to change the locations of these directories anytime.
See TEXMF Trees, for
more information.
- Installation Directory: Installation Directory
- Local Directory: Local Directory
Node:Installation Directory,
Next:Local Directory,
Previous:Directory Tree,
Up:Directory Tree
Installation Directory
The installation directory (usually c:texmf) is the root of a
TDS-compliant directory hierarchy. If you have installed the complete
distribution, then the installation directory contains the following
sub-directories:
bibtex,dvips,makeindex, …- These directories contain application related input files.
doc- This directory contains all user documentation.
fonts- This directory contains fonts in various formats.
miktex- The
miktexdirectory is reserved for MiKTeX related files:miktexbin- Contains all executable files.
miktexconfig- Contains the global configuration file
miktex.iniand the
MiKTeX font mapping filemiktex.map. The MiKTeX Setup
Wizard installs its own log file here. miktexbase- Contains the METAFONT string pool file
mf.pool. miktexfmt- Contains TeX string pool files:
etex.pool,pdftex.pool,
omega.pool,tex.pool. miktexmem- Contains the MetaPost string pool file
mp.pool.
Node:Local Directory,
Previous:Installation Directory,
Up:Directory Tree
Local Directory
The local directory (usually c:localtexmf) receives files that
are generated on-the-fly. For example, if the TeX compiler needs a
TeX Font Metric (TFM) file that is not available yet, then it creates
that file (if possible) and installs it in an appropriate sub-directory
of the local directory.
Typically, the Local Directory contains the following sub-directories:
fonts- Contains font files that are not part of the MiKTeX distribution, but
that were created on-the-fly. miktexconfig- This directory contains the file name database files.
Node:UnInstall,
Previous:Directory Tree,
Up:Installing
Removing MiKTeX
There is no uninstall option (yet), thus you have to do it by hand if
you decide to remove MiKTeX:
- Remove the main TEXMF folder (usually
c:texmf) including sub
folders. - Remove the local TEXMF folder (usually
c:localtexmf) including
sub folders. - Remove Registry entries:
- Start
regedit - Open the key
HKEY_LOCAL_MACHINESOFTWAREand delete the
MiKsubkey. - Open the key
HKEY_CURRENT_USERSoftwareand delete theMiK
subkey.
- Start
- Remove the MiKTeX item from the Windows start menu.
- Remove the
bindirectory from thePATH.
Node:Configuring,
Next:TeX,
Previous:Installing,
Up:Top
Configuring MiKTeX
- IniTeXMF: The MiKTeX Configuration Utility.
- Configuration File: The MiKTeX configuration file.
- config.ps: The Dvips configuration file.
Node:IniTeXMF,
Next:Configuration File,
Previous:Configuring,
Up:Configuring
The MiKTeX Configuration Utility
initexmf.exe is the MiKTeX configuration utility.
You can use it to
- redefine the list of TEXMF root directories
- refresh the file name database
- update standard dump files (
plain.fmtand friends) - define the name and location of a personal configuration file
- TEXMF Trees: Defining TEXMF Root Directories
- fndb: Maintaining the file name database
- psres: Maintaining the PostScript resource database
- Standard Dump Files: Making Standard Dump Files
- Personal Configuration File: Personal Configuration File
Node:TEXMF Trees,
Next:fndb,
Previous:IniTeXMF,
Up:IniTeXMF
Defining TEXMF Root Directories
The standard setup procedure creates two TEXMF root directories:
c:texmf: the installation directory (see Installation Directory).c:localtexmf: the local directory (see Local Directory).
You can redefine the TEXMF root directories by using the command-line switches
--root-directories and --local-root:
--root-directories=dirlist- This switch defines the list of TEXMF root directories. dirlist is
a semicolon-separated list of directory path names. --local-root=dir- This switch defines the local directory.
It is necessary to refresh the file name database whenever you redefine
the TEXMF root directories (see Maintaining the File Name Database).
Node:fndb,
Next:psres,
Previous:TEXMF Trees,
Up:IniTeXMF
Maintaining the file name database
To speed up file search, MiKTeX makes use of a list of known file
names. This list is called the file name database (FNDB). The FNDB is
spread over several files, one for each TEXMF root directory.
The FNDB file for the first TEXMF tree is called texmf0.fndb.
For the second tree it is called texmf1.fndb. And so on.
It is strongly recommended that you update the FNDB whenever files
are added to or removed from one of the TEXMF trees.
You update all fndb files by invoking initexmf with the
command line switch --update-fndb:
c:> initexmf --update-fndb
You can update a certain FNDB file by specifying the TEXMF root.
For example,
c:> initexmf --update-fndb=c:texmf
will update the FNDB file for the tree rooted at c:texmf.
Node:psres,
Next:Standard Dump Files,
Previous:fndb,
Up:IniTeXMF
Maintaining the PostScript resource database
The PostScript resource database (PSres) is used by some utilities in
order to locate PostScript resources (font outlines/metrics/encodings).
The database is located in the MiKTeX config directory (usually
c:texmfmiktexconfig). The name of the database file is
dpres.dpr. It is a text file, i.e. you can view it with a
conventional text editor.
It is strongly recommended that you update the database whenever
PostScript resources (*.pfb;*.afm;*.enc) are added to or removed
from one of the TEXMF trees.
You update the database files by invoking initexmf with
the command line switch --mkpsres:
c:> initexmf --mkpsres
- mkpsres: Incorporating External Font Directories
Node:mkpsres,
Previous:psres,
Up:psres
Incorporating External Font Directories
It is possible to add non-MiKTeX font directories to the PostScript
resource database. The --mkpsres switch accepts as an optional
argument the name of an external font directory. You can use several
--mkpsres switches with one invocation of initexmf.
By specifying the command line flag --search, you can cause
initexmf to automatically search your workstation for third party
PostScript resource files (e.g. Acrobat Reader fonts):
c:> initexmf --mkpsres --search
Node:Standard Dump Files,
Next:Personal Configuration File,
Previous:psres,
Up:IniTeXMF
Making Standard Dump Files
Some programs initialize itself by reading parts of the memory from an
external file. For the TeX family of programs, such a file is called
a Dump File.
The MiKTeX configuration file has built-in rules for standard dump
files.
Non-standard dump files (i.e. dump files not mentioned in this section)
must be created with the ini-version of the program. For example, you
would say initex texinfo @dump to produce a Texinfo dump file
(texinfo.fmt).
You create standard dump files by invoking initexmf with the command
line switch --dump. This switch takes an optional argument,
which is the name of the program for which a new dump file is to be
created:
c:> initexmf --dump[=program]
If program is ommited, then all standard dump files will be rebuilt.
Otherwise, program must be one of the following names:
elatex- This creates the dump file
latex.efmtwhich is used by
elatex.exe. etex- This creates the dump file
plain.efmtwhich is used by
etex.exe. lambda- This creates the dump file
lambda.fmtwhich is used by
lambda.exe. latex- This creates the dump file
latex.fmtwhich is used by
latex.exe. tex- This creates the dump file
plain.fmtwhich is used by
tex.exe. metafont- This creates the dump file
plain.basewhich is used by
mf.exe(METAFONT). metapost- This creates the dump file
plain.memwhich is used by
mpost.exe(MetaPost). omega- This creates the dump file
omega.fmtwhich is used by
omega.exe. pdflatex- This creates the dump file
pdflatex.fmtwhich is used by
pdflatex.exe. pdftex- This creates the dump file
pdftex.fmtwhich is used by
pdftex.exe.
- language.dat: Controlling which hyphenation patterns are loaded
Node:language.dat,
Previous:Standard Dump Files,
Up:Standard Dump Files
Controlling which hyphenation patterns are used by LaTeX
You can control the loading of hyphenation patterns by modifying the
file language.dat (say initexmf --find-tex language.dat to
find out the absolute path).
As distributed with MiKTeX, language.dat has the following
contents:
% File    : language.dat
% Purpose : specify which hyphenation patterns to load
%           while running iniTeX
english ushyphen.tex
%ukenglish ukhyphen.tex
german ghyph31.tex
%italian ithyph.tex
%dutch nehyph2.tex
%finnish fihyph.tex
%norwegian nohyph.tex
%french f8hyph.tex
Lines starting with % are comments. The only uncommented lines
in the example are english ushyphen.tex and german. That is, only hyphenation patterns for U.S. English and
ghyph31.tex
German will be loaded by TeX. To load other hyphenation patterns,
you have to uncomment the corresponding lines.
After modifying language.dat, you have to create new LaTeX
dump files (see Standard Dump Files).
Node:Personal Configuration File,
Previous:Standard Dump Files,
Up:IniTeXMF
Personal Configuration File
You can cause MiKTeX to read a personal configuration file (in
addition to the global one) by using the command line switch
--personal. Usage is:
initexmf --personal[=filename]
If specified, filename must be the name of an existing
configuration file. If filename is omitted, then MiKTeX will
not use a personal configuration file.
Values read from filename will override those values that were
read from the global configuration file.
For example, consider the case that you have some private LaTeX style
files in your home directory (say c:usersme). You could write
a private configuration file (say miktex.ini) and place it in
your home directory. The configuration file should look like this:
[LaTeX]
Input Dirs=.;c:usersme//;%Rtexlatex//;%Rtexgeneric//
Then you had to announce the configuration file this way:
c: initexmf --personal=c:usersmemiktex.ini
Node:Configuration File,
Next:config.ps,
Previous:IniTeXMF,
Up:Configuring
The MiKTeX Configuration File
This section discusses the usage of MiKTeX Configuration File.
- Two Kinds: The Two Kinds of Configuation Files
- Search Paths: How to specify search paths
- Layout: Contents of a MiKTeX Configuration File
Node:Two Kinds,
Next:Search Paths,
Previous:Configuration File,
Up:Configuration File
The Two Kinds of Configuation Files
MiKTeX configuration parameters are stored in two configuration files:
- The global configuration file contains site-wide configuration
settings (i.e. settings shared by all MiKTeX users). The name of
this file ismiktex.ini. It is located in the directory
miktexconfigrelative to the installation root directory
(usuallyc:texmf). - The optional personal configuration file contains per-user
configuration settings. The location of the personal configuration file
can be defined with the help ofinitexmf(see Personal Configuration File).
Personal configuration settings override global settings.
Node:Search Paths,
Next:Layout,
Previous:Two Kinds,
Up:Configuration File
How to specify search paths
Search paths are used by MiKTeX to find special files (such as TeX
input files) within a comprehensive directory hierarchy.
A search path is a semicolon-separated list of directory paths. This
list is traversed from left to right, i.e. the first directory is
searched first.
In a directory path, the following character sequences have a special
meaning:
%R- A placeholder for the list of TEXMF root directories.
//- A flag, which causes MiKTeX to search recursively.
Example
Assuming that c:texmf;\myservertexmf is the list of TEXMF root
directories, the search path .;%Rtexlatex//;%Rtexgeneric//
causes LaTeX to search its input files in the following locations:
- In the current directory (
.). - In the directory
c:texmftexlatexand in all directories below
it. - In the directory
\myservertexmftexlatexand in all
directories below it. - In the directory
c:texmftexgenericand in all directories
below it - In the directory
\myservertexmftexgenericand in all
directories below it.
Testing a new search path
You can use the configuration utility initexmf to test whether
an input file can be found via the current search path.
For example, the command
c:> initexmf --find-latex-input a4.sty
searches for the LaTeX input file a4.sty. The full path name
is printed if the file was found.
Node:Layout,
Previous:Search Paths,
Up:Configuration File
Contents of a MiKTeX Configuration File
A MiKTeX configuration file is divided into several named sections.
Each section contains configuration settings for a specific application
or feature.
- BibTeX Section: BibTeX related settings
- Dvips Section: dvips related settings
- Graphics Section: Graphics Conversion Rules
- Magic Section: Memory Settings
- MakeIndex Section: MakeIndex Configuration Settings
- MakePK Section: MakePK Configuration Settings
- MakeTFM Section: MakeTFM Configuration Settings
- METAFONT Section: METAFONT related settings
- MetaPost Section: MetaPost related settings
- MiKTeX Section: General Configuration Settings
- Omega Section: Omega related configuration settings
- otp2ocp Section:
otp2ocpConfiguration Settings - pdfTeX Section: pdfTeX related configuration settings
- ps2pk Section: ps2pk related settings
- TeX Section: TeX Related Configuration Settings
- Yap Section: Yap Configuratuin Settings
Node:BibTeX Section,
Next:Dvips Section,
Previous:Layout,
Up:Layout
[BibTeX]: BibTeX Configuration Settings
The section [BibTeX] contains BibTeX related configuration
settings.
Input Dirs- Search path for BibTeX input files (both databases and style files).
min_crossrefs- Minimum number of cross-refs required for automatic
cite_list
inclusion.
Node:Dvips Section,
Next:Graphics Section,
Previous:BibTeX Section,
Up:Layout
[Dvips]: Dvips Configuration Settings
The section [Dvips] contains Dvips related configuration
settings.
CONFIGPath- Where Dvips searches its configuration files (e.g.
config.ps). ENCPath- Where Dvips searches for
.encfiles. GraphicsPath- Where Dvips searches for
.epsfiles. MAPPath- Where Dvips searches for
.mapfiles. PSPath- Where Dvips searches for PS header files.
Node:Graphics Section,
Next:Magic Section,
Previous:Dvips Section,
Up:Layout
[Graphics]: Graphics Conversion Rules
The section [Graphics] contains graphics conversion rules. Each
rule has the syntax
.fromext.toext=commandline
fromext is the file name extension of the source file.
toext is the file name extension of the destination file.
commandline is the command-line which does the conversion. The
command-line may include the following placeholders:
%i- The name of the input file.
%o- The name of the output file.
The standard MiKTeX configuration file contains the following rules:
.gif.bmp=giftopnm %i | ppmtobmp -windows > %o
.pcx.bmp=pcxtoppm %i | ppmtobmp -windows > %o
.png.bmp=pngtopnm %i | ppmtobmp -windows > %o
.tga.bmp=tgatoppm %i | ppmtobmp -windows > %o
.tif.bmp=tifftopnm %i | ppmtobmp -windows > %o
.tiff.bmp=tifftopnm %i | ppmtobmp -windows > %o
Node:Magic Section,
Next:MakeIndex Section,
Previous:Graphics Section,
Up:Layout
[Magic]: Memory Settings for TeX & Friends
The section [Magic] contains memory related configuration settings.
The values are used by TeX, pdfTeX and Omega for the dynamic
allocation of certain data structures.
Format-Independent Values
The following parameters can be changed at run time to extend or reduce
TeX’s capacity. They may have different values in INITEX and
in production versions of TeX.
mem_min- Smallest index in TeX’s internal
memarray; must be 0 or more;
must be equal tomem_botinINITEX, otherwise <=mem_bot. mem_max- Greatest index in TeX’s internal
memarray; must be strictly
less than 1073741823. buf_size- Maximum number of characters simultaneously present in current lines of
open files and in control sequences betweencsnameand
endcsname; must not exceed 1073741823. error_line- Width of context lines on terminal error messages.
half_error_line- Width of first lines of contexts in terminal error messages; should be
between 30 and (error_line— 15). max_print_line- Width of longest text lines output; should be at least 60.
stack_size- Maximum number of simultaneous input sources.
max_in_open- Maximum number of input files and error insertions that can be going on
simultaneously. font_max- Maximum internal font number; must not exceed 5000.
font_mem_size- Number of words of
font_infofor all fonts. param_size- Maximum number of simultaneous macro parameters.
nest_size- Maximum number of semantic levels simultaneously active.
max_strings- Maximum number of strings; must not exceed 1073741823.
string_vacancies- The minimum number of characters that should be available for the user’s
control sequences and font names, after TeX’s own error messages are
stored. pool_size- Maximum number of characters in strings, including all error messages
and help texts, and the names of all fonts and control sequences; must
exceedstring_vacanciesby the total length of TeX’s own
strings, which is currently about 23000. save_size- Space for saving values outside of current group; must be at most
1073741823. trie_size- Space for hyphenation patterns; should be larger for
INITEXthan
it is in production versions of TeX. trie_op_size- Space for «opcodes» in the hyphenation patterns.
Format-Dependent Values
Like the preceding parameters, the following quantities can be changed
at run time to extend or reduce TeX’s capacity. But if they are
changed, it is necessary to rerun the initialization program
INITEX to generate new tables for the production TeX program.
One can’t simply make helter-skelter changes to the following constants,
since certain rather complex initialization numbers are computed from
them.
mem_bot- Smallest index in the mem array dumped by
INITEX; must not be
less thanmem_min. mem_top- Largest index in the mem array dumped by
INITEX; must be
substantially larger than 0 and not greater thanmem_max.
Node:MakeIndex Section,
Next:MakePK Section,
Previous:Magic Section,
Up:Layout
[MakeIndex]: MakeIndex Configuration Settings
The section [MakeIndex] contains MakeIndex related configuration
settings.
INDEXSTYLE- Search path for MakeIndex style files.
Node:MakePK Section,
Next:MakeTFM Section,
Previous:MakeIndex Section,
Up:Layout
[MakePK]: MakePK Configuration Settings
The section [MakePK] contains configuration settings that are
related to the auto-creation of packed raster fonts.
DestDir- The specification of a directory where newly created PK (Packed Raster
Font) files are to be installed.The specifiation may include special character sequences which will be
replaced at search-time:%m- The current METAFONT mode.
%d- The horizontal resolution (in dots per inch).
%s- The font supplier (e.g.
public). %t- The typeface name (e.g.
cm).
Admin note: All MiKTeX users must have permission to create
files in the specified directory.
Node:MakeTFM Section,
Next:METAFONT Section,
Previous:MakePK Section,
Up:Layout
[MakeTFM]: MakeTFM Configuration Settings
DestDir- Where new
.tfmfiles are to be installed.The specifiation may contain special character sequences which are
replaced at search-time:%s- The font supplier (e.g.
public). %t- The typeface name (e.g.
cm).
Admin note: MiKTeX users must have permission to add files
to the specified directory.
Node:METAFONT Section,
Next:MetaPost Section,
Previous:MakeTFM Section,
Up:Layout
[METAFONT]: METAFONT Configuration Settings
The section [METAFONT] contains METAFONT related configuration
settings.
Input Dirs- Search path for METAFONT input files.
Node:MetaPost Section,
Next:MiKTeX Section,
Previous:METAFONT Section,
Up:Layout
[MetaPost]: MetaPost Related Configuration Settings
The section [MetaPost] contains MetaPost related configuration
settings.
Input Dirs- Where MetaPost searches for input files.
Node:MiKTeX Section,
Next:Omega Section,
Previous:MetaPost Section,
Up:Layout
[MiKTeX]: General Configuration Settings
The section [MiKTeX] contains general configuration settings
and search path specifications.
General Configuration Settings
Trace- This is a comma separated list of trace options:
notrace- Inhibits trace output to the console.
fndb- Traces the file name database.
filesearch- Traces the find-file machinery.
access- Traces file accesses.
process- Traces secondary processes.
tcx- Traces TCX tables.
error- Traces error conditions.
time- Traces execution time.
TraceFile- The name of the trace file.
Search Path Specifications
AFMPath- Used to locate Adobe font metric files (
*.afm). BASEPath- Used to locate METAFONT base files (
*.base). ENCPath- Used to locate
*.encfiles. EXEPath- Used to locate executables.
FMTPath- Used to locate TeX dump files (
.fmt). Also used to
locate e-TeX dump files (.efmt). GraphicsPath- Used to locate graphics files (
*.eps;*.bmp;...). MAPPath- Used to locate font map files (
*.map). MEMPath- Used to locate MetaPost memory files (
.mem). OFMPath- Used to locate Omega font metric files (
*.ofm). OVFPath- Used to locate Omega virtual fonts (
*.ovf). PKPath- Used to locate packed font raster files (
*.pk). PSPath- Used to locate PostScript header files (
*.enc;*.map); TCXPath- Used to locate character translation files (
.tcx). TFMPath- Used to locate TeX font metric files (
*.tfm). TTFPath- Used to locate TrueType fonts (
*.ttc;*.ttf). Type1Path- Used to locate Type1 fonts (
*.pfa;*.pfb). VFPath- Used to locate virtual fonts (
*.vf).
Node:Omega Section,
Next:otp2ocp Section,
Previous:MiKTeX Section,
Up:Layout
[Omega]: Omega Configuration Settings
The section [Omega] contains Omega related configuration settings:
Input Dirs- The search path for Omega input files.
OCPPath- Where Omega searches for OCP files.
Node:otp2ocp Section,
Next:pdfTeX Section,
Previous:Omega Section,
Up:Layout
[otp2ocp]: otp2ocp Configuration Settings
Input Dirs- Used by
otp2ocpto locate OTP files (.otp).
Node:pdfTeX Section,
Next:ps2pk Section,
Previous:otp2ocp Section,
Up:Layout
[pdfTeX]: pdfTeX Configuration Settings
The section [pdfTeX] contains pdfTeX related configuration settings.
Input Dirs- Where pdfTeX searches for input files.
PSPath- Where pdfTeX searches for font mapping files.
Node:ps2pk Section,
Next:TeX Section,
Previous:pdfTeX Section,
Up:Layout
[ps2pk]: ps2pk Configuration Settings
The section [ps2pk] contains configuration settings for the
ps2pk utility:
PSResPath- Where
ps2pksearches for PS resource files.
Node:TeX Section,
Next:Yap Section,
Previous:ps2pk Section,
Up:Layout
[TeX]: TeX Configuration Settings
The section [TeX] contains TeX-related configuration settings.
Editor- The command to be started when you press
ein the error menu.You can use the following placeholders:
%f- Will be replaced by the name of the input file that caused the error.
%h- Will be replaced by a help text.
%l- Will be replaced by the line number.
%m- Will be replaced by the error message.
%vindex %t
%t- Will be replaced by the name of the transcript file.
For example, a suitable value for WinEdt would be
winedt %f.
-G(1,%l,0) -S(12,+1,0)For NT Emacs, set
Editortognulientw -F +%l %f. Input Dirs- Used by TeX to locate input files.
Node:Yap Section,
Previous:TeX Section,
Up:Layout
[Yap]: Yap Configuration Settings
Input Dirs- Used by Yap to locate DVI files (
*.dvi).
Node:config.ps,
Previous:Configuration File,
Up:Configuring
The Dvips Configuration File
As distributed with MiKTeX, Dvips is configured as follows:
- When generating fonts, Dvips uses METAFONT mode
ljfour(HP
Laserjet 4). - Horizontal resolution is 600 dpi.
- Paper size is A4.
- Dvips does not make use of the CM & AMS PostScript fonts.
You probably have to change some of theses settings for your site. To
do so, open the Dvips configuration file config.ps with your
favourite text editor.
The line starting with M specifies the METAFONT mode which Dvips
uses for the generation of new raster fonts. Enter a suitable mode
here. If you don’t know the mode for your output device, then take a
look at metafontmiscmodes.mf. This file contains an annotated
list of METAFONT modes.
The line starting with D specifies the resolution.
Enter a value that matches your printer.
See the
!(dvips manual!)![!ExecProgram(«yap.exe ../dvips/dvips.dvi», 0)!],
for more information about configuring Dvips.
Node:TeX,
Next:TeXifying,
Previous:Configuring,
Up:Top
Non-standard TeX Features
This chapter describes features, that were added to the MiKTeX
implementation of Donald Knuth’s TeX.
- Suppressing Screen Output: Supressing screen output.
- Source Specials: Auto-insertion of source specials.
- Quoted File Names: Quoted File Names
- TCX files: Character translations.
Node:Suppressing Screen Output,
Next:Source Specials,
Previous:TeX,
Up:TeX
Suppressing Screen Output
The command-line option --quiet suppresses all diagnostic
messages. You will see no screen output, unless there are errors.
These are shown in a «C style form» and do not stop the compilation
process. For example, the input file
foo.tex:
documentclass{article}
begin{document}
What's This?
end{documnt}
would cause TeX to print one error message, as in
c:> latex --quiet foo.tex
foo.tex:3: Undefined control sequence
c:>
Node:Source Specials,
Next:Quoted File Names,
Previous:Suppressing Screen Output,
Up:TeX
Auto-insertion of Source Specials
What are source specials?
Source specials are pieces of information embedded in a DVI file, which
make a connection between the source file location (e.g. line 100 in
foo.tex) and the DVI location (e.g. page 2 in foo.dvi).
Source specials can improve the Edit-TeX-View-Edit cycle:
- You edit your source file.
- You compile the source file to get a DVI file.
- You execute a special editor command to open Yap, going directly to the
DVI page that corresponds to the cursor location in your source file. - You navigate inside the DVI file (e.g. PgUp/PgDn).
- You double-click somewhere on the DVI view; this causes Yap to bring the
editor window to the front, moving the text cursor directly to the line
that corresponds to the view location.
How to insert source specials
The TeX compiler option --src inserts source specials into the DVI
file. You would say
c:> latex --src foo.tex
to create the DVI file foo.dvi with embedded source specials.
Node:Quoted File Names,
Next:TCX files,
Previous:Source Specials,
Up:TeX
Quoted File Names
The TeX handles quoted file names. This makes it possible to specify
long file names that contain spaces.
For example, to compile the input file long file name.tex,
you start TeX as follows:
c:> latex "long file name"
This produces the DVI file long file name.dvi. The log file is
named long file name.log.
You can, to some extent, use quoted file names inside the TeX
document. For example,
input{"extra long file name"}
would cause TeX to read the file extra long file name.tex.
Things get a little bit complicated if you want to use the LaTeX
primitive include. You have to write
include{"extraspace longspace filespace name"}
in order to get the expected result.
Node:TCX files,
Previous:Quoted File Names,
Up:TeX
TCX files: Character translations
[ This section is «borrowed» from the Web2C manual ].
TCX (TeX character translation) files help TeX support direct
input of 8-bit international characters if fonts containing those
characters are being used. Specifically, they map an input (keyboard)
character code to the internal TeX character code (a superset of
ASCII).
Of the various proposals for handling more than one input encoding, TCX
files were chosen because they follow Knuth’s original ideas for the use
of the xchr and xord tables. He ventured that these would
be changed in the WEB source in order to adjust the actual version to a
given environment. It turned out, however, that recompiling the WEB
sources is not as simple task as Knuth predicted; therefore, TCX files,
providing the possibility of changing of the conversion tables on
on-the-fly, has been implemented instead.
This approach limits the portability of TeX documents, as some
implementations do not support it (or use a different method for
input-internal reencoding). It may also be problematic to determine the
encoding to use for a TeX document of unknown provenance; in the
worst case, failure to do so correctly may result in subtle errors in
the typeset output.
While TCX files can be used with any format, using them breaks the
LaTeX inputenc package. This is why you should either use
tcxfile or inputenc in LaTeX files, but never both.
Specifying TCX files:
- You can specify a TCX file to be used for a particular TeX run by
specifying the command-line option
-translate-file=tcxfileor (preferably) specifying it
explicitly in the first line of the main document%&.
-translate-file=tcxfile - TCX files are searched for along the
TCXPathpath. INITEXignores TCX files.
The MiKTeX distribution comes with at least two TCX files,
il1-t1.tcx and il2-t1.tcx. These support ISO Latin 1 and
ISO Latin 2, respectively, with Cork-encoded fonts (a.k.a. the T1
encoding). TCX files for Czech, Polish, and Slovak are also provided.
Syntax of TCX files:
- Line-oriented. Blank lines are ignored.
- Whitespace is ignored except as a separator.
- Comments start with
%and continue to the end of the line. - Otherwise, a line consists of one or two character codes:
src [dest]
- Each character code may be specified in octal with a leading
0,
hexadecimal with a leading0x, or decimal otherwise. Values must
be between 0 and 255, inclusive (decimal). - If the dest code is not specified, it is taken to be the same as
src. - If the same src code is specified more than once, it is the last
definition that counts.
Finally, here’s what happens: when TeX sees an input character with
code src, it 1) changes src to dest; and 2) makes code
the dest «printable», i.e., printed as-is in diagnostics and the
log file instead of in ^^ notation.
By default, no characters are translated, and character codes between 32
and 126 inclusive (decimal) are printable. It is not possible to make
these (or any) characters unprintable.
Specifying translations for the printable ASCII characters (codes
32-127) will yield unpredictable results. Additionally you shouldn’t
make the following characters printable: ^^I (TAB), ^^J
(line feed), ^^M (carriage return), and ^^? (delete),
since TeX uses them in various ways.
Thus, the idea is to specify the input (keyboard) character code for
src, and the output (font) character code for dest.
Node:TeXifying,
Next:Manual Pages,
Previous:TeX,
Up:Top
TeXify: The MiKTeX Compiler Driver
texify is a command-line utility that simplifies the production
of DVI (PDF) documents: texify automatically runs LaTeX
(pdfLaTeX), MakeIndex and BibTeX as many times as necessary to
produce a DVI (PDF) file with sorted indices and all cross-references
resolved.
To run texify on an input file foo.tex, do this:
c:> texify foo.tex
As shown in this example, the input file names to texify must
include any extension (.tex, .ltx, etc.).
There are several command-line optione you can use to control texify
(see texify). Here are some examples:
texify --clean foo.tex- All auxiliary files will be removed, i.e. only the output
foo.dvi
file will be left in the current directory. texify --tex-opt=--src foo.tex- Passes the option
--srcto the TeX compiler. texify --run-viewer foo.tex- Opens the output file
foo.dvi(unless there are compile erros). texify --tex-opt=--src --viewer-opt="-1 -s"200 foo.tex"" --run-viewer foo.tex- Compiles
foo.texwith source file information (--src) and
then initiates forward DVI search to openfoo.dviat the source
special location200 foo.tex. The viewer option-1
activates the current viewer task (if there is already one running).
Node:Manual Pages,
Next:Index,
Previous:TeXifying,
Up:Top
Manual Pages
- Common Compiler Options: Common Compiler Options.
- bibtex:
bibtex. - bibtex8:
bibtex8(8-bit enhanced BibTeX). - dvicopy:
dvicopy. - dvipdfm:
dvipdfm. - dvips:
dvips. - initexmf:
initexmf(MiKTeX Configuration Utility). - mp:
mp(MetaPost) - omega:
omega. - pdftex:
pdftex. - tex:
tex. - texify:
texify(MiKTeX Compiler Driver).
Node:Common Compiler Options,
Next:bibtex,
Previous:Manual Pages,
Up:Manual Pages
Common Compiler Options
The following command-line switches are commonly supported by all TeX
compilers.
--buf-size=n- Set the internal
buf_sizeto n.buf_sizeis the
maximum number of characters simultaneously present in current lines of
open files and in control sequences betweencsnameand
endcsname; must not exceed 1073741823. --c-style-errors- Show C/C++ style error messages. This switch implies
scrollmode. --error-line=n- Set the internal
error_lineto n.error_lineus the
width of context lines on terminal error messages. --half-error-line=n- Set the internal
half_error_lineto n.
half_error_lineis the width of first lines of contexts in
terminal error messages; should be between 30 and (error_line—
15). --halt-on-error- Quit after the first error.
--initialize- Initialize internal tables; these tables can be
dumped to a dump
file. --interaction=mode- Set TeX’s interaction mode (one of:
batchmode,nonstopmode,
scrollmode,errorstopmode). --job-name=name- Specify the name of the job. This also sets the name of all output files.
--job-time=filename- Set the time of all output files to the time of filename.
--help- Show a help screen and exit.
--max-in-open=n- Set the internal
max_in_opento n.max_in_openis
the maximum number of input files and error insertions that can be going
on simultaneously. --max-print-line=n- Set the internal
max-print-lineto n.
max-print-lineis the width of longest text lines output; should
be at least 60. --max-strings=n- Set the internal
max_stringsto n.max_stringsis
the maximum number of strings; must not exceed 1073741823. --mem-bot=n- Set the internal
mem_botto n.mem_botis the
smallest index in thecodearray dumped byINITEX
(INIOMEGA,INIPDFTEX); must not be less than
mem_min. --mem-max=n- Set the internal
mem_maxto n.mem_maxis the
greatest index in the internalmemarray; must be strictly less
than 1073741823. --mem-min=n- Set the internal
mem_minto n.mem_minis the
smallest index in the internalmemarray; must be 0 or more; must
be equal tomem_botinINITEX(INIOMEGA,
INIPDFTEX), otherwise <=mem_bot. --mem-top=n- Set the internal
mem_topto n.mem_topis the
largest index in thememarray dumped byINITEX
(INIOMEGA,INIPDFTEX); must be substantially larger than 0
and not greater thanmem_max. --nest-size=n- Set the internal
nest_sizeto n.nest_sizeis the
maximum number of semantic levels simultaneously active. --param-size=n- Set the internal
param_sizeto n.param_sizeis the
maximum number of simultaneous macro parameters. --pool-size=n- Set the internal
pool-sizeto n.pool_sizeis the
maximum number of characters in strings, including all error messages
and help texts, and the names of all fonts and control sequences; must
exceedstring_vacanciesby the total length of the program’s own
strings, which is currently about 30000. --quiet- Suppress all output (except errors).
--save-size=n- Set the internal
save_sizeto n.save_sizeis the
amount of space for saving values outside of current group; must be at
most 1073741823. --silent- Same as
--quiet. --src-specials- Insert source file information into the DVI file.
--stack-size=n- Set the internal
stack_sizeto n.stack_sizeis the
maximum number of simultaneous input sources. --string-vacancies=n- Set the internal
string_vacanciesto n.
string_vacanciesis the minimum number of characters that should
be available for the user’s control sequences and font names, after the
program’s own error messages are stored. --tcx=name--translate-file=name- Causes TeX to process the TCX table name.
--terminal=oem- Causes TeX to use the current DOS codepage (e.g. cp850) for console output.
--trace=traceflags- Set trace flags.
--trie-size=n- Set the internal
trie_sizeto n.trie_sizeis the
amount of space for hyphenation patterns; should be larger for
INITEX(INIOMEGA,INIPDFTEX) than it is in
production versions of the program. --trie-op-size=n- Set the internal
trie_op_sizeto n.trie_op_sizeis
the amount of space for «opcodes» in the hyphenation patterns. --try-gz- Try file
.tex.gzif file.texcannot be found. --undump=name- Causes TeX to read the dump file name.
--version- Print version information and exit.
Node:bibtex,
Next:bibtex8,
Previous:Common Compiler Options,
Up:Manual Pages
bibtex
BibTeX is a preprocessor for the LaTeX document-preparation
system. It handles most of the formatting decisions required to produce
a reference list, outputting a .bbl file; with this file LaTeX
actually produces the reference list.
Synopsis
bibtex [option...] name
Reads the file name.aux and outputs the file
name.bbl.
Options
--help- Shows a help screen and exits successfully.
--min-crossrefs=N- Sets the internal
min_crossrefsparameter to N. --version- Shows version information and exits successfully.
Documentation
See BibTeXing, available as file btxdoc.dvi.
Node:bibtex8,
Next:dvicopy,
Previous:bibtex,
Up:Manual Pages
bibtex8
BibTeX8 is an enhanced version of BibTeX. Enhanced by conversion
to «big» (32-bit) capacity, addition of run-time selectable capacity
and 8-bit support extensions. National character set and sorting order
are controlled by an external configuration file.
Synopsis
bibtex8 [option...] name
where name is the name of the TeX auxilliary output file to be
processed by bibtex8. The trailing .aux may be omitted.
Options
-?
--help- Display some brief help text and then exit.
-7--traditional- Operate in the original 7-bit mode. A CS file is not read: only 7-bit
ASCII characters are supported and sorting is strictly by ASCII code
value.bibtex8will not allow you to specify--traditionalwith
either the--8bitor--csfileoption. -8
--8bit- Force 8-bit mode. A CS file is not read. All 8-bit characters (code >
127) are treated as letters and sorting is strictly by code page value.BibTeX will not allow you to specify
--8bitwith either the
--csfileor--traditionaloption. -c file--csfile file- Read file as the BibTeX8 codepage and sort definition (CS)
file. The CS file is used to define the 8-bit character set used by
BibTeX8 and the order in which those characters should be sorted.BibTeX8 will not allow you to specify
--csfilewith either the
--8bitor--traditionaloption. -d type--debug type- Report debugging information to the BibTeX8 log file and the standard
error device. The value type controls the type of debugging
information reported. type can be one or more of:all- all debugging categories
csf- CS file processing
io- file I/O
mem- memory allocation and capacity
misc- other debugging information
search- path searching and file location
-s--statistics- Report internal statistics to the BibTeX8 log file.
-t--trace- Report execution tracing to the BibTeX8 log file.
-v--version- Report BibTeX8’s version and then exit.
-B
--big- Set BibTeX8’s capacity to «big». The size of particular parameters
will be set as follows (the default sizes are shown in brackets):Hash_Prime 8,501 (4,253) Hash_Size 10,000 (5,000) Max_Cites 2,000 (750) Max_Ent_Ints 4,000 (3,000) Max_Ent_Strs 6,000 (3,000) Max_Fields 30,000 (17,250) Max_Strings 10,000 (4,000) Pool_Size 130,000 (65,530) Wiz_Fn_Space 6,000 (3,000)
-H--huge- Set BibTeX8’s capacity to «huge». The size of particular
parameters will be set as follows (the default sizes are shown in
brackets):Hash_Prime 16,319 (4,253) Hash_Size 19,000 (5,000) Max_Cites 5,000 (750) Max_Ent_Ints 5,000 (3,000) Max_Ent_Strs 10,000 (3,000) Max_Fields 85,000 (17,250) Max_Strings 19,000 (4,000) Pool_Size 500,000 (65,530) Wiz_Fn_Space 10,000 (3,000)
-W--wolfgang- Set BibTeX8’s capacity to «really huge» — required for Wolfgang’s
PhD thesis. The size of particular parameters will be set as follows
(the default sizes are shown in brackets):Hash_Prime 30,011 (4,253) Hash_Size 35,000 (5,000) Max_Cites 7,500 (750) Max_Ent_Ints 7,500 (3,000) Max_Ent_Strs 10,000 (3,000) Max_Fields 125,000 (17,250) Max_Strings 30,000 (4,000) Pool_Size 750,000 (65,530) Wiz_Fn_Space 10,000 (3,000)
-M n--min_crossrefs n- Set
min_crossrefsto n. If an item is cross-referenced at
least n times, it will be placed in the list of citations, even if
it is not explicitlycited as a reference. The default value is
2. --mcites n- Allow a maximum of n distinct
cites in the.aux
files. This number must be less than the maximum number of strings
(settable with--mstrings). --mentints n- Allow a maximum of n integer entries in the
.bibdatabases. --mentstrs n- Allow a maximum of n string entries in the
.bibdatabases. --mfields n- Allow a maximum of n fields in the
.bibdatabases. --mpool n- Set the string pool to n bytes.
--mstrings n- Allow a maximum of n unique strings. This number must be less
than the hash size and greater than the maximum number ofcites
(settable with--mcites). --mwizfuns n- Allow a maximum of n wizard functions.
Documentation
For a general description of bibtex8, see the text file
00readme.txt.
For a description of the CS file syntax see the text file
csfile.txt.
Node:dvicopy,
Next:dvipdfm,
Previous:bibtex8,
Up:Manual Pages
dvicopy
dvicopy is a utility program that allows one to take a DVI file
that references composite fonts (VF) and convert it into a DVI file that
does not contain such references.
Synopsis
dvicopy [option...] old new
Converts DVI file old into new.
Options
--help- Shows a help screen and exits successfully.
--mag=MAG- Sets magnification to MAG.
--select=range- Selects a range of pages to be copied.
--version- Prints version information and exits successfully.
Node:dvipdfm,
Next:dvips,
Previous:dvicopy,
Up:Manual Pages
dvipdfm
dvipdfm is a DVI to PDF conversion utility.
Synopsis
dvipdfm [option...] dvifile
Options
-c- Ignore color specials (for printing on B&W printers).
-f filename- Set font map file name [t1fonts.map].
-o filename- Set output file name [dvifile.pdf].
-l- Landscape mode.
-m number- Set additional magnification.
-p papersize- Set papersize (
letter,legal,ledger,
tabloid,a4, ora3) [letter]. -r resolution- Set resolution (in DPI) for raster fonts [600].
-s pages- Select page ranges (-).
-x dimension- Set horizontal offset [1.0in].
-y dimension- Set vertical offset [1.0in].
-e- Disable partial font embedding [default is enabled].
-z number- Set compression level (0-9) [default is 9].
-v- Be verbose.
-vv- Be more verbose.
All dimensions entered on the command line are «true» TeX
dimensions. Argument of -s lists physical page ranges separated
by commas, e.g., -s 1-3,5-6.
Documentation
See Dvipdfm User’s Manual (available as file dvipdfm.dvi,
for a complete description.
Node:dvips,
Next:initexmf,
Previous:dvipdfm,
Up:Manual Pages
dvips
dvips is a program to translate a DVI file into PostScript.
Synopsis
dvips [options...] filename[.dvi]
Options
See the Dvips documentation, for a list of available options.
Documentation
For a complete description of Dvips, see Dvips: A DVI driver.
This document is available
- as a Windows help file (
dvips.hlp - as a DVI file (
dvips.dvi)
Node:initexmf,
Next:mp,
Previous:dvips,
Up:Manual Pages
initexmf (MiKTeX Configuration Utility)
initexmf is the MiKTeX Configuration Utility.
Synopsis
initexmf [option...]
Options
--dump- Refresh all dump files
(*.base;*.efmt;*.fmt;*.mem). --dump=program- Refresh the dump files related to a specific program.
program must be one of:
elatex,
etex,
lambda,
latex,
metafont,
metapost,
omega,
pdflatex,
pdftex,
tex. --find-elatex-input FILE- Find e-LaTeX input file.
--find-etex-input FILE- Find e-TeX input file.
--find-executable FILE- Find a MiKTeX executable.
--find-lambda-input FILE- Find Lambda input file.
--find-latex-input FILE- Find LaTeX input file.
--find-metafont-input FILE- Find METAFONT input file.
--find-metapost-input FILE- Find MetaPost input file.
--find-omega-input FILE- Find Omega input file.
--find-other-executable FILE- Find an executable.
--find-pdflatex-input FILE- Find pdfLaTeX input file.
--find-pdftex-input FILE- Find pdfTeX input file.
--find-tex-input FILE- Find TeX input file.
--list-modes- List all known METAFONT modes.
--local-root root- Specify the local TEXMF root.
--mkpsres- Update the PostScript resource database
psres.dpr. You can use
this option in conjunction with--search(see below). --mkpsres=dir- Add a new font directory to the PostScript resource database
psres.dpr. --personal
-p- Do not use a personal configuration file.
--personal=filename-pfilename- Define the location of the personal configuration file.
--print-only-n- Print what would be done. Nothing is changed.
--quiet- Suppress screen output.
--reconfigure- Reconfigure MiKTeX.
--report- Create a configuration report.
--root-directories dirlist-r dirlist- Specify the list of TEXMF root directories.
--search- Search for PS resource files (requires
--mkpsres). --update-fndb-u- Refresh the whole file name database.
--update-fndb=root-uroot- Refresh the file name database for a specific TEXMF root.
--verbose-v- Print information on what is being done.
--version-V- Print the version number and exit.
Node:mp,
Next:omega,
Previous:initexmf,
Up:Manual Pages
mp (MetaPost)
MetaPost (installed as mp) reads a series of pictures specified
in the MetaPost programming language, and outputs corresponding
PostScript code.
Synopsis
mp [option...] [name[.mp]] [command...]
mp [option...] "&format" [command...]
Options
--c-style-errors- Show C/C++ style error messages. This switch implies
scrollmode. --initialize- Initializes MetaPost’s internal tables so that they can be dumped.
--help- Shows a short help screen and exits successfully.
--tex=texprogram- Uses texprogram instead of
texwhen compiling text labels.
This flag overrides the environment variableTEX. --version- Prints version information and exits successfully.
Aliases
inimp- Equivalent to
mp --ini.
mpost- Equivalent to
mp.
virmp- Equivalent to
mp.
Environment Variables
TEX- Specifies the TeX compiler which should be used when compiling text
labels.
Documentation
For a complete description of the MetaPost language, see AT&T technical
report CSTR-162, available as the file mpman.ps.
Node:omega,
Next:pdftex,
Previous:mp,
Up:Manual Pages
omega
Omega is a 16-bit enhanced version of TeX.
Synposis
omega [option...] [name[.tex]] [command...]
Options
Omega supports the common compiler options (see Common Compiler Options).
Aliases
iniomega- Equivalent to
omega --ini. viromega- Equivalent to
omega. lambda- Equivalent to
omega "&lambda".
Documentation
For a complete description of Omega, see the Omega manual, available as
the file omega-manual.dvi.
Node:pdftex,
Next:tex,
Previous:omega,
Up:Manual Pages
pdftex
pdfTeX is a special version of TeX that outputs PDF.
Synopsis
pdftex [option...] [name[.tex]] [command...]
pdftex [option...] "&format" [command...]
Options
Besides the common command-line switches (see Common Compiler Options), pdfTeX supports these options:
--font-max=n- Sets the internal
font_maxto n.font_maxis the
maximum internal font number; must not exceed 5000.
Aliases
inipdftex- Equivalent to
pdftex --ini. virpdftex- Equivalent to
pdftex. pdflatex- Equivalent to
pdftex "&pdflatex".
Documentation
For a complete description of pdfTeX, see the the pdfTeX User
Manual, available as file pdftexman.pdf.
Node:tex,
Next:texify,
Previous:pdftex,
Up:Manual Pages
tex
tex is Donald Knuth’s TeX compiler.
Synopsis
tex [option...] [name[.tex]] [command...]
tex [option...] "&format" [command...]
Options
Besides the common command-line switches (see Common Compiler Options), tex supports the following options:
--font-max=n- Sets the internal
font_maxto n.font_maxis the
maximum internal font number; must not exceed 5000.
Aliases
latex- Equivalent to
tex "&latex". initex- Equivalent to
tex --ini. virtex- Equivalent to
tex.
See Also
See texify, for an alternative way to invoke TeX.
Documentation
For a complete description of TeX, see The TeXbook by
Donald E. Knuth.
Node:texify,
Previous:tex,
Up:Manual Pages
texify
texify runs Texinfo or LaTeX input files through TeX
(pdfTeX) in turn until all cross-references are resolved, building
all indices.
Synopsis
texify [option]... file...
The directory containing each file is searched for included files.
The suffix of file is used to determine its language (LaTeX or
Texinfo).
Makeinfo is used to perform Texinfo macro expansion before running
TeX when needed.
Options
-@- Use
@inputinstead ofinput; for preloaded Texinfo. -b--batch- No interaction.
-c--clean- Remove all auxiliary files.
-e--expand- Force macro expansion using makeinfo.
-I dir- Search dir for input files.
-h--help- Display this help and exit successfully.
-l lang--language=lang- Specify the lang of file:
latexortexinfo. --mkidx-option=option- Pass option to the index generator.
-p--pdf- Use pdfTeX or pdfLaTeX for processing.
-q--quiet- No output unless errors (implies
--batch). --run-viewer- Run a viewer on the resulting DVI/PDF file.
-s--silent- Same as
--quiet. -t cmd--texinfo=cmd- Insert cmd after
@setfilenamein copy of input file.
Multiple values accumulate. --tex-option=option- Pass option to (La)(pdf)TeX.
-v--version- Display version information and exit successfully.
--viewer-option=option- Pass option to the viewer.
Environment Variables
The values of the BIBTEX, LATEX (or PDFLATEX),
MAKEINDEX, MAKEINFO, TEX (or PDFTEX), and
TEXINDEX environment variables are used to run those commands, if
they are set.
Aliases
texi2dvi- Equivalent to
texify.
Node:Index,
Previous:Manual Pages,
Up:Top
Index
%d: MakePK Section%f: TeX Section%h: TeX Section%l: TeX Section%m: TeX Section, MakePK Section%R: Search Paths%s: MakeTFM Section, MakePK Section%t: MakePK Section, MakeTFM Section--8bit: bibtex8--additional-directory-trees: Setup Options--allow-unattended-reboot: Setup Options--batch: texify--big: bibtex8--buf-size=n: Common Compiler Options--c-style-errors: Common Compiler Options, mp--clean: TeXifying, texify--csfile file: bibtex8--debug type: bibtex8--dry-run: Setup Options--dump: Standard Dump Files, initexmf--dump=program: initexmf--error-line=n: Common Compiler Options--expand: texify--find-elatex-input FILE: initexmf--find-etex-input FILE: initexmf--find-executable FILE: initexmf--find-lambda-input FILE: initexmf--find-latex-input: Search Paths--find-latex-input FILE: initexmf--find-metafont-input FILE: initexmf--find-metapost-input FILE: initexmf--find-omega-input FILE: initexmf--find-other-executable FILE: initexmf--find-pdflatex-input FILE: initexmf--find-pdftex-input FILE: initexmf--find-tex-input FILE: initexmf--font-max=n: tex, pdftex--half-error-line=n: Common Compiler Options--halt-on-error: Common Compiler Options--help: bibtex8, mp, bibtex, dvicopy, Setup Options, texify, Common Compiler Options--huge: bibtex8--initialize: Common Compiler Options, mp--installation-directory: Setup Options--interaction=mode: 1.20e, Common Compiler Options--job-name=name: Common Compiler Options--job-time=filename: Common Compiler Options--language=lang: texify--list-modes: initexmf--local-directory: Setup Options--local-root: TEXMF Trees--local-root root: initexmf--mag=MAG: dvicopy--max-in-open=n: Common Compiler Options--max-print-line=n: Common Compiler Options--max-strings=n: Common Compiler Options--mcites n: bibtex8--mem-bot=n: Common Compiler Options--mem-max=n: Common Compiler Options--mem-min=n: Common Compiler Options--mem-top=n: Common Compiler Options--mentints n: bibtex8--mentstrs n: bibtex8--mfields n: bibtex8--min-crossrefs=N: bibtex--min_crossrefs n: bibtex8--mkidx-option=option: texify, 1.20e--mkpsres: initexmf, psres, mkpsres--mkpsres=: initexmfdir--mpool n: bibtex8--mstrings n: bibtex8--mwizfuns n: bibtex8--nest-size=n: Common Compiler Options--no-additional-directory-trees: Setup Options--no-local-directory: Setup Options--param-size=n: Common Compiler Options--pdf: texify--personal: initexmf, Personal Configuration File--personal=filename: initexmf--pool-size=n: Common Compiler Options--print-only: initexmf--program-folder: Setup Options--quiet: Common Compiler Options, texify, Suppressing Screen Output, initexmf, 1.20e, Common Compiler Options--reconfigure: initexmf--report: initexmf--root-directories: TEXMF Trees--root-directories dirlist: initexmf--run-viewer: 1.20e, TeXifying, texify--save-size=n: Common Compiler Options--screen: 1.20e--search: initexmf, mkpsres--select=range: dvicopy--silent: texify, Common Compiler Options--src: Source Specials--src-specials: Common Compiler Options--stack-size=n: Common Compiler Options--statistics: bibtex8--string-vacancies=n: Common Compiler Options--tcx=name: Common Compiler Options--terminal=mode: Common Compiler Options--tex-option=option: texify, TeXifying, 1.20e--tex=texprogram: mp--texinfo=cmd: texify--trace: bibtex8--trace=traceflags: Common Compiler Options--traditional: bibtex8--translate-file=name: Common Compiler Options--trie-op-size=n: Common Compiler Options--trie-size=n: Common Compiler Options--try-gz: Common Compiler Options--unattended: Setup Options--undump=name: Common Compiler Options--update-fndb: fndb, initexmf--update-fndb=root: initexmf--verbose: initexmf--version: mp, bibtex8, Common Compiler Options, dvicopy, texify, bibtex, initexmf--viewer-option=option: 1.20e, texify, TeXifying--wolfgang: bibtex8-1: TeXifying-7: bibtex8-8: bibtex8-?: bibtex8-@: texify-B: bibtex8-b: texify-c: dvipdfm, texify-c file: bibtex8-d type: bibtex8-e: dvipdfm, texify-f filename: dvipdfm-h: texify-H: bibtex8-I dir: texify-l: dvipdfm-l lang: texify-M n: bibtex8-m number: dvipdfm-n: initexmf-o filename: dvipdfm-p: initexmf, texify-p papersize: dvipdfm-pfilename: initexmf-q: texify-r dirlist: initexmf-r resolution: dvipdfm-s: TeXifying, texify, bibtex8-s pages: dvipdfm-t: bibtex8-t cmd: texify-u: initexmf-uroot: initexmf-v: bibtex8, dvipdfm, initexmf, texify-V: initexmf-vv: dvipdfm-W: bibtex8-x dimension: dvipdfm-y dimension: dvipdfm-z number: dvipdfm.tcxcharacter translation files: TCX files//: Search Paths- 8-bit characters: TCX files
^^notation, avoiding: TCX files- accented character: TCX files
- Acrobat Reader: Getting, mkpsres
- adding files to the TEXMF tree: fndb, psres
- Administrator: IniTeXMF
- AFM (Adobe Font Metric) files, search path for: MiKTeX Section
AFMPath: MiKTeX Sectionautoexec.bat: Setup Wizard- auxiliary files, removing: TeXifying, texify
- Babel: 1.20e
BASEPath: MiKTeX SectionBIBTEX: texify- blank lines, in TCX files: TCX files
- BMP (Windows Bitmap): Graphics Section, Features
buf_size: Common Compiler Options, Magic Section- character codes, in TCX files: TCX files
- character translation files: TCX files
- codepage: Common Compiler Options
- color interpolation: 1.20e
- color specials: Features
- comments, in TCX files: TCX files
- compressed input files: Features, Common Compiler Options
config.ps: Dvips Section, config.psCONFIGPath: Dvips Section- configuration file: Two Kinds
- configuration file, personal: Personal Configuration File
- configuration report, creating a: initexmf
- Cork encoding and ISO input: TCX files
cp850: Common Compiler Options- CTAN: Getting
- decimal character codes, in TCX files: TCX files
DestDir: MakePK Section, MakeTFM Section- disk space, required: Setup Wizard
dpres.dpr: psres- dump files, creating standard: Standard Dump Files
- DVI files, search path for: Yap Section
- Dvips, configuring: Dvips Section
- Edit-TeX-View-Edit cycle: Source Specials
Editor: TeX Section- Emacs: TeX Section
- emTeX: 1.20e
ENCPath: Dvips Section, MiKTeX Section- error messages, C-style: mp, Common Compiler Options, Suppressing Screen Output
- error messages, length of: Common Compiler Options, Magic Section
error_line: Common Compiler Options, Magic Section- execution time, tracing: MiKTeX Section
EXEPath: MiKTeX Section- FAQ, MiKTeX: Documentation
- features, MiKTeX: TeX, Features
- file accesses, tracing: MiKTeX Section
- file name database, maintaining the: fndb
- file name database, refreshing the: initexmf
- file name databes, tracing the: MiKTeX Section
- file search, tracing: MiKTeX Section
FMTPath: MiKTeX Section- FNDB (file name database): fndb
- font character code, translating: TCX files
- font directories, adding: mkpsres
- font mapping files, search path for: MiKTeX Section
- font supplier: MakePK Section
font_max: pdftex, Magic Section, texfont_mem_size: Magic Section- format files, search path for: MiKTeX Section
- FreeType: 1.20e
- Ghostscript: Getting
- GIF (Graphics Interchange Format): Graphics Section
- graphics, search path for: MiKTeX Section
GraphicsPath: MiKTeX Section, Dvips Sectionhalf_error_line: Magic Section, Common Compiler Options- hex character codes, in TCX files: TCX files
- Hyperref: 1.20e
- HyperTeX specials: Features
- hyphenation patterns, controling loading of: language.dat
- hyphenation patterns, space for: Magic Section
il1-t1.tcx: TCX filesil2-t1.tcx: TCX filesINDEXSTYLE: MakeIndex Section- initexmf: Personal Configuration File
Input Dirs: MetaPost Section, Yap Section, Omega Section, BibTeX Section, pdfTeX Section, METAFONT Section, TeX Section, otp2ocp Section- installation directory: TEXMF Trees, Installation Directory, Directory Tree, Setup Wizard, Two Kinds
- interaction mode, setting TeX’s: Common Compiler Options
- international characters: TCX files
- job name: Common Compiler Options
- keyboard character code, translating: TCX files
- Kleinschmit, Wolfgang: 1.20e
- Knuth, Donald E.: TeX, tex
lambda.fmt: Standard Dump Fileslanguage.dat: language.datLATEX: texifylatex.efmt: Standard Dump Fileslatex.fmt: Standard Dump Filesljfour: config.ps- local directory: Local Directory, Setup Wizard, Directory Tree, TEXMF Trees
- local directory, defining the: TEXMF Trees
log files, Setup Wizard: Installation Directory- long file names: Features, 1.20e
- long file names, quoting of: Quoted File Names
- mailing list, MiKTeX: Mailing Lists
MAKEINDEX: texifyMAKEINFO: texifyMAPPath: Dvips Section, MiKTeX Sectionmax_in_open: Common Compiler Options, Magic Sectionmax_print_line: Common Compiler Options, Magic Sectionmax_strings: Common Compiler Options, Magic Section- Mekeindex, configuring: MakeIndex Section
mem_bot: Magic Section, Common Compiler Optionsmem_max: Magic Section, Common Compiler Optionsmem_min: Magic Section, Common Compiler Optionsmem_top: Common Compiler Options, Magic Section- memory allocation, dynamic: Magic Section
MEMPath: MiKTeX Section- METAFONT: METAFONT Section, 1.20e
- METAFONT base files, search path for: MiKTeX Section
- METAFONT mode: config.ps, MakePK Section
- MetaPost: MetaPost Section, mp
- MiKTeX Compiler Driver: TeXifying, texify
miktex.ini: Two Kinds, Installation Directorymiktex.map: Installation Directorymin_crossrefs: BibTeX Section, bibtexmodes.mf: config.psnest_size: Common Compiler Options, Magic Section- network installation: Features
OCPPath: Omega Section- octal character codes, in TCX files: TCX files
- OEM mode: Common Compiler Options
OFMPAth: MiKTeX Section- Omega, configuring: Omega Section
omega.fmt: Standard Dump Files- output file, setting name of: Common Compiler Options
OVFPath: MiKTeX Section- paper size: config.ps
param_size: Magic Section, Common Compiler OptionsPATH: UnInstall, Setup Wizard- PCX: Graphics Section
- PDF, creating: dvipdfm, texify, pdftex, TeXifying
PDFLATEX: texifypdflatex.fmt: Standard Dump Files- pdfTeX: 1.20e
PDFTEX: texify- pdfTeX, configuring: pdfTeX Section
pdftex.fmt: Standard Dump Files- Perl: Getting
- PK (Packed Raster Font): MakePK Section
- PK files, search path for: MiKTeX Section
PKPath: MiKTeX Sectionplain.base: Standard Dump Filesplain.efmt: Standard Dump Filesplain.fmt: Standard Dump Filesplain.mem: Standard Dump Files- PNG (Portable Network Graphics): Graphics Section
pool_size: Common Compiler Options, Magic Section- PostScrip resource database, maintaining the: psres
- PostScript: Getting, dvips
- PostScript header files, search path for: MiKTeX Section
- printable characters, specifying: TCX files
- processes, tracing: MiKTeX Section
- Project Page, MiKTeX: Project Page
PSPath: pdfTeX Section, Dvips Section, MiKTeX Section- PSres (PostScript resource database): psres
PSResPath: ps2pk Section- quoted file names: Quoted File Names
- read-only media, installing on: Setup Wizard
- Registry: UnInstall
- removing files from the TEXMF tree: fndb, psres
- resolution: MakePK Section, config.ps
- root directories, defining: TEXMF Trees
save_size: Common Compiler Options, Magic Section- screen output, suppressing: Suppressing Screen Output, texify, Common Compiler Options, initexmf
- screen output, witdh of: Magic Section
- search paths, specifying: Search Paths
- Setup Wizard: Setup Wizard
setupwiz.opt: Setup Options- source specials: Features, Source Specials
- source specials, inserting: Source Specials, Common Compiler Options
- spaces in file names: Quoted File Names
- spaces, in file names: 1.20e
stack_size: Common Compiler Options, Magic Section- start menu, Windows: Start Menu
string_vacancies: Common Compiler Options, Magic Section- T1 encoding and ISO input: TCX files
- TCX (character translation): Features
TCXcharacter translation files: TCX files- TCX files, processing: Common Compiler Options
- TCX files, search path for: MiKTeX Section
- TCX files, syntax of: TCX files
- TCX files, tracing: MiKTeX Section
TCXPath: MiKTeX SectionTCXPath, search path for TCX files: TCX files- TDS (TeX directory structure): Directory Tree, Features
- terminal mode, setting: Common Compiler Options
TEX: mp, texify- TeX input files, search path for: TeX Section
- TeX, configuring: TeX Section
TEXINDEX: texify- Texinfo: texify, 1.20e, Standard Dump Files
texinfo.fmt: Standard Dump Files- TeXLive: Setup Wizard
texmf0.fndb: fndbtexmf1.fndb: fndb- TFM (TeX Font Metrics): MakeTFM Section
- TFM files, search path for: MiKTeX Section
TFMPath: MiKTeX Section- TGA (TrueVision Targa): Graphics Section
- thumbnails: 1.20e
- TIFF (Tagged Image File Format): Graphics Section
- Tips & Tricks, MiKTeX: Documentation
Trace: MiKTeX SectionTraceFile: MiKTeX Section- tracing: Common Compiler Options, MiKTeX Section
trie_op_size: Common Compiler Options, Magic Sectiontrie_size: Common Compiler Options, Magic Section- TrueType fonts, search path for: MiKTeX Section
TTFPath: MiKTeX Section- TtH: 1.20e
- Type1 fonts, search path for: MiKTeX Section
Type1Path: MiKTeX Section- UNC (Universal Naming Code): Features
- uninstalling MiKTeX: UnInstall
VFPath: MiKTeX Section- virtual fonts, search path for: MiKTeX Section
- whitespace, in TCX files: TCX files
- Windows NT: Setup Wizard
- WinEdt: Getting, TeX Section
- WMF (Windows Metafile): Features
- Yap: 1.20e
- Yap, configuring: Yap Section
Table of Contents
- MiKTeX Manual, revision 1.20e
- What is MiKTeX?
- MiKTeX Features
- How to get MiKTeX
- The MiKTeX Project Page
- The MiKTeX Mailing List
- Documentation
- What’s new in MiKTeX 1.20e?
- Installing MiKTeX
- Running the Setup Wizard
- Setup Options
- Items in the Start menu
- The TEXMF Directory Hierarchy
- Installation Directory
- Local Directory
- Removing MiKTeX
- Running the Setup Wizard
- Configuring MiKTeX
- The MiKTeX Configuration Utility
- Defining TEXMF Root Directories
- Maintaining the file name database
- Maintaining the PostScript resource database
- Incorporating External Font Directories
- Making Standard Dump Files
- Controlling which hyphenation patterns are used by LaTeX
- Personal Configuration File
- The MiKTeX Configuration File
- The Two Kinds of Configuation Files
- How to specify search paths
- Contents of a MiKTeX Configuration File
- [BibTeX]: BibTeX Configuration Settings
- [Dvips]: Dvips Configuration Settings
- [Graphics]: Graphics Conversion Rules
- [Magic]: Memory Settings for TeX & Friends
- [MakeIndex]: MakeIndex Configuration Settings
- [MakePK]: MakePK Configuration Settings
- [MakeTFM]: MakeTFM Configuration Settings
- [METAFONT]: METAFONT Configuration Settings
- [MetaPost]: MetaPost Related Configuration Settings
- [MiKTeX]: General Configuration Settings
- [Omega]: Omega Configuration Settings
- [otp2ocp]:
otp2ocpConfiguration Settings - [pdfTeX]: pdfTeX Configuration Settings
- [ps2pk]:
ps2pkConfiguration Settings - [TeX]: TeX Configuration Settings
- [Yap]: Yap Configuration Settings
- The Dvips Configuration File
- The MiKTeX Configuration Utility
- Non-standard TeX Features
- Suppressing Screen Output
- Auto-insertion of Source Specials
- Quoted File Names
- TCX files: Character translations
- TeXify: The MiKTeX Compiler Driver
- Manual Pages
- Common Compiler Options
- bibtex
- bibtex8
dvicopydvipdfmdvipsinitexmf(MiKTeX Configuration Utility)mp(MetaPost)omegapdftextextexify
- Index
Footnotes
-
CTAN:
Comprehensive TeX Archive Network