Table Of Contents
- Kivy Basics
- Installation of the Kivy environment
- Create an application
- Kivy App Life Cycle
- Running the application
- Customize the application
Installation of the Kivy environment
Kivy depends on many libraries, such as SDL2, gstreamer, PIL,
Cairo, and more. They are not all required, but depending on the
platform you’re working on, they can be a pain to install. To ease your
development process, we provide pre-packaged binaries for Windows, macOS and Linux.
Have a look at one of these pages for detailed installation instructions:
-
Installation on Windows
-
Installation on macOS
-
Installation on Linux
-
Installation on Raspberry Pi
Alternatively, instructions for the development version can be found here:
-
Development install
Create an application
Creating a kivy application is as simple as:
-
sub-classing the
Appclass -
implementing its
build()method so it returns a
Widgetinstance (the root of your widget tree) -
instantiating this class, and calling its
run()
method.
Here is an example of a minimal application:
import kivy
kivy.require('2.1.0') # replace with your current kivy version !

from kivy.app import App
from kivy.uix.label import Label


class MyApp(App):

    def build(self):
        return Label(text='Hello world')


if __name__ == '__main__':
    MyApp().run()
You can save this to a text file, main.py for example, and run it.
Kivy App Life Cycle
First off, let’s get familiar with the Kivy app life cycle.
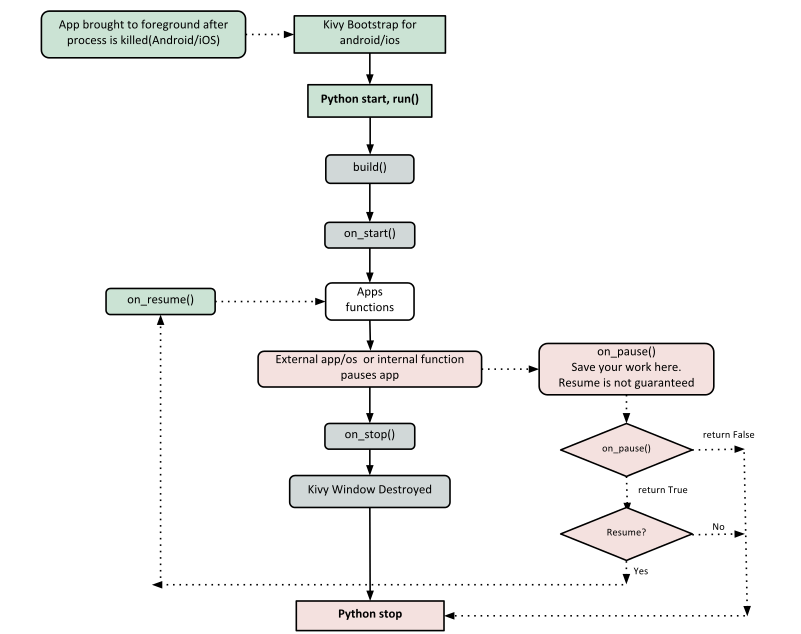
As you can see above, for all intents and purposes, our entry point into our App
is the run() method, and in our case that is “MyApp().run()”. We will get back
to this, but let’s start from the line:
It’s required that the base Class of your App inherits from the App class.
It’s present in the kivy_installation_dir/kivy/app.py.
Note
Go ahead and open up that file if you want to delve deeper into what the
Kivy App class does. We encourage you to open the code and read through it.
Kivy is based on Python and uses Sphinx for documentation, so the
documentation for each class is in the actual file.
Similarly on line 5:
from kivy.uix.label import Label
One important thing to note here is the way packages/classes are laid out. The
uix module is the section that holds the user interface elements
like layouts and widgets.
Moving on to line 8:
This is where we are defining the Base Class of our Kivy App. You should only
ever need to change the name of your app MyApp in this line.
Further on to line 10:
As highlighted by the image above, show casing the Kivy App Life Cycle, this
is the function where you should initialize and return your Root Widget. This
is what we do on line 11:
return Label(text='Hello world')
Here we initialize a Label with text ‘Hello World’ and return its instance.
This Label will be the Root Widget of this App.
Note
Python uses indentation to denote code blocks, therefore take note that in
the code provided above, at line 11 the class and function definition ends.
Now on to the portion that will make our app run at line 14 and 15:
if __name__ == '__main__':
    MyApp().run()
Here the class MyApp is initialized and its run() method called. This
initializes and starts our Kivy application.
Running the application
To run the application, follow the instructions for your operating system:
For Windows, Linux, macOS, or the RPi. From the terminal
where you installed Kivy simply run:
For Android or iOS, your application needs some complementary files to be able to run.
See Create a package for Android or See Create a package for iOS for further reference.
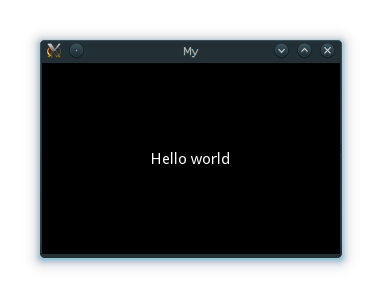
A window should open, showing a single Label (with the Text ‘Hello World’) that
covers the entire window’s area. That’s all there is to it.
Customize the application
Lets extend this application a bit, say a simple UserName/Password page.
from kivy.app import App
from kivy.uix.gridlayout import GridLayout
from kivy.uix.label import Label
from kivy.uix.textinput import TextInput


class LoginScreen(GridLayout):

    def __init__(self, **kwargs):
        super(LoginScreen, self).__init__(**kwargs)
        self.cols = 2
        self.add_widget(Label(text='User Name'))
        self.username = TextInput(multiline=False)
        self.add_widget(self.username)
        self.add_widget(Label(text='password'))
        self.password = TextInput(password=True, multiline=False)
        self.add_widget(self.password)


class MyApp(App):

    def build(self):
        return LoginScreen()


if __name__ == '__main__':
    MyApp().run()
At line 2 we import a Gridlayout:
from kivy.uix.gridlayout import GridLayout
This class is used as a Base for our Root Widget (LoginScreen) defined
at line 7:
class LoginScreen(GridLayout):
At line 9 in the class LoginScreen, we override the method
__init__() so as to add widgets and to define their
behavior:
def __init__(self, **kwargs):
    super(LoginScreen, self).__init__(**kwargs)
One should not forget to call super in order to implement the functionality of
the original class being overloaded. Also note that it is good practice not to
omit the **kwargs while calling super, as they are sometimes used internally.
Moving on to Line 11 and beyond:
self.cols = 2
self.add_widget(Label(text='User Name'))
self.username = TextInput(multiline=False)
self.add_widget(self.username)
self.add_widget(Label(text='password'))
self.password = TextInput(password=True, multiline=False)
self.add_widget(self.password)
We ask the GridLayout to manage its children in two columns and add a
Label and a TextInput
for the username and password.
Running the above code will give you a window that should look like this:
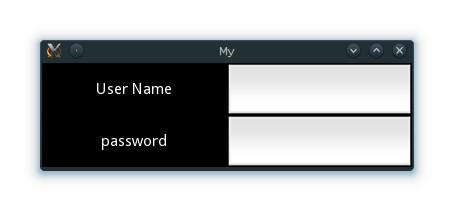
Try re-sizing the window and you will see that the widgets on screen adjust
themselves according to the size of the window without you having to do
anything. This is because widgets use size hinting by default.
The code above doesn’t handle the input from the user, does no validation or
anything else. We will delve deeper into this and Widget
size and positioning in the coming sections.
Appendix
The appendix contains licensing information and an enumeration of all the
different modules, classes, functions and variables available in Kivy.
License
Kivy is released and distributed under the terms of the MIT license starting
version 1.7.2. Older versions are still under the LGPLv3.
You should have received a copy of the MIT license alongside your Kivy
distribution. See the LICENSE file in the Kivy root folder. An online version
of the license can be found at:
In a nutshell, the license allows you to use Kivy in your own projects
regardless of whether they are open source, closed source, commercial or free.
Even if the license doesn’t require it, we would really appreciate when you
make changes to the Kivy sourcecode itself, share those changes with us!
For a list of authors, please see the file AUTHORS that accompanies the
Kivy source code distribution (next to LICENSE).
Kivy – Copyright 2010-2022, The Kivy Authors.
Время на прочтение
22 мин
Количество просмотров 74K

Буквально статью тому назад, большинством голосов, было решено начать серию уроков по созданию аналога нативного приложения, написанного для Android на Java, но с помощью фреймворка Kivy + Python. Будет рассмотрено: создание и компоновка контроллов и виджетов, углубленное исследование техники разметки пользовательского интерфейса в Kv-Language, динамическое управление элементами экранов, библиотека, предоставляющая доступ к Android Material Design, и многое другое…
Заинтересовавшихся, прошу под кат!
Итак, после безуспешных поисков подопытного кролика подходящего приложения, в меру сложного (чтобы не растягивать наш туториал до масштабов Санты Барбары) и не слишком простого (дабы осветить как можно больше технических аспектов Kivy разработки), по совету хабровчанина Roman Hvashchevsky, который согласился выступить Java консультантом наших уроков (иногда в статьях я буду приводить листинги кода оригинала, написанного на Java), я был переадресован вот сюда — и выбор был сделан:
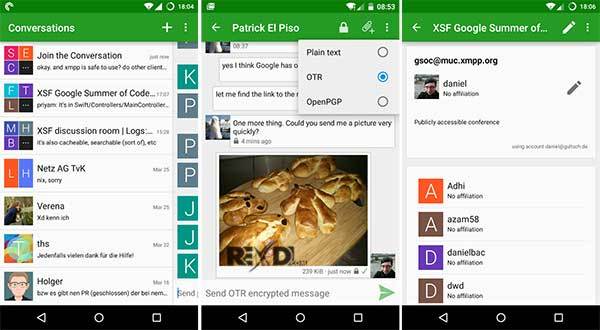
Conversations — приложение для обмена мгновенными сообщениями для Android, используещее XMPP/Jabber протокол. Альтернатива таким программам, как WhatsApp, WeChat, Line, Facebook Messenger, Google Hangouts и Threema.
Именно на основе данного приложения будут построены наши уроки, а ближе к релизу к концу финальной статьи у нас будет свой пресмыкающийся земноводно-фруктовый тондем питона, жабы и фрукта Jabber-Python-Kivy — PyConversations и заветная apk-шечка, собранная с Python3!
Надеюсь, чаем и сигаретами вы запаслись, потому что мы начинаем! Как всегда, вам понадобиться, если еще не обзавелись, Мастер создания нового проекта для Kivy приложений. Клонируйте его в своих лабораториях, откройте корневую директорию мастера в терминале и выполните команду:
python3 main.py PyConversations путь/к/месту/расположения/создаваемого/проекта -repo https://github.com/User/PyConversations -autor Easy -mail gorodage@gmail.comЕстественно, сам фреймворк Kivy, об установке которого можно прочитать здесь. Ну, а замечательную библиотеку KivyMD для создания нативного интерфейса в стиле Android Material Design вы, конечно же, уже нашли по ссылке в репозитории Мастера создания нового проекта.
Теперь отправляйтесь на PornHub github и форкните/ клонируйте/скачайте репу PyConversations, потому что проект, который мы с вами затеяли, будет не маленький, и по ходу выхода новых статей, он будет обрастать новыми функциями, классами и файлами. В противном случае, уже во второй статье вы будете курить бамбук недоумевать, почему у вас ничего не работает.
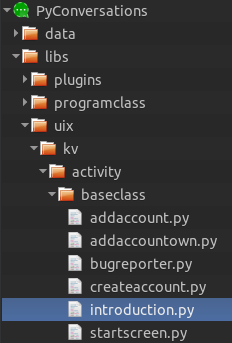
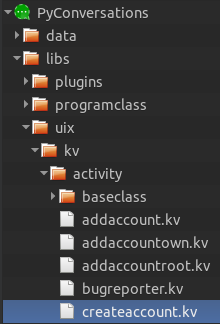
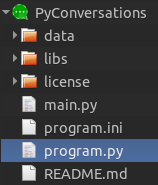
Итак, проект создан:
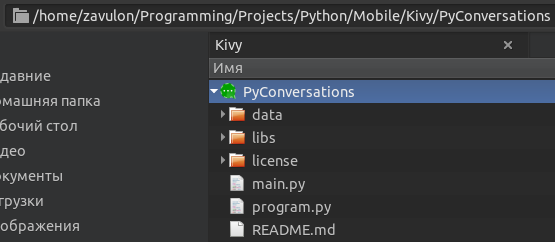
Для сегодняшней статьи я взял первые четыре Activity официального приложения Conversations (Activity регистарции нового аккаунта), которые мы с вами сейчас будем создавать:
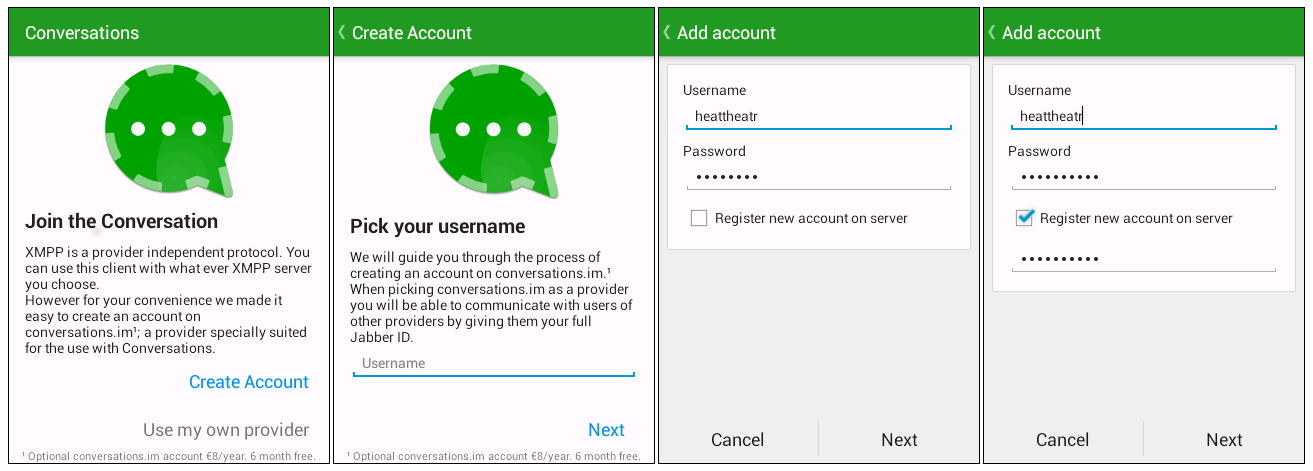
Однако прежде, чем начать, чтобы мы с вами понимали друг друга, вам стоит ознакомиться с базовыми правилами и понятиями…
Создание и управление динамическими классами
Базовое представление динамического класса на простом примере:
from kivy.app import App
from kivy.uix.boxlayout import BoxLayout
from kivy.lang import Builder
from kivy.properties import StringProperty

Builder.load_string('''
#: import MDFlatButton kivymd.button.MDFlatButton

# Данные инструкции в Kivy-Language аналогичны импорту в python сценариях:
# from kivymd.button import MDFlatButton
#
# В kv-файле вы можете включать другие файлы разметки,
# если интерфейс, например, слишком сложный: #: include your_kv_file.kv
#
# Стандартные виджеты и контроллы, предоставляемые Kivy из коробки,
# не нужно импортировать в Activity — просто используйте их.

# Все элементы данного Activity будут располагаться в BoxLayout -
# виджете, от которого унаследован базовый класс.
<StartScreen>

    MDFlatButton:
        id: button
        text: 'Press Me'
        size_hint_x: 1  # относительная ширина контролла - от 0 до 1
        pos_hint: {'y': .5}  # положение контролла относительно вертикали 'y' корневого виджета

        # Событие контролла.
        on_release:
            # Ключевое слово 'root' - это инстанс базового класса разметки,
            # через который вы можете получить доступ ко всем его методам и атрибутам.
            root.set_text_on_button()
''')
# Или Builder.load_file('path/to/kv-file'),
# если разметка Activity находится в файле.

class StartScreen(BoxLayout):
    '''Базовый класс.'''

    new_text_for_button = StringProperty()
    # В Kivy вы должны явно указывать тип атрибутов:
    #
    # StringProperty;
    # NumericProperty;
    # BoundedNumericProperty;
    # ObjectProperty;
    # DictProperty;
    # ListProperty;
    # OptionProperty;
    # AliasProperty;
    # BooleanProperty;
    # ReferenceListProperty;
    #
    # в противном случае вы получите ошибку
    # при установке значений этих атрибутов.
    #
    # Например, если не указывать тип:
    #
    # new_text_for_button = ''
    #
    # будет возбуждено исключение -
    # TypeError: object.__init__() takes no parameters.

    def set_text_on_button(self):
        self.ids.button.text = self.new_text_for_button
        # ids - это словарь всех объектов Activity
        # которым назначен идентификатор.
        #
        # Так, обратившись через идентификатор 'button' - self.ids.button -
        # к объекту кнопки, мы получаем доступ
        # ко всем его методам и атрибутам.

    # Любой атрибут, инициализировванный как Properties,
    # автоматически получает метод в базовом классе с префиксом 'on_',
    # который будет вызван как только данный атрибут получит новое значение.
    def on_new_text_for_button(self, instance, value):
        print(instance, value)

class Program(App):
    def build(self):
        '''Метод, вызываемый при старте программы.
        Должен возвращать объект создаваемого Activity.'''

        return StartScreen(new_text_for_button='This new text')

if __name__ in ('__main__', '__android__'):
    Program().run()  # запуск приложения
Ссылаемся на собственные атрибуты и методы внутри Activity:
from kivy.app import App
from kivy.uix.boxlayout import BoxLayout
from kivy.lang import Builder
from kivy.properties import StringProperty

Builder.load_string('''
#: import MDFlatButton kivymd.button.MDFlatButton

<StartScreen>

    MDFlatButton:
        id: button
        text: 'Press Me'
        size_hint_x: 1
        pos_hint: {'y': .5}

        on_release:
            # Через ключево слово 'self' мы можем ссылаться
            # на собственые атрибуты и методы текущего виджета.
            self.text = root.new_text_for_button
''')

class StartScreen(BoxLayout):
    new_text_for_button = StringProperty()

    def on_new_text_for_button(self, instance, value):
        print(instance, value)

class Program(App):
    def build(self):
        return StartScreen(new_text_for_button='This new text')

if __name__ in ('__main__', '__android__'):
    Program().run()
Использование id контроллов и виджетов внутри Activity:
from kivy.app import App
from kivy.uix.boxlayout import BoxLayout
from kivy.lang import Builder
from kivy.properties import StringProperty

Builder.load_string('''
#: import MDFlatButton kivymd.button.MDFlatButton

<StartScreen>
    orientation: 'vertical'

    MDFlatButton:
        id: button
        text: 'Press Me'
        size_hint: 1, 1
        pos_hint: {'center_y': .5}

        on_release:
            # Получаем доступ через id к атрибутам и методам второй кнопки.
            # Обратите внимание, что внутри разметки мы можем выполнять код Python
            # точно так, как и в обычном Python сценарии.
            button_two.text = 'Id: "button_two: " {}'.format(root.new_text_for_button)

    MDFlatButton:
        id: button_two
        text: 'Id: "button_two: " Old text'
        size_hint: 1, 1
        pos_hint: {'center_y': .5}
''')

class StartScreen(BoxLayout):
    new_text_for_button = StringProperty()

class Program(App):
    def build(self):
        return StartScreen(new_text_for_button='This new text')

if __name__ in ('__main__', '__android__'):
    Program().run()
Использование методов с префиксом ‘on_’ внутри Activity:
from kivy.app import App
from kivy.uix.boxlayout import BoxLayout
from kivy.lang import Builder
from kivy.properties import StringProperty

Builder.load_string('''
#: import MDFlatButton kivymd.button.MDFlatButton
#: import snackbar kivymd.snackbar

<StartScreen>
    orientation: 'vertical'

    MDFlatButton:
        id: button
        text: 'Press Me'
        size_hint: 1, 1
        pos_hint: {'center_y': .5}

        on_release:
            button_two.text = 'Id: "button_two: " {}'.format(root.new_text_for_button)

    MDFlatButton:
        id: button_two
        text: 'Id: "button_two: " Old text'
        size_hint: 1, 1
        pos_hint: {'center_y': .5}

        on_text:
            # Событие на изменения значения атрибута 'text'.
            snackbar.make('О, Боже! Мой текст только что изменили!')
''')

class StartScreen(BoxLayout):
    new_text_for_button = StringProperty()

class Program(App):
    def build(self):
        return StartScreen(new_text_for_button='This new text')

if __name__ in ('__main__', '__android__'):
    Program().run()
Использование аттрибутов и методов из главного класса приложения внутри Activity:
from kivy.app import App
from kivy.uix.boxlayout import BoxLayout
from kivy.lang import Builder
from kivy.properties import StringProperty

Builder.load_string('''
#: import MDFlatButton kivymd.button.MDFlatButton

<StartScreen>
    MDFlatButton:
        # Через лкючевое слово 'app' — экземпляр приложения -
        # получаем доступ к методам и атрибутам,
        # инициальзированным в главном классе приложения,
        # унаследованном от kivy.app.App.
        text: app.string_attribute
        size_hint_x: 1
        pos_hint: {'y': .5}
''')

class StartScreen(BoxLayout):
    pass

class Program(App):
    string_attribute = StringProperty('String from App')

    def build(self):
        return StartScreen()

if __name__ in ('__main__', '__android__'):
    Program().run()
Использование Activity без корневого класса:
from kivy.app import App
from kivy.lang import Builder

Activity = '''
<MyScreen@FloatLayout>:

    Label:
        text: 'Text 1'

BoxLayout:
    MyScreen:
'''

class Program(App):
    def build(self):
        return Builder.load_string(Activity)

if __name__ in ('__main__', '__android__'):
    Program().run()
Использование ids в Activity без корневого класса:
from kivy.app import App
from kivy.lang import Builder

Activity = '''
#: import MDFlatButton kivymd.button.MDFlatButton

# Обратите внимание, если мы не используем базовый класс,
# мы должны указать, базовый виджет. В текущем примере - FloatLayout.
<MyScreen@FloatLayout>:
    Label:
        id: label_1
        text: 'Text 1'

BoxLayout:
    orientation: 'vertical'

    MyScreen:
        id: my_screen

    MDFlatButton:
        text: 'Press me'
        size_hint_x: 1

        on_press:
            my_screen.ids.label_1.text = 'New text'
'''

class Program(App):
    def build(self):
        return Builder.load_string(Activity)

if __name__ in ('__main__', '__android__'):
    Program().run()
Для понимания того, о чем я буду рассказывать далее, этого пока достаточно, остальное буду объяснять в окопе по дороге. Что ж, давайте начнем со стартового Activity нашего проекта. Откройте файл start_screen.kv. В дереве проекта он, как все остальные Activity приложения, размещается в директории libs/uix/kv/activity:
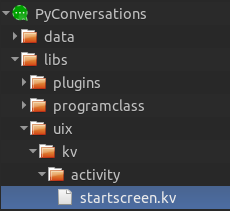
И Activity выглядит так:
#: kivy 1.9.1
#: import Toolbar kivymd.toolbar.Toolbar
#: import NoTransition kivy.uix.screenmanager.NoTransition
<StartScreen>:
orientation: 'vertical'
Toolbar:
id: action_bar
background_color: app.theme_cls.primary_color # цвет установленной темы
title: app.title
opposite_colors: True # черная либо белая иконка
elevation: 10 # длинна тени
# Иконки слева -
# left_action_items: [['name-icon', function], …]
# Иконки справа -
# right_action_items: [['name-icon', function], …]
ScreenManager:
id: root_manager
transition: NoTransition() # эффект смены Activity
Introduction:
id: introduction
# Вызывается при выводе текущего Activity на экран.
on_enter: self._on_enter(action_bar, app)
CreateAccount:
id: create_account
on_enter: self._on_enter(action_bar, app, root_manager)
AddAccount:
id: add_account
on_enter: self._on_enter(action_bar, app)
# Вызывается при закрытии текущего Activity.
on_leave: action_bar.title = app.data.string_lang_create_account
AddAccountOwn:
id: add_account_own_provider
on_enter: self._on_enter(action_bar, app, root_manager)
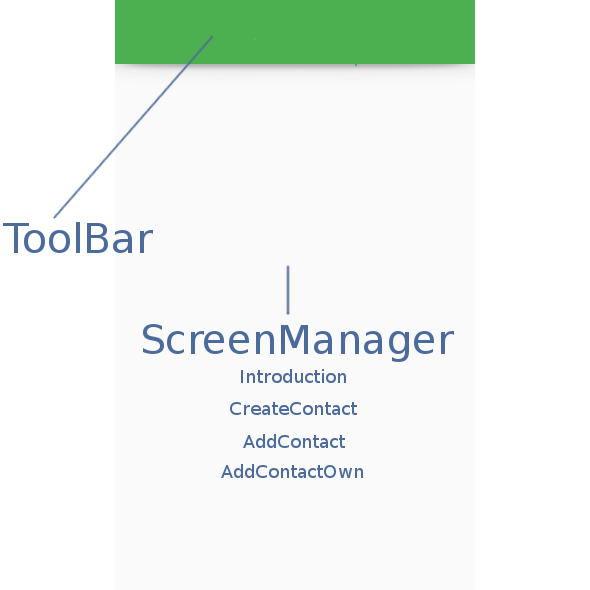
on_leave: action_bar.title = app.title; action_bar.left_action_items = []А вот более наглядно:
Теперь откроем базовый класс Activity StartScreen, который находится по пути libs/uix/kv/activity/baseclass:
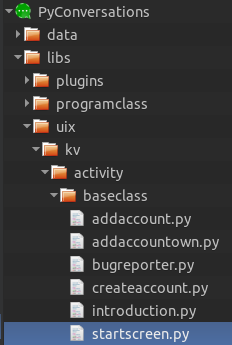
startscreen.py:
from kivy.uix.boxlayout import BoxLayout

class StartScreen(BoxLayout):
    pass
Как видите, класс пуст, но унаследован от контейнера BoxLayout, который размещает в себе виджеты вертикально, либо горизонтально в зависимости от параметра ‘orientation’ — ‘vertical’ или ‘horizontal’ (по умолчанию — ‘horizontal’). Вот еще более подробная схема Activity StartScreen:
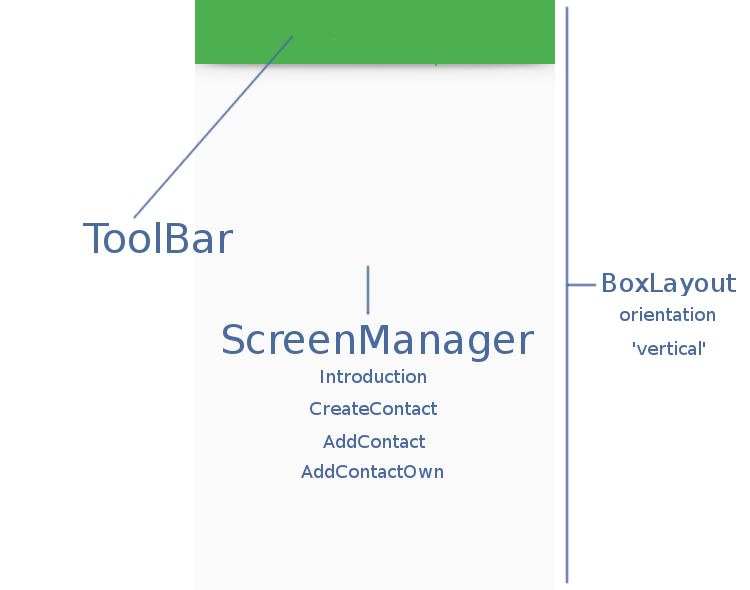
Базовый класс Activity StartScreen, мы унаследовали от BoxLayout, в самой разметке объявили его ориентацию как нетрадиционную вертикальную, и поместили в его контейнер ToolBar и менеджер экранов ScreenManager. ScreenManager — это тоже своего рода контейнер, в который мы помещаем экраны Screen с созданными Activity и в дальнейшем устанавливаем их на экран просто нызывая их по именам. Например:
from kivy.app import App
from kivy.lang import Builder

Activity = '''
#: import MDFlatButton kivymd.button.MDFlatButton

ScreenManager:

    Screen:
        name: 'Screen one'  # имя экрана

        MDFlatButton:
            text: 'I`m Screen one with Button'
            size_hint: 1, 1
            on_release:
                root.current = 'Screen two'  # смена экрана

    Screen:
        name: 'Screen two'

        BoxLayout:
            orientation: 'vertical'

            Image:
                source: 'data/logo/kivy-icon-128.png'

            MDFlatButton:
                text: 'I`m Screen two with Button'
                size_hint: 1, 1
                on_release: root.current = 'Screen one'
'''

class Program(App):
    def build(self):
        return Builder.load_string(Activity)

if __name__ in ('__main__', '__android__'):
    Program().run()
Наш ScreenManager содержит четыре экрана с Activity: Introduction, CreateAccount, AddAccount и AddAccountOwn. Начнем с первого:
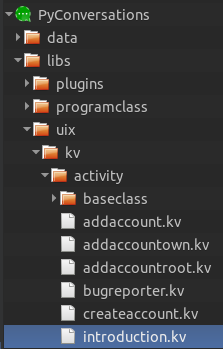
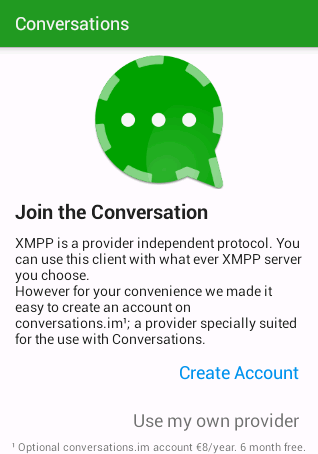
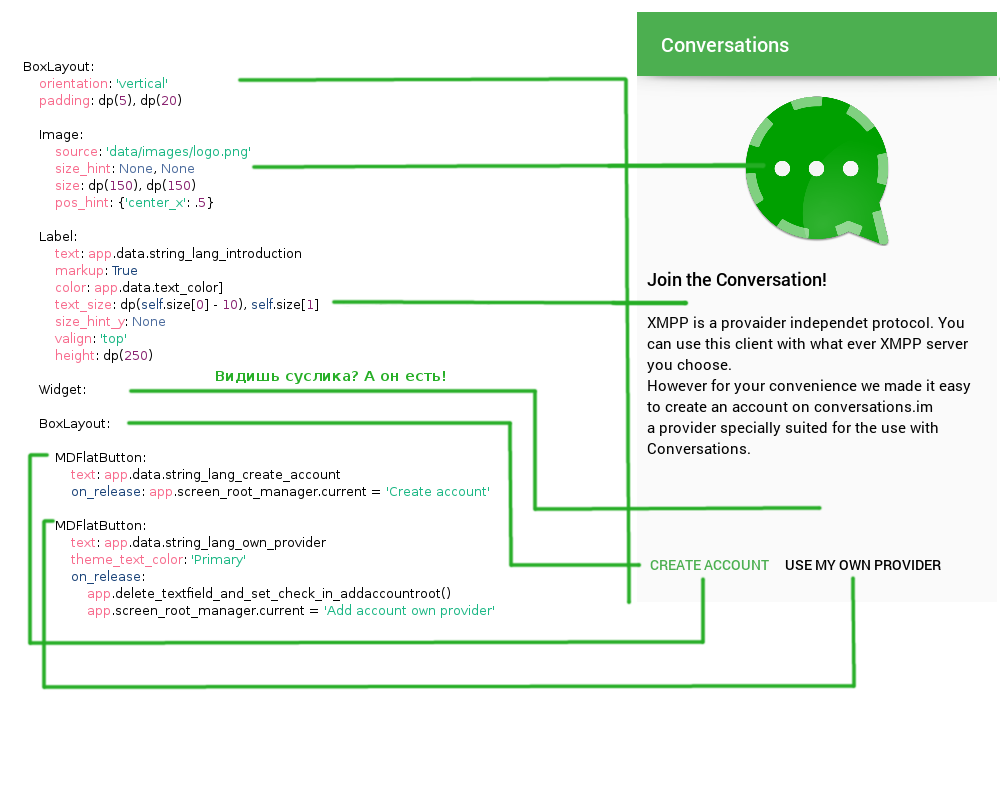
Introduction.kv
#: kivy 1.9.1
#: import MDFlatButton kivymd.button.MDFlatButton

# Стартовое Activity приложения.

<Introduction>:
    name: 'Start screen'

    BoxLayout:
        orientation: 'vertical'
        padding: dp(5), dp(20)

        Image:
            source: 'data/images/logo.png'
            size_hint: None, None
            size: dp(150), dp(150)
            pos_hint: {'center_x': .5}

        Label:
            text: app.data.string_lang_introduction
            markup: True
            color: app.data.text_color
            text_size: dp(self.size[0] - 10), self.size[1]
            size_hint_y: None
            valign: 'top'
            height: dp(250)

        Widget:

        BoxLayout:

            MDFlatButton:
                text: app.data.string_lang_create_account
                on_release: app.screen_root_manager.current = 'Create account'

            MDFlatButton:
                text: app.data.string_lang_own_provider
                theme_text_color: 'Primary'
                on_release:
                    app.delete_textfield_and_set_check_in_addaccountroot
()
                    app.screen_root_manager.current = 'Add account own provider'
Вот, что представляет данное Activity на экране устройства (я позволил себе некоторые вольности, но, мне показалось, так будет лучше):

Вот оригинал на Java:
Оригинальная разметка Activity в Java
<?xml version="1.0" encoding="utf-8"?>
<ScrollView xmlns:android="http://schemas.android.com/apk/res/android"
            android:layout_width="match_parent"
            android:layout_height="match_parent"
            android:fillViewport="true">
    <RelativeLayout
        android:layout_width="match_parent"
        android:layout_height="match_parent"
        android:background="?attr/color_background_primary">

        <LinearLayout
            android:id="@+id/linearLayout"
            android:layout_width="match_parent"
            android:layout_height="wrap_content"
            android:layout_alignParentBottom="true"
            android:layout_alignParentLeft="true"
            android:layout_alignParentStart="true"
            android:minHeight="256dp"
            android:orientation="vertical"
            android:paddingBottom="10dp"
            android:paddingLeft="16dp"
            android:paddingRight="16dp">
            <Space
                android:layout_width="match_parent"
                android:layout_height="0dp"
                android:layout_weight="1"/>
            <TextView
                android:layout_width="wrap_content"
                android:layout_height="wrap_content"
                android:text="@string/welcome_header"
                android:textColor="?attr/color_text_primary"
                android:textSize="?attr/TextSizeHeadline"
                android:textStyle="bold"/>
            <TextView
                android:layout_width="wrap_content"
                android:layout_height="wrap_content"
                android:layout_marginTop="8dp"
                android:text="@string/welcome_text"
                android:textColor="?attr/color_text_primary"
                android:textSize="?attr/TextSizeBody"/>
            <Button
                android:id="@+id/create_account"
                style="?android:attr/borderlessButtonStyle"
                android:layout_width="wrap_content"
                android:layout_height="wrap_content"
                android:layout_gravity="right"
                android:text="@string/create_account"
                android:textColor="@color/accent"/>
            <Button
                android:id="@+id/use_own_provider"
                style="?android:attr/borderlessButtonStyle"
                android:layout_width="wrap_content"
                android:layout_height="wrap_content"
                android:layout_gravity="right"
                android:text="@string/use_own_provider"
                android:textColor="?attr/color_text_secondary"/>
        </LinearLayout>
        <RelativeLayout
            android:layout_width="match_parent"
            android:layout_height="match_parent"
            android:layout_above="@+id/linearLayout"
            android:layout_alignParentLeft="true"
            android:layout_alignParentStart="true"
            android:layout_alignParentTop="true">
            <ImageView
                android:layout_width="wrap_content"
                android:layout_height="wrap_content"
                android:layout_centerHorizontal="true"
                android:layout_centerVertical="true"
                android:padding="8dp"
                android:src="@drawable/main_logo"/>
        </RelativeLayout>
        <TextView
            android:paddingLeft="8dp"
            android:paddingRight="8dp"
            android:layout_width="wrap_content"
            android:layout_height="wrap_content"
            android:layout_alignParentBottom="true"
            android:textColor="?attr/color_text_secondary"
            android:textSize="@dimen/fineprint_size"
            android:maxLines="1"
            android:text="@string/free_for_six_month"
            android:layout_centerHorizontal="true"/>
    </RelativeLayout>
</ScrollView>
Ниже приводится схема Activity Introduction:
Теперь хотелось бы пройти по атрибутам виджетов:
BoxLayout:
    …

    padding: dp(5), dp(20)  # отступы контента от краев контейнера — слева/справа и сверху/снизу
Image:
…
# Как следует из имени параметра,это подсказка - относительный
# размер виджета от 0 до 1 (.1, .5, .01 и т. д.). Если мы желаем
# указать конкретные размеры, мы должны задать в size_hint
# значения в None, после чего указать фиксированый размер.
# Например, укажем ширину изображения:
#
# size_hint_x: None
# width: 250
#
# или высоту
#
# size_hint_y: None
# height: 50
#
# или, как в коде Activity, и ширину и высоту сразу.
# По умолчанию параметр size_hint имеет значения (1, 1),
# то есть, занимает всю доступную ему в контейнере площадь.
size_hint: None, None
size: dp(150), dp(150)
# Относительное положение виджета от ценра по оси 'x'
# Также есть 'жестское' положение, которое задается в параметре
# pos, например, pos: 120, 90.
pos_hint: {'center_x': .5}С относительными положениями и размерами виджета можете поэкспериментировать на примере ниже:
from kivy.app import App
from kivy.lang import Builder

Activity = '''
FloatLayout:

    Button:
        text: "We Will"
        pos: 100, 100
        size_hint: .2, .4

    Button:
        text: "Wee Wiill"
        pos: 280, 200
        size_hint: .4, .2

    Button:
        text: "ROCK YOU!!"
        pos_hint: {'x': .3, 'y': .6}
        size_hint: .5, .2
'''

class Program(App):
    def build(self):
        return Builder.load_string(Activity)

if __name__ in ('__main__', '__android__'):
    Program().run()
Далее по атрибутам:
Label:
    …

    # Указывает, использовать ли markdown теги в тексте
    # или оставить as is.
    # Поддерживаемых тегов немного:
    # [b][/b]
    # [i][/i]
    # [u][/u]
    # [s][/s]
    # [font=<str>][/font]
    # [size=<integer>][/size]
    # [color=#<color>][/color]
    # [ref=<str>][/ref]
    # [anchor=<str>]
    # [sub][/sub]
    # [sup][/sup]
    markup: True
    # Область, ограничивающая текст.
    text_size: dp(self.size[0] - 10), self.size[1]
    # Вертикальное выравнивание текста:
    # 'bottom', 'middle', 'center' или 'top'.
    valign: 'top'
С областью, ограничивающую текст, можете поэкспериментировать на примере ниже:
from kivy.app import App
from kivy.uix.label import Label

class LabelTextSizeTest(App):
    def build(self):
        return Label(
            text='Область текста, ограниченная прямоугольникомn' * 50,
            text_size=(250, 300),  # поэксперементируйте с этими значениями
            line_height=1.5
        )

if __name__ == '__main__':
    LabelTextSizeTest().run()
Далее по Activity:
Widget:В контексте используется как аналог в Java:
<Space
    android:layout_width="match_parent"
    android:layout_height="0dp"
    android:layout_weight="1"/>
Далее:
BoxLayout:

    MDFlatButton:
        text: app.data.string_lang_create_account
        # Установка Activity с именем 'Create account'.
        on_release: app.screen_root_manager.current = 'Create account'

    MDFlatButton:
        text: app.data.string_lang_own_provider
        # Для установки своего цывета текста на кнопке
        # дайте параметру theme_text_color значение 'Custom'
        # и далее указывайте цвет - text_color: .7, .2, .2, 1
        theme_text_color: 'Primary'
        on_release:
            # Вызов функции из основного класа программы.
            # Можно было реализовать прямо здесь, но, коскольку
            # я считаю, что лишний код в разметке отвлекает
            # от понимания дерева Activity, было решено его вынести.
            app.delete_textfield_and_set_check_in_addaccountroot()
            app.screen_root_manager.current = 'Add account own provider'
Так. У нас остался не рассмотренным еще один вопрос. Вернемся к разметке Activity StartScreen:
        Introduction:
            id: introduction
            # Вызывается при выводе текущего Activity на экран.
            on_enter: self._on_enter(action_bar, app)
То есть, как только Activity будет выведено на экран, выполнится код события on_enter. Давайте посмотрим, что делает метод _on_enter в базовом классе Activity (файл libs/uix/kv/activity/baseclass/introduction.py):
from kivy.uix.screenmanager import Screen

class Introduction(Screen):
    def _on_enter(self, instance_toolbar, instance_program):
        instance_toolbar.left_action_items = []
        instance_toolbar.title = instance_program.title
Метод _on_enter удаляет иконку в ToolBar слева, устанавливая значение left_action_items, как пустой список, и меняет подпись ToolBar на имя приложения.
Для примера приведу управляющий класс из Java оригинала:
WelcomeActivity
package eu.siacs.conversations.ui;

import android.app.ActionBar;
import android.app.Activity;
import android.content.Intent;
import android.content.pm.ActivityInfo;
import android.os.Bundle;
import android.view.View;
import android.widget.Button;

import eu.siacs.conversations.R;

public class WelcomeActivity extends Activity {

    @Override
    protected void onCreate(final Bundle savedInstanceState) {
        if (getResources().getBoolean(R.bool.portrait_only)) {
            setRequestedOrientation(ActivityInfo.SCREEN_ORIENTATION_PORTRAIT);
        }
        final ActionBar ab = getActionBar();
        if (ab != null) {
            ab.setDisplayShowHomeEnabled(false);
            ab.setDisplayHomeAsUpEnabled(false);
        }
        super.onCreate(savedInstanceState);
        setContentView(R.layout.welcome);
        final Button createAccount = (Button) findViewById(R.id.create_account);
        createAccount.setOnClickListener(new View.OnClickListener() {
            @Override
            public void onClick(View v) {
                Intent intent = new Intent(WelcomeActivity.this, MagicCreateActivity.class);
                intent.addFlags(Intent.FLAG_ACTIVITY_NO_ANIMATION);
                startActivity(intent);
            }
        });
        final Button useOwnProvider = (Button) findViewById(R.id.use_own_provider);
        useOwnProvider.setOnClickListener(new View.OnClickListener() {
            @Override
            public void onClick(View v) {
                startActivity(new Intent(WelcomeActivity.this, EditAccountActivity.class));
            }
        });

    }

}
Так. С этим разобрались. У нас есть Activity и две юзабельные кнопки. Начнем с первой:
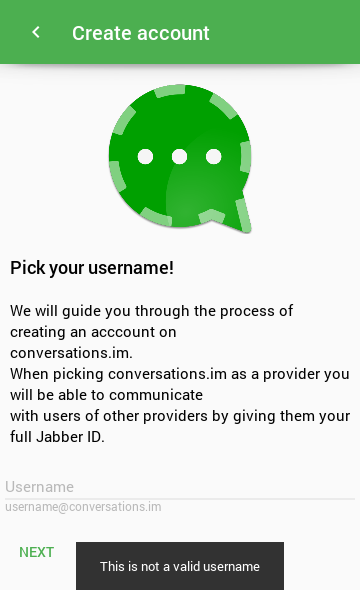
При клике на кнопку будет выведено Activity CreateAccount:
MDFlatButton:
    text: app.data.string_lang_create_account
    on_release: app.screen_root_manager.current = 'Create account'
Activity CreateAccount (Kivy):
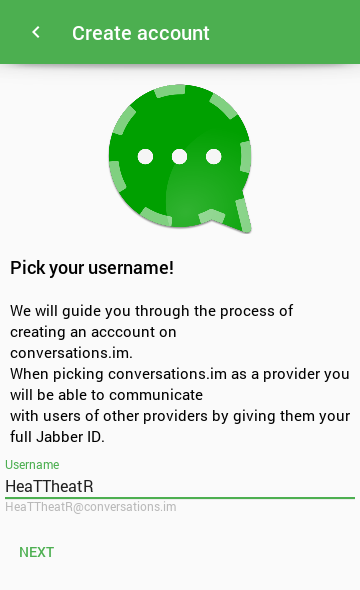
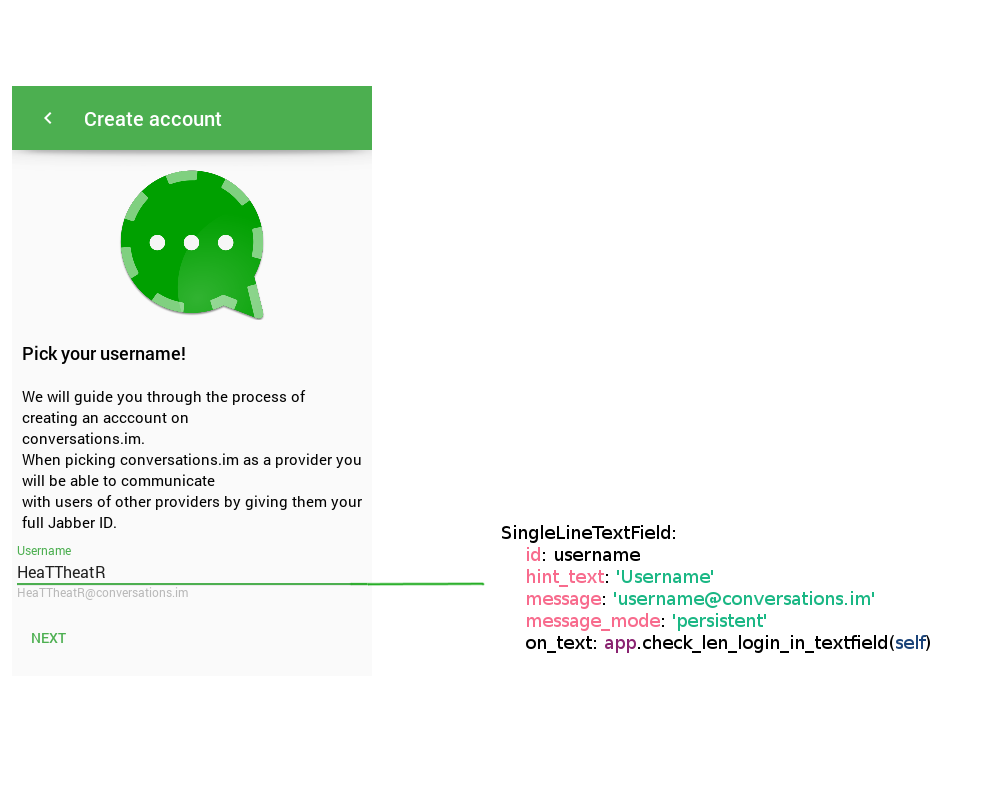
Activity CreateAccount (original):
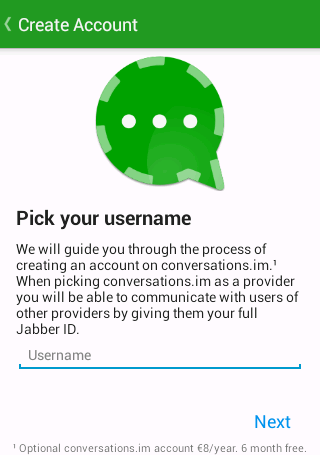
Откроем Activity CreateAccount нашего проета:
createaccount.kv
#: kivy 1.9.1
#: import SingleLineTextField kivymd.textfields.SingleLineTextField
#: import snackbar kivymd.snackbar

# Activity регистрации нового аккаунта.
# Вызывается по событию кнопки 'Create account' стартового Activity.

<CreateAccount>:
    name: 'Create account'

    BoxLayout:
        orientation: 'vertical'
        padding: dp(5), dp(20)

        Image:
            source: 'data/images/logo.png'
            size_hint: None, None
            size: dp(150), dp(150)
            pos_hint: {'center_x': .5}

        Label:
            text: app.data.string_lang_enter_user_name
            markup: True
            color: app.data.text_color
            text_size: dp(self.size[0] - 10), self.size[1]
            size_hint_y: None
            valign: 'top'
            height: dp(215)

        Widget:
            size_hint_y: None
            height: dp(10)

        SingleLineTextField:
            id: username
            hint_text: 'Username'
            message: 'username@conversations.im'
            message_mode: 'persistent'
            on_text: app.check_len_login_in_textfield(self)

        Widget:

        BoxLayout:

            MDFlatButton:
                text: app.data.string_lang_next
                on_release:
                    if username.text == '' or username.text.isspace():
                    snackbar.make(app.data.string_lang_not_valid_username)
                    else: app.screen_root_manager.current = 'Add account'
Ничего нового здесь для вас нет, на схеме ниже приведу только то, что мы еще не обсуждали:
Заголовок и иконка в ToolBar устанавливаются в базовом классе Activity CreateAccount в методе _on_enter:
from kivy.uix.screenmanager import Screen

class CreateAccount(Screen):

    def _on_enter(self, instance_toolbar, instance_program, instance_screenmanager):
        instance_toolbar.title = instance_program.data.string_lang_create_account
        instance_toolbar.left_action_items = [
            ['chevron-left', lambda x: instance_program.back_screen(
                instance_screenmanager.previous())]
        ]
Оригинальный управляющий класс MagicCreateActivity на Java
package eu.siacs.conversations.ui;

import android.content.Intent;
import android.content.pm.ActivityInfo;
import android.os.Bundle;
import android.text.Editable;
import android.text.TextWatcher;
import android.view.View;
import android.widget.Button;
import android.widget.EditText;
import android.widget.TextView;
import android.widget.Toast;

import java.security.SecureRandom;

import eu.siacs.conversations.Config;
import eu.siacs.conversations.R;
import eu.siacs.conversations.entities.Account;
import eu.siacs.conversations.xmpp.jid.InvalidJidException;
import eu.siacs.conversations.xmpp.jid.Jid;

public class MagicCreateActivity extends XmppActivity implements TextWatcher {

    private TextView mFullJidDisplay;
    private EditText mUsername;
    private SecureRandom mRandom;

    private static final String CHARS = "ABCDEFGHIJKLMNOPQRSTUVWXYZabcdefghijklmnopqrstuvwxyz0123456780+-/#$!?";
    private static final int PW_LENGTH = 10;

    @Override
    protected void refreshUiReal() {

    }

    @Override
    void onBackendConnected() {

    }

    @Override
    protected void onCreate(final Bundle savedInstanceState) {
        if (getResources().getBoolean(R.bool.portrait_only)) {
            setRequestedOrientation(ActivityInfo.SCREEN_ORIENTATION_PORTRAIT);
        }
        super.onCreate(savedInstanceState);
        setContentView(R.layout.magic_create);
        mFullJidDisplay = (TextView) findViewById(R.id.full_jid);
        mUsername = (EditText) findViewById(R.id.username);
        mRandom = new SecureRandom();
        Button next = (Button) findViewById(R.id.create_account);
        next.setOnClickListener(new View.OnClickListener() {
            @Override
            public void onClick(View v) {
                String username = mUsername.getText().toString();
                if (username.contains("@") || username.length() < 3) {
                    mUsername.setError(getString(R.string.invalid_username));
                    mUsername.requestFocus();
                } else {
                    mUsername.setError(null);
                    try {
                        Jid jid = Jid.fromParts(username.toLowerCase(), Config.MAGIC_CREATE_DOMAIN, null);
                        Account account = xmppConnectionService.findAccountByJid(jid);
                        if (account == null) {
                            account = new Account(jid, createPassword());
                            account.setOption(Account.OPTION_REGISTER, true);
                            account.setOption(Account.OPTION_DISABLED, true);
                            account.setOption(Account.OPTION_MAGIC_CREATE, true);
                            xmppConnectionService.createAccount(account);
                        }
                        Intent intent = new Intent(MagicCreateActivity.this, EditAccountActivity.class);
                        intent.putExtra("jid", account.getJid().toBareJid().toString());
                        intent.putExtra("init", true);
                        intent.setFlags(Intent.FLAG_ACTIVITY_NEW_TASK | Intent.FLAG_ACTIVITY_CLEAR_TASK);
                        Toast.makeText(MagicCreateActivity.this, R.string.secure_password_generated, Toast.LENGTH_SHORT).show();
                        startActivity(intent);
                    } catch (InvalidJidException e) {
                        mUsername.setError(getString(R.string.invalid_username));
                        mUsername.requestFocus();
                    }
                }
            }
        });
        mUsername.addTextChangedListener(this);
    }

    private String createPassword() {
        StringBuilder builder = new StringBuilder(PW_LENGTH);
        for(int i = 0; i < PW_LENGTH; ++i) {
            builder.append(CHARS.charAt(mRandom.nextInt(CHARS.length() - 1)));
        }
        return builder.toString();
    }

    @Override
    public void beforeTextChanged(CharSequence s, int start, int count, int after) {

    }

    @Override
    public void onTextChanged(CharSequence s, int start, int before, int count) {

    }

    @Override
    public void afterTextChanged(Editable s) {
        if (s.toString().trim().length() > 0) {
            try {
                mFullJidDisplay.setVisibility(View.VISIBLE);
                Jid jid = Jid.fromParts(s.toString().toLowerCase(), Config.MAGIC_CREATE_DOMAIN, null);
                mFullJidDisplay.setText(getString(R.string.your_full_jid_will_be, jid.toString()));
            } catch (InvalidJidException e) {
                mFullJidDisplay.setVisibility(View.INVISIBLE);
            }

        } else {
            mFullJidDisplay.setVisibility(View.INVISIBLE);
        }
    }
}
… вызванном по событию on_enter (когда Activity было выведено на экран):
<StartScreen>:
    …

    ScreenManager:
        …

        CreateAccount:
            on_enter: self._on_enter(action_bar, app, root_manager)

        …
Также нас интересует событие on_text, когда меняется значение текстового поля:
<CreateAccount>:
    …

        SingleLineTextField:
            …

            on_text: app.check_len_login_in_textfield(self)
Метод check_len_login_in_textfield из главного класса приложения:
def check_len_login_in_textfield(self, instance_textfield):
    # Если введенное значение в поле больше 20 символов.
    if len(instance_textfield.text) > 20:
            instance_textfield.text = instance_textfield.text[:20]
    # Изменяем значение подписи под текстовым полем согласно
    # введенным пользователем в текстовое поле данным.
    instance_textfield.message = 'username@conversations.im'
        if instance_textfield.text == ''
        else '{}@conversations.im'.format(instance_textfield.text)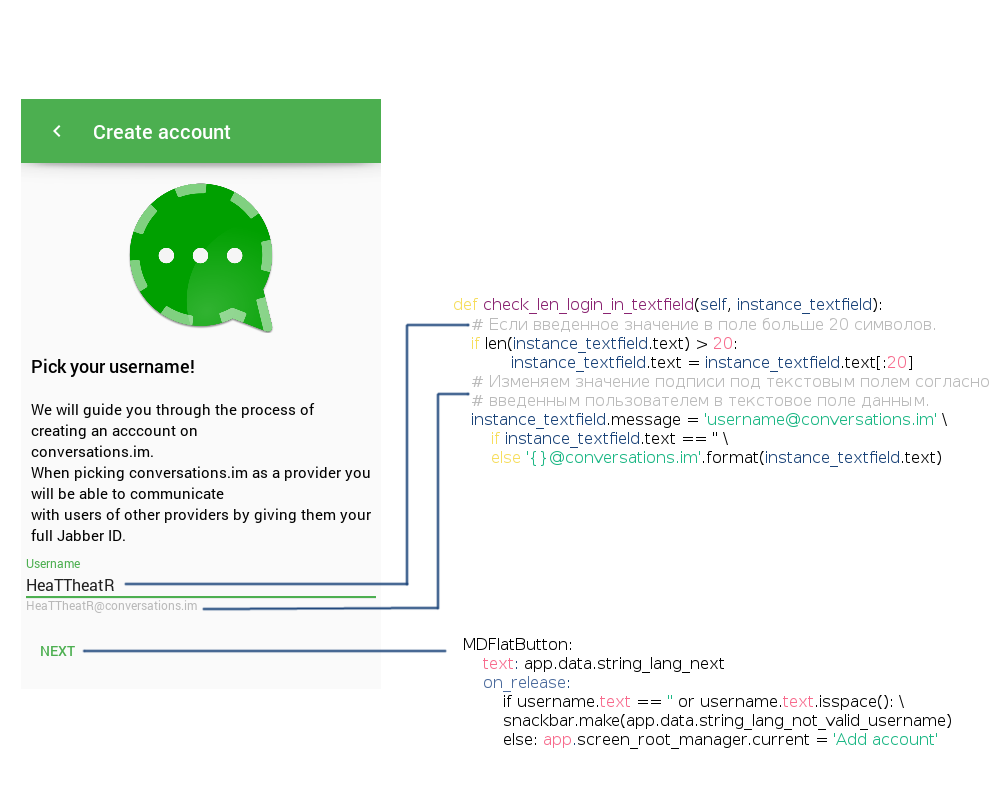
Итак, если данные текстового поля корректны, выводим Activity AddAccount:
MDFlatButton:
    …

    on_release:
        if …
            …
        else: app.screen_root_manager.current = 'Add account'
В противном случае выводим сообщение о некорректных данных:
MDFlatButton:
    …

    on_release:
        if username.text == '' or username.text.isspace():
        snackbar.make(app.data.string_lang_not_valid_username)
        …
Ну, и, наконец, у нас осталось последнее Activity…
Original:
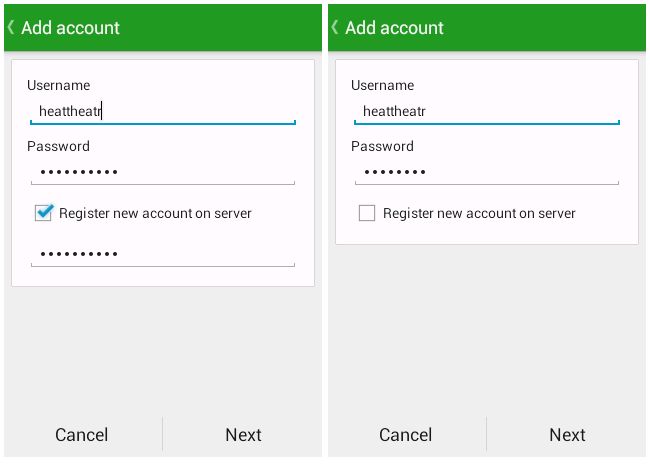
Kivy:
Да, это одно Activity. Из второго, при его выводе на экран, мы просто программно удаляем «лишнее» текстовое поле.
<StartScreen>:
    …

    ScreenManager:
        …

        AddAccount:
            id: add_account
            on_enter: self._on_enter(action_bar, app)
            on_leave: action_bar.title = app.data.string_lang_create_account
        AddAccountOwn:
            id: add_account_own_provider
            on_enter: self._on_enter(action_bar, app, root_manager)
            on_leave: action_bar.title = app.title; action_bar.left_action_items = []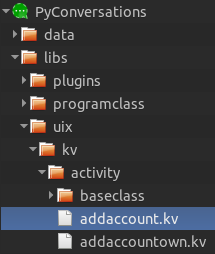
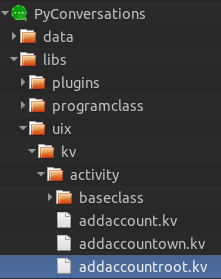
В файлах разметки мы создали шаблоны Activity:
<AddAccount>:
    name: 'Add account'

    AddAccountRoot:
        id: add_account_root
<AddAccountOwn>:
name: 'Add account own provider'
AddAccountRoot:
id: add_account_root«унаследовав» их от Activity AddAccountRoot:
Activity AddAccountRoot
#: kivy 1.9.1
#: import progress libs.uix.dialogs.dialog_progress
#: import MDFlatButton kivymd.button.MDFlatButton
#: import SingleLineTextField kivymd.textfields.SingleLineTextField
#: import MDCheckbox kivymd.selectioncontrols.MDCheckbox

# Activity регистрации нового аккаунта на сервере.

<AddAccountRoot@BoxLayout>:
    canvas:
        Color:
            rgba: app.data.background
        Rectangle:
            size: self.size
            pos: self.pos

    orientation: 'vertical'
    padding: dp(10), dp(10)

    BoxLayout:
        id: box
        canvas:
            Color:
                rgba: app.data.rectangle
            Rectangle:
                size: self.size
                pos: self.pos
            Color:
                rgba: app.data.list_color
            Rectangle:
                size: self.size[0] - 2, self.size[1] - 2
                pos: self.pos[0] + 1, self.pos[1] + 1

        orientation: 'vertical'
        size_hint_y: None
        padding: dp(10), dp(10)
        spacing: dp(15)
        height: app.window.height // 2

        SingleLineTextField:
            id: username
            hint_text: 'Username'
            on_text:
                if self.message != '': app.check_len_login_in_textfield(self)

        SingleLineTextField:
            id: password
            hint_text: 'Password'
            password: True

        BoxLayout:
            id: box_check
            size_hint_y: None
            height: dp(40)

            MDCheckbox:
                id: check
                size_hint: None, None
                size: dp(40), dp(40)
                active: True
                on_state:
                    if self.active: box.add_widget(confirm_password)
                    else: box.remove_widget(confirm_password)
                    if username.message != '': confirm_password.hint_text = 'Confirm password'

            Label:
                text: 'Register new account on server'
                valign: 'middle'
                color: app.data.text_color
                size_hint_x: .9
                text_size: self.size[0] - 10, self.size[1]

        SingleLineTextField:
            id: confirm_password
            password: True

        Widget:

    Widget:

    BoxLayout:
        padding: dp(0), dp(10)

        MDFlatButton:
            text: app.data.string_lang_cancel
            theme_text_color: 'Primary'
            on_release:
                if app.screen.ids.root_manager.current == 'Add account own provider':
                app.screen.ids.root_manager.current = 'Start screen';
                app.screen.ids.action_bar.title = app.title
                else:
                app.screen.ids.root_manager.current = 'Create account';
                app.screen.ids.action_bar.title = app.data.string_lang_create_account

        MDFlatButton:
            text: app.data.string_lang_next
            on_release:
                instance_progress, instance_text_wait =
                progress(text_wait=app.data.string_lang_text_wait.format(app.data.text_color_hex),
                events_callback=lambda x: instance_progress.dismiss())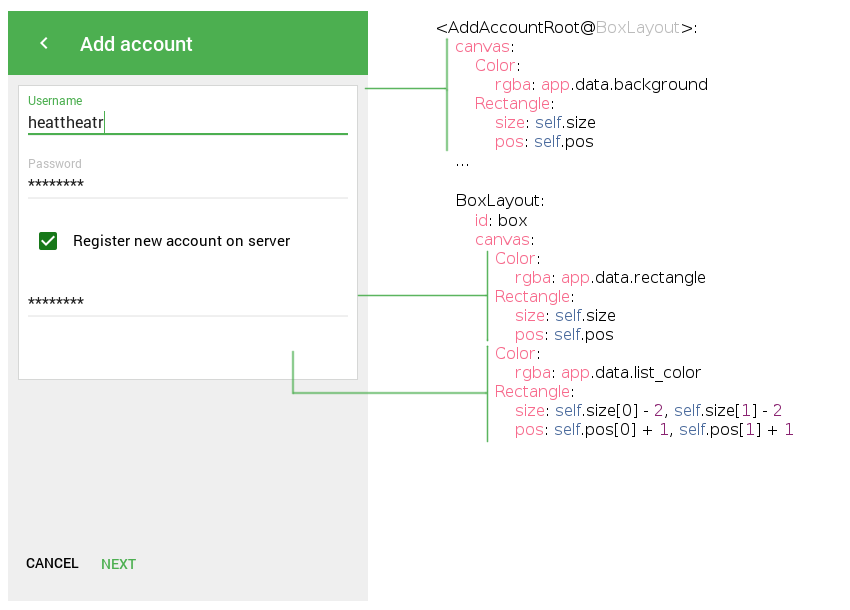
Любой виджет в Kivy имеет свойство canvas. Поэтому вы можете рисовать на нем все, что угодно: от примитивных фигур до накладывания текстур. В данном Activity я нарисовал прямоугольник сначала серым цветом, затем сверху наложил прямоугольник белого цвета, но меньшим размером (рисовать просто линии, вычисляя их координаты было лень). Получилась рамка.
При активации чекбокса нижнее текстовое поле удаляется:
MDCheckbox:
…
on_state:
# True/False — активен/не активен
if self.active: box.add_widget(confirm_password)
else: box.remove_widget(confirm_password)
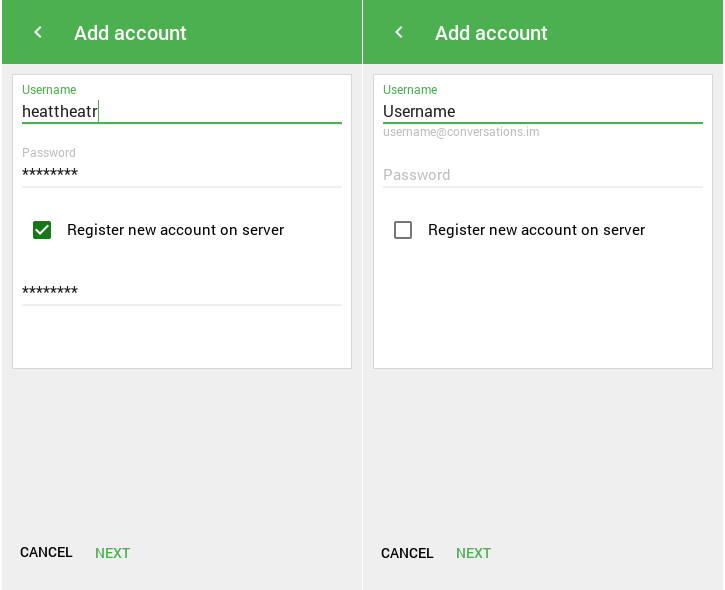
…Когда Activity AddAccount выводится на экран, устанавливаем значения текстовых полей и их фокус:
from kivy.uix.screenmanager import Screen
from kivy.clock import Clock

class AddAccount(Screen):

    def _on_enter(self, instance_toolbar, instance_program):
        instance_toolbar.title = self.name
        self.ids.add_account_root.ids.username.focus = True
        # Выполняется единожды через заданный интервал времени.
        Clock.schedule_once(instance_program.set_text_on_textfields, .5)
Главный класс программы:
def set_focus_on_textfield(self, interval=0, instance_textfield=None, focus=True):
    if instance_textfield: instance_textfield.focus = focus

def set_text_on_textfields(self, interval):
    add_account_root = self.screen.ids.add_account.ids.add_account_root
    field_username = add_account_root.ids.username
    field_password = add_account_root.ids.password
    field_confirm_password = add_account_root.ids.confirm_password
    field_username.text = self.screen.ids.create_account.ids.username.text.lower()
    field_password.focus = True
    password = self.generate_password()
    field_password.text = password
    field_confirm_password.text = password

    Clock.schedule_once(
        lambda x: self.set_focus_on_textfield(
            instance_textfield=field_password, focus=False), .5
    )
    Clock.schedule_once(
        lambda x: self.set_focus_on_textfield(
            instance_textfield=field_username), .5
    )
Что ж! Четыре запланированных Activity готовы, пальцы устали, голова разболелась. Это я о себе. Поэтому на сегодня пока все. Поскольку невозможно в рамках одной статьи осветить все вопросы, описать все параметры виджетов Kivy и нюансы, они будут рассмотрены в следующих статьях, поэтому не стесняйтесь, задавайте вопросы.
Скорее всего, во второй части статьи будет рассмотрена архитектура самого проекта PyConversations и ваши вопросы относительно первой части, если таковые будут. До встречи!
PyConversations на github.
В наши дни каждый разработчик может столкнуться с необходимостью работы над мобильным или веб-приложением на Python. В Python нет встроенных инструментов для мобильных устройств, тем не менее существуют пакеты, которые можно использовать для создания мобильных приложений. Это Kivy, PyQt и даже библиотека Toga от Beeware.
Содержание
- Принципы работы фреймворка Kivy Python
- Установка Kivy
- Работа с виджетами в Kivy
- Запуск программы «Hello, Kivy!»
- Отображение виджета Image в Kivy Python
- Разметка (Layout) в UI Kivy
- Добавление событий в Kivy
- Использование языка дизайна KV
- Создание приложения Kivy Python
- Создаем apk приложения для Android на Python
- Создание приложений для iPhone (iOS) на Python
- Создание exe приложений для Windows на Python используя Kivy
- Создание приложений для macOS на Python используя Kivy
Библиотеки являются основными элементами мобильного мира Python. Однако, говоря о Kivy, нельзя игнорировать преимущества данного фреймворка при работе с мобильными приложениями. Внешний вид приложения автоматически подстраивается под все платформы, разработчику при этом не нужно компилировать код после каждой поправки. Кроме того, здесь для создания приложений можно использовать чистый синтаксис Python.
В руководстве будут разобраны следующие темы:
- Работа с виджетами Kivy;
- Планировка UI и лейауты;
- Добавление событий;
- Использование языка KV;
- Создание приложения-калькулятора;
- Упаковка приложения для iOS, Android, Windows и macOS.
Разбор данного руководства предполагает, что читатель знаком с объектно-ориентированным программированием. Для введения в курс дела можете просмотреть статью об Объектно-ориентированном программировании (ООП) в Python 3.
Приступим!
Принципы работы фреймворка Kivy Python
Kivy был создан в 2011 году. Данный кросс-платформенный фреймворк Python работает на Windows, Mac, Linux и Raspberry Pi. В дополнение к стандартному вводу через клавиатуру и мышь он поддерживает мультитач. Kivy даже поддерживает ускорение GPU своей графики, что во многом является следствием использования OpenGL ES2. У проекта есть лицензия MIT, поэтому библиотеку можно использовать бесплатно и вкупе с коммерческим программным обеспечением.
Во время разработки приложения через Kivy создается интуитивно понятный интерфейс (Natural user Interface), или NUI. Его главная идея в том, чтобы пользователь мог легко и быстро приспособиться к программному обеспечению без чтения инструкций.
Kivy не задействует нативные элементы управления, или виджеты. Все его виджеты настраиваются. Это значит, что приложения Kivy будут выглядеть одинаково на всех платформах. Тем не менее, это также предполагает, что внешний вид вашего приложения будет отличаться от нативных приложений пользователя. Это может стать как преимуществом, так и недостатком, все зависит от аудитории.
Установка Kivy
У Kivy есть множество зависимостей, поэтому лучше устанавливать его в виртуальную среду Python. Можно использовать встроенную библиотеку Python venv или же пакет virtualenv.
Виртуальная среда Python создается следующим образом:
|
$ python3 —m venv my_kivy_project |
По ходу данного действия исполняемый файл Python 3 будет скопирован в папку под названием my_kivy_project, куда также будут добавлено несколько других папок.
Есть вопросы по Python?
На нашем форуме вы можете задать любой вопрос и получить ответ от всего нашего сообщества!
Telegram Чат & Канал
Вступите в наш дружный чат по Python и начните общение с единомышленниками! Станьте частью большого сообщества!
Паблик VK
Одно из самых больших сообществ по Python в социальной сети ВК. Видео уроки и книги для вас!
Для использования виртуальной среды ее нужно активировать. На Mac или Linux это можно сделать, выполнив следующую команду, будучи внутри папки my_kivy_project:
Команда для Windows точно такая же, но активировать скрипт нужно в другом месте — через папку Scripts, а не bin.
После активации виртуальной среды Python можно запустить pip для установки Kivy. На Linux и Mac нужно выполнить следующую команду:
|
$ python —m pip install kivy |
Инсталляция на Windows несколько сложнее. В официальной документации фреймворка изучите пункт, касающийся установки Kivy на Windows. Пользователи Mac также могут скачать файл dmg и установить Kivy данным образом.
В случае возникновения проблем во время установки Kivy на вашу платформу изучите дополнительные инструкции, с которыми можно ознакомиться через страницу загрузки.
Работа с виджетами в Kivy
Виджеты — это отображаемые на экране элементы управления, которыми пользователь может оперировать. Любой инструментарий графического интерфейса пользователя поставляется с набором виджетов. Типичными представителями виджетов, что вы не раз использовали, являются кнопки, выпадающие списки и вкладки. Внутри фреймворка Kivy встроено много виджетов.
Запуск программы «Hello, Kivy!»
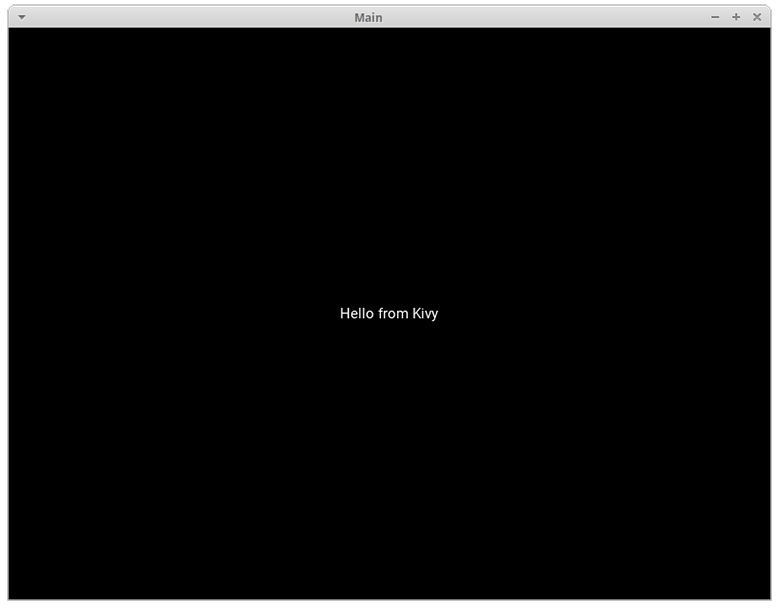
Принцип работы Kivy можно уловить, взглянув на следующее приложение «Hello, World!»:
|
from kivy.app import App from kivy.uix.label import Label class MainApp(App): def build(self): label = Label(text=‘Hello from Kivy’, size_hint=(.5, .5), pos_hint={‘center_x’: .5, ‘center_y’: .5}) return label if __name__ == ‘__main__’: app = MainApp() app.run() |
Каждому приложению Kivy требуется создать подкласс App и переопределить метод build(). Сюда вы помещаете код UI или вызываете другие функции, которые определяют код UI. В данном случае создается виджет Label и передается text, size_hint и pos_hint. Последние два аргумента не обязательны.
size_hint говорит Kivy о размерах что нужно использовать при создании виджета. Используются два числа:
- Первое число
xуказывает на размер ширины элемента управления. - Второе число
yуказывает на размер высоты элемента управления.
Значение обоих чисел должно быть в промежутке между 0 и 1. Значение по обоих показателей по умолчанию равно 1. Также можно задействовать pos_hint, что используется для позиционирования виджета. В коде, размещенном выше, указывается, что виджет должен быть размещен в центре осей x и y.
Для запуска приложения нужно инициализировать класс MainApp и вызвать метод run(). После этих действий на экране появится следующее:
Kivy также выводит в stdout довольно много текста:
|
1 2 3 4 5 6 7 8 9 10 11 12 13 14 15 16 17 18 19 20 21 22 23 |
[INFO ] [Logger ] Record log in /home/mdriscoll/.kivy/logs/kivy_19—06—07_2.txt [INFO ] [Kivy ] v1.11.0 [INFO ] [Kivy ] Installed at «/home/mdriscoll/code/test/lib/python3.6/site-packages/kivy/__init__.py» [INFO ] [Python ] v3.6.7 (default, Oct 22 2018, 11:32:17) [GCC 8.2.0] [INFO ] [Python ] Interpreter at «/home/mdriscoll/code/test/bin/python» [INFO ] [Factory ] 184 symbols loaded [INFO ] [Image ] Providers: img_tex, img_dds, img_sdl2, img_gif (img_pil, img_ffpyplayer ignored) [INFO ] [Text ] Provider: sdl2([‘text_pango’] ignored) [INFO ] [Window ] Provider: sdl2([‘window_egl_rpi’] ignored) [INFO ] [GL ] Using the «OpenGL» graphics system [INFO ] [GL ] Backend used <sdl2> [INFO ] [GL ] OpenGL version <b‘4.6.0 NVIDIA 390.116’> [INFO ] [GL ] OpenGL vendor <b‘NVIDIA Corporation’> [INFO ] [GL ] OpenGL renderer <b‘NVS 310/PCIe/SSE2’> [INFO ] [GL ] OpenGL parsed version: 4, 6 [INFO ] [GL ] Shading version <b‘4.60 NVIDIA’> [INFO ] [GL ] Texture max size <16384> [INFO ] [GL ] Texture max units <32> [INFO ] [Window ] auto add sdl2 input provider [INFO ] [Window ] virtual keyboard not allowed, single mode, not docked [INFO ] [Base ] Start application main loop [INFO ] [GL ] NPOT texture support is available |
Это может быть полезно для отладки приложения.
Далее добавим виджет Image и посмотрим, чем он отличается от Label.
Отображение виджета Image в Kivy Python
В Kivy есть несколько видов виджетов, связанных с изображениями. Для загрузки картинок с жесткого диска можно задействовать Image, а при использовании адреса URL подойдет AsyncImage. К следующем примере берется стандартный класс Image:
|
from kivy.app import App from kivy.uix.image import Image class MainApp(App): def build(self): img = Image(source=‘/path/to/real_python.png’, size_hint=(1, .5), pos_hint={‘center_x’:.5, ‘center_y’:.5}) return img if __name__ == ‘__main__’: app = MainApp() app.run() |
В данном коде импортируется Image из подпакета kivy.uix.image. Класс Image принимает много разных параметров, однако единственным для нас нужным является source, что указывает Kivy, какое изображение должно быть загружено. Здесь передается полный путь к выбранному изображению. Оставшаяся часть кода такая же, как и в прошлом примере.
После запуска кода должно выводиться нечто подобное:
Текст из предыдущего примера был заменен картинкой.
Теперь рассмотрим, как добавить и оптимально расположить несколько виджетов в приложении.
Разметка (Layout) в UI Kivy
У каждого фреймворка есть свой собственный метод для размещения виджетов. К примеру, в wxPython используются классификаторы, а в Tkinter будет задействован лейаут, или менеджер геометрии. В Kivy за это отвечают Лейауты (Layouts). Доступно несколько различных типов Лейаутов. Чаще всего используются следующие виды:
- BoxLayout;
- FloatLayout;
- GridLayout.
Найти полный список доступных Лейаутов можно в документации Kivy. Рабочий исходный код можно найти в kivy.uix.
Рассмотрим BoxLayout на примере следующего кода:
|
1 2 3 4 5 6 7 8 9 10 11 12 13 14 15 16 17 18 19 20 21 22 23 24 25 26 27 28 |
import kivy import random from kivy.app import App from kivy.uix.button import Button from kivy.uix.boxlayout import BoxLayout red = [1,0,0,1] green = [0,1,0,1] blue = [0,0,1,1] purple = [1,0,1,1] class HBoxLayoutExample(App): def build(self): layout = BoxLayout(padding=10) colors = [red, green, blue, purple] for i in range(5): btn = Button(text=«Button #%s» % (i+1), background_color=random.choice(colors) ) layout.add_widget(btn) return layout if __name__ == «__main__»: app = HBoxLayoutExample() app.run() |
Здесь из kivy.uix.boxlayout импортируется модуль BoxLayout и затем устанавливается. После этого создается список цветов, которые представляют собой цвета RGB (Red-Blue-Green).
В конечном итоге формируется цикл для range из 5, результатом чего является кнопка btn для каждой итерации. Сделаем вещи немного интереснее и поставим в качестве фона кнопки background_color случайный цвет. Теперь можно добавить кнопку в лейаут при помощи layout.add_widget(btn).
После запуска кода выведется нечто подобное:
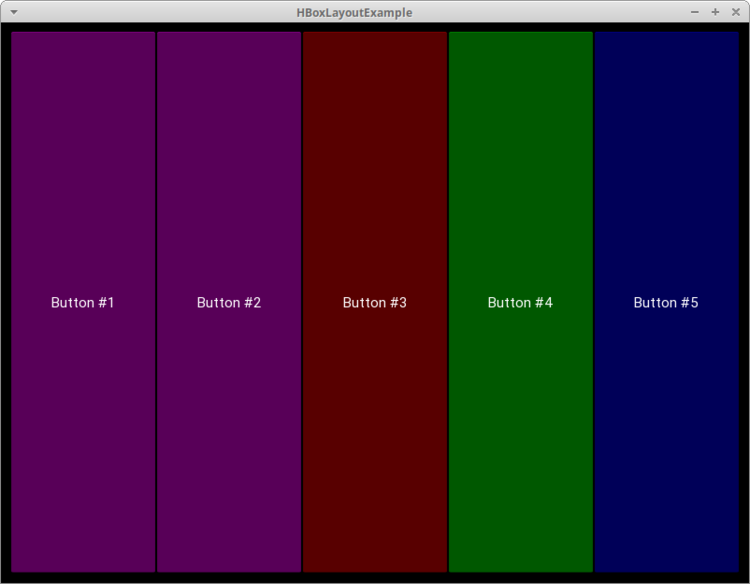
Здесь представлены 5 кнопок, окрашенных случайным образом, по одной для каждой итерации цикла for.
Во время создания лейаута следует учитывать следующие аргументы:
- padding: Отступ
paddingмежду лейаутом и его дочерними элементами уточняется в пикселях. Для этого можно выбрать один из трех способов:- Список из четырех аргументов:
[padding_left, padding_top, padding_right, padding_bottom] - Список из двух аргументов:
[padding_horizontal, padding_vertical] - Один аргумент:
padding=10
- Список из четырех аргументов:
- spacing: При помощи данного аргумента добавляется расстояние между дочерними виджетами.
- orientation: Позволяет изменить значение
orientationдляBoxLayoutпо умолчанию — с горизонтального на вертикальное.
Добавление событий в Kivy
Как и многие другие инструментарии GUI, по большей части Kivy полагается на события. Фреймворк отзывается на нажатие клавиш, кнопки мышки или прикосновение к сенсорному экрану. В Kivy задействован концепт Часов (Clock), что дает возможность создать своего рода график для вызова определенных функций в будущем.
В Kivy также используется концепт Свойств (Properties), что работает с EventDispatcher. Свойства помогают осуществить проверку достоверности. Они также запускают события, когда виджет меняет размер или позицию.
Добавим событие для кнопки из предыдущего кода:
|
1 2 3 4 5 6 7 8 9 10 11 12 13 14 15 16 17 18 |
from kivy.app import App from kivy.uix.button import Button class MainApp(App): def build(self): button = Button(text=‘Hello from Kivy’, size_hint=(.5, .5), pos_hint={‘center_x’: .5, ‘center_y’: .5}) button.bind(on_press=self.on_press_button) return button def on_press_button(self, instance): print(‘Вы нажали на кнопку!’) if __name__ == ‘__main__’: app = MainApp() app.run() |
В данном коде вызывается button.bind(), а событие on_press ссылается на MainApp.on_press_button().
Этот метод неявно принимает экземпляр виджета, который является самим объектом кнопки. Сообщение будет выводиться на stdout всякий раз при нажатии пользователем на кнопку.
Использование языка дизайна KV
Kivy предоставляет язык дизайна KV, что можно использовать в приложениях Kivy. Язык KV позволяет отделить дизайн интерфейса от логики приложения. Он придерживается принципа разделения ответственности и является частью архитектурного паттерна Модель-Представление-Контроллер (Model-View-Controller). Предыдущий пример можно обновить, используя язык KV:
|
from kivy.app import App from kivy.uix.button import Button class ButtonApp(App): def build(self): return Button() def on_press_button(self): print(‘Вы нажали на кнопку!’) if __name__ == ‘__main__’: app = ButtonApp() app.run() |
С первого взгляда данный код может показаться несколько странным, так как кнопка Button создается без указания атрибутов или привязывания к ним событий. Здесь Kivy автоматически ищет файл с таким же названием, что и у класса, только строчными буквами и без части App в названии класса.
В данном случае названием класса является ButtonApp, поэтому Kivy будет искать файл button.kv. Если такой файл существует, и он также форматирован должным образом, тогда Kivy использует его при загрузке UI. Попробуйте создать такой файл и добавить следующий код:
|
<Button>: text: ‘Press me’ size_hint: (.5, .5) pos_hint: {‘center_x’: .5, ‘center_y’: .5} on_press: app.on_press_button() |
Действия каждой строки:
- Строка 1 соответствует вызову
Buttonв коде Python. Kivy должен осмотреть инициализированный объект для определения кнопки; - Строка 2 устанавливает
textкнопки; - Строка 3 устанавливает ширину и высоту при помощи
size_hint; - Строка 4 устанавливает позицию кнопки через
pos_hint; - Строка 5 устанавливает обработчик событий
on_press. Для указания Kivy места обработчика событий используетсяapp.on_press_button(). Здесь Kivy будет искать метод.on_press_button()в классеApplication.
Вы можете установить все ваши виджеты и лейауты внутри одного или нескольких файлов языка KV. Язык KV также поддерживает импорт модулей Python в KV, создавая динамичные классы, и это далеко не предел. Ознакомиться с полным перечнем его возможностей можно в гиде Kivy по языку KV.
Теперь мы можем приступить к созданию настоящего рабочего приложения.
Создание приложения Kivy Python
Создание чего-то полезное несомненно является отличным способом выучить новый навык. Учитывая данное утверждение, давайте используем Kivy при создании калькулятора, который будет поддерживать следующие операции:
- Сложение;
- Вычитание;
- Умножение;
- Деление.
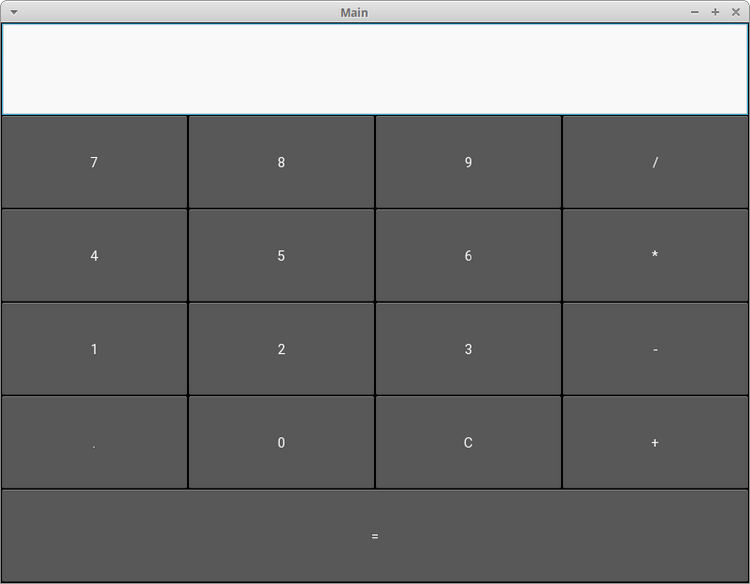
В данном приложении будет использован набор кнопок в своего рода лейауте. В верхней части также будет специальный блок для вывода операций и их результатов. В итоге калькулятор будет выглядеть следующим образом:

Теперь, когда у нас есть в наличии целевой UI, может составить код:
|
1 2 3 4 5 6 7 8 9 10 11 12 13 14 15 16 17 18 19 20 21 22 23 24 25 26 27 28 29 30 31 32 33 34 35 36 37 38 39 |
from kivy.app import App from kivy.uix.boxlayout import BoxLayout from kivy.uix.button import Button from kivy.uix.textinput import TextInput class MainApp(App): def build(self): self.operators = [«/», «*», «+», «-«] self.last_was_operator = None self.last_button = None main_layout = BoxLayout(orientation=«vertical») self.solution = TextInput( multiline=False, readonly=True, halign=«right», font_size=55 ) main_layout.add_widget(self.solution) buttons = [ [«7», «8», «9», «/»], [«4», «5», «6», «*»], [«1», «2», «3», «-«], [«.», «0», «C», «+»], ] for row in buttons: h_layout = BoxLayout() for label in row: button = Button( text=label, pos_hint={«center_x»: 0.5, «center_y»: 0.5}, ) button.bind(on_press=self.on_button_press) h_layout.add_widget(button) main_layout.add_widget(h_layout) equals_button = Button( text=«=», pos_hint={«center_x»: 0.5, «center_y»: 0.5} ) equals_button.bind(on_press=self.on_solution) main_layout.add_widget(equals_button) return main_layout |
Калькулятор работает следующим образом:
- В строках с 8 по 10 создается список
operatorsи несколько полезных значений,last_was_operatorиlast_button, которые будут использованы чуть позже. - В строках с 11 по 15 создается лейаут верхнего уровня
main_layout, к нему также добавляется виджет только для чтенияTextInput. - В строках с 16 по 21 создается вложенный список из списков, где есть большая часть кнопок для калькулятора.
- В строке 22 начинается цикл for для кнопок. Для каждого вложенного списка делается следующее:
- В строке 23 создается
BoxLayoutс горизонтальной ориентацией. - В строке 24 начинается еще один цикл
forдля элементов вложенного списка. - В строках с 25 по 39 создаются кнопки для ряда и связываются обработчиком событий, после чего кнопки добавляются к горизонтальному
BoxLayoutиз строки 23. - В строке 31 этот лейаут добавляется к
main_layout.
- В строке 23 создается
- В строках с 33 по 37 создается кнопка равно (=) и привязывается к обработчику событий, после чего она добавляется к
main_layout.
Далее создается обработчик событий .on_button_press(). Код будет выглядеть следующим образом:
|
1 2 3 4 5 6 7 8 9 10 11 12 13 14 15 16 17 18 19 20 |
def on_button_press(self, instance): current = self.solution.text button_text = instance.text if button_text == «C»: # Очистка виджета с решением self.solution.text = «» else: if current and ( self.last_was_operator and button_text in self.operators): # Не добавляйте два оператора подряд, рядом друг с другом return elif current == «» and button_text in self.operators: # Первый символ не может быть оператором return else: new_text = current + button_text self.solution.text = new_text self.last_button = button_text self.last_was_operator = self.last_button in self.operators |
Почти все виджеты приложения вызывают .on_button_press(). Это работает следующим образом:
- Строка 41 принимает аргумент
instance, в результате чего можно узнать, какой виджет вызвал функцию. - Строки между 42 и 43 извлекают и хранят значения
solutionиtextкнопки. - Строки c 45 по 47 проверяют, на какую кнопку нажали. Если пользователь нажимает с, тогда очищается
solution. В противном случае используется утверждениеelse. - Строка 49 проверяет, было ли у решения предыдущее значение.
- Строки с 50 по 52 проверяют, была ли последняя нажатая кнопка оператором. Если да, тогда
solutionобновляться не будет. Это необходимо для предотвращения создания двух операций в одном ряду. К примеру,1 * /будет недействительным утверждением. - Строки с 53 по 55 проверяют, является ли первый символ оператором. Если да, тогда solution обновляться не будет, так как первое значение не может быть значением оператора.
- Строки с 56 по 58 переходят к условию
else. Если никакое из предыдущих значений не найдено, тогда обновляетсяsolution. - Строка 59 устанавливает
last_buttonк метке последней нажатой кнопки. - Строка 60 устанавливает
last_was_operatorк значениюTrueилиFalseв зависимости от того, был символ оператором или нет.
Последней частью кода будет .on_solution():
|
def on_solution(self, instance): text = self.solution.text if text: solution = str(eval(self.solution.text)) self.solution.text = solution |
Здесь берется текущий текст из solution и используется встроенный в Python eval() для исполнения. Если пользователь создал формулу вроде 1+2, тогда eval() запустит код и вернет результат. В конце результат устанавливается как новое значение виджета solution.
На заметку: порой
eval()бывает опасным, так как он может запустить произвольный код. Многие разработчики избегают его использование именно по этой причине. Тем не менее, ввиду задействования только целых чисел, операторов и точки в качестве вводных данных дляeval(), в данном контексте его можно использовать безопасно.
При запуске данного кода на рабочем столе компьютера приложение будет выглядеть следующим образом:
Полный текст кода примера калькулятора представлен ниже:
|
1 2 3 4 5 6 7 8 9 10 11 12 13 14 15 16 17 18 19 20 21 22 23 24 25 26 27 28 29 30 31 32 33 34 35 36 37 38 39 40 41 42 43 44 45 46 47 48 49 50 51 52 53 54 55 56 57 58 59 60 61 62 63 64 65 66 67 68 69 70 71 |
from kivy.app import App from kivy.uix.boxlayout import BoxLayout from kivy.uix.button import Button from kivy.uix.textinput import TextInput class MainApp(App): def build(self): self.operators = [«/», «*», «+», «-«] self.last_was_operator = None self.last_button = None main_layout = BoxLayout(orientation=«vertical») self.solution = TextInput( multiline=False, readonly=True, halign=«right», font_size=55 ) main_layout.add_widget(self.solution) buttons = [ [«7», «8», «9», «/»], [«4», «5», «6», «*»], [«1», «2», «3», «-«], [«.», «0», «C», «+»], ] for row in buttons: h_layout = BoxLayout() for label in row: button = Button( text=label, pos_hint={«center_x»: 0.5, «center_y»: 0.5}, ) button.bind(on_press=self.on_button_press) h_layout.add_widget(button) main_layout.add_widget(h_layout) equals_button = Button( text=«=», pos_hint={«center_x»: 0.5, «center_y»: 0.5} ) equals_button.bind(on_press=self.on_solution) main_layout.add_widget(equals_button) return main_layout def on_button_press(self, instance): current = self.solution.text button_text = instance.text if button_text == «C»: # Очистка виджета с решением self.solution.text = «» else: if current and ( self.last_was_operator and button_text in self.operators): # Не добавляйте два оператора подряд, рядом друг с другом return elif current == «» and button_text in self.operators: # Первый символ не может быть оператором return else: new_text = current + button_text self.solution.text = new_text self.last_button = button_text self.last_was_operator = self.last_button in self.operators def on_solution(self, instance): text = self.solution.text if text: solution = str(eval(self.solution.text)) self.solution.text = solution if __name__ == «__main__»: app = MainApp() app.run() |
Пришло время разместить приложение в Google Play или в AppStore!
По завершении составления кода вы можете поделиться своим приложением с другими. Хорошим способом сделать это может стать превращение вашего кода в приложения для смартфона на Android. Для этого вначале нужно установить пакет buildozer через pip:
Затем создается новая папка, после чего нужно перейти в нее через терминал. Затем выполняется следующая команда:
После этого создается файл buildozer.spec, который будет использован для конфигурации сборки. К примеру, первые две строчки файла спецификации можно редактировать следующим образом:
|
[app] # (str) Название вашего приложения title = KvCalc # (str) Название упаковки package.name = kvcalc # (str) Домен упаковки (нужен для упаковки android/ios) package.domain = org.kvcalc |
Не бойтесь посмотреть оставшуюся часть файла для выяснения того, что еще можно поменять.
На данный момент приложение почти готово к сборке, однако для начала нужно установить зависимости для buildozer. После их установки скопируйте ваше приложение калькулятора в новую папку и переименуйте его в main.py. Этого требует buildozer. Если файл будет назван неверно, тогда процесс сборки завершится неудачей.
Теперь можно запустить следующую команду:
|
$ buildozer —v android debug |
Этап сборки займет время! На моем компьютере на это ушло около 15-20 минут. Здесь все зависит от вашего железа, так что времени может потребоваться еще больше. Расслабьтесь, налейте чашечку кофе или прогуляйтесь. Buildozer скачает те элементы Android SDK, которые нужны для процесса сборки. Если все идет по плану, тогда в папке bin появится файл под названием, напоминающим что-то вроде kvcalc-0.1-debug.apk.
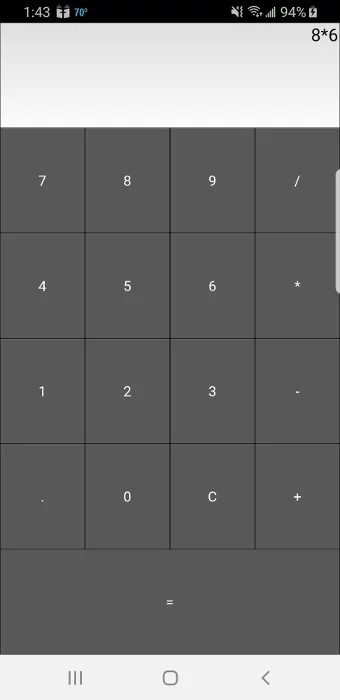
Далее требуется связать телефон Android с компьютером и перенести туда файл apk. Затем откройте менеджер файлов телефона и кликните на файл apk. Android должен спросить, хотите ли вы установить приложение. Есть вероятность появления предупреждения, ведь приложение было скачано не из Google Play. Тем не менее, вы по-прежнему сможете установить его.
Вот как выглядит калькулятор, запущенный на Samsung S9:
У buildozer также есть несколько других команд, которые вы можете использовать. Изучите документацию, чтобы подробнее узнать об этом.
При необходимости добиться более детального управления упаковку можно осуществить через python-for-android. Здесь это обсуждаться не будет, но если интересно, ознакомьтесь, как еще можно быстро начать проект.
Создание приложений для iPhone (iOS) на Python
Инструкция для сборки приложения для iOS будет немного сложнее, нежели для Android. Для получения последней информации всегда проверяйте обновления официальной документации Kivy.
Вам нужен будет компьютер с операционной системой OS X: MacBook или iMac. На Linux или Windows вы не сможете создать приложения для Apple.
Перед упаковкой приложения для iOS на Mac необходимо выполнить следующие команды:
|
$ brew install autoconf automake libtool pkg—config $ brew link libtool $ sudo easy_install pip $ sudo pip install Cython==0.29.10 |
После успешной установки нужно скомпилировать при использования следующих команд:
|
$ git clone git://github.com/kivy/kivy—ios $ cd kivy—ios $ ./toolchain.py build python3 kivy |
Если вы получаете ошибку, где говорится, что iphonesimulator не найден, тогда поищите способ решение проблемы на StackOverflow, после чего попробуйте запустить команды вновь.
Если вы получаете ошибки SSL, тогда скорее всего у вас не установлен OpenSSL от Python. Следующая команда должна это исправить:
|
$ cd /Applications/Python 3.7/ $ ./Install Certificates.command |
Теперь вернитесь назад и запустите команду toolchain опять.
После успешного выполнения всех указанных выше команд можете создать проект Xcode при помощи использования скрипта toolchain. Перед созданием проекта Xcode переименуйте ваше главное приложение в main.py, это важно. Выполните следующую команду.
|
./toolchain.py create <title> <app_directory> |
Здесь должна быть папка под названием title, внутри которой будет проект Xcode. Теперь можно открыть проект Xcode и работать над ним отсюда. Обратите внимание, что если вы хотите разместить свое приложение на AppStore, вам понадобится создать аккаунт разработчика на developer.apple.com и заплатить годовой взнос.
Создание exe приложений для Windows на Python используя Kivy
Упаковать приложение Kivy для Windows можно при помощи PyInstaller. Если ранее вы никогда не работали с ним, тогда изучите тему использования PyInstaller для упаковки кода Python в исполняемый файл.
Для установки PyInstaller можно использовать pip:
|
$ pip install pyinstaller |
Следующая команда упакует ваше приложение:
Команда создаст исполняемый файл Windows, а вместе с ним еще несколько других файлов. Аргумент -w говорит PyInstaller, что приложение открывается в оконном режиме и не является приложение для командной строки. Если вы хотите, чтобы PyInstaller создал только один исполняемый файл, тогда можете передать в дополнение к -w аргумент --onefile.
Создание приложений для macOS на Python используя Kivy
Как и в случае с Windows, для создания исполняемого файла Mac можно также использовать PyInstaller. Единственным условием является запуск следующей команды на Mac:
|
$ pyinstaller main.py —w —onefile |
Результатом станет один исполняемый файл в папке dist. Название исполняемого файла будет таким же, как и название файла Python, что был передан PyInstaller.
Если вы хотите уменьшить размер исполняемого файла или использовать в приложении GStreamer, тогда для получения дополнительной информации изучите тему упаковки для macOS.
Заключение
Kivy является действительно интересным фреймворком GUI, что можно использовать для создания пользовательских интерфейсов и мобильных приложений для Android и iOS. Внешне приложения Kivy будут отличаться от нативных приложений выбранной платформы. В том случае, если вы хотите выделяться на фоне конкурентов, это может быть выгодным преимуществом.
В данном руководстве были рассмотрены основы Kivy, среди которых стоит выделить добавление виджетов, привязку событий, планировку виджетов и лейауты, а также использование языка KV. В результате мы получили рабочее приложение Kivy и рассмотрели способы его переноса на другие платформы, в том числе мобильные.
В Kivy есть множество виджетов и концептов, которые не были рассмотрены в статьи. Для дальнейшего изучения темы можете изучить официальный сайт Kivy, где размещены разнообразные руководства, примеры приложений и многое другое.
Рекомендации
Для дальнейшего изучения Kivy ознакомьтесь со следующими ресурсами:
- Гид программирования на Kivy
- Документация по упаковке приложений Kivy
- Сборка приложений GUI через Python
Чтобы посмотреть, как создать приложение с графическим интерфейсом при использовании другого GUI фреймфорка Python, можете ознакомиться со статьями о wxPython.

Являюсь администратором нескольких порталов по обучению языков программирования Python, Golang и Kotlin. В составе небольшой команды единомышленников, мы занимаемся популяризацией языков программирования на русскоязычную аудиторию. Большая часть статей была адаптирована нами на русский язык и распространяется бесплатно.
E-mail: vasile.buldumac@ati.utm.md
Образование
Universitatea Tehnică a Moldovei (utm.md)
- 2014 — 2018 Технический Университет Молдовы, ИТ-Инженер. Тема дипломной работы «Автоматизация покупки и продажи криптовалюты используя технический анализ»
- 2018 — 2020 Технический Университет Молдовы, Магистр, Магистерская диссертация «Идентификация человека в киберпространстве по фотографии лица»
Watch Now This tutorial has a related video course created by the Real Python team. Watch it together with the written tutorial to deepen your understanding: Build Cross-Platform GUI Apps With Kivy
These days, developers are highly likely to be working on a mobile or web application. Python doesn’t have built-in mobile development capabilities, but there are packages you can use to create mobile applications, like Kivy, PyQt, or even Beeware’s Toga library.
These libraries are all major players in the Python mobile space. However, there are some benefits you’ll see if you choose to create mobile applications with Kivy. Not only will your application look the same on all platforms, but you also won’t need to compile your code after every change. What’s more, you’ll be able to use Python’s clear syntax to build your applications.
In this tutorial, you’ll learn how to:
- Work with Kivy widgets
- Lay out the UI
- Add events
- Use the KV language
- Create a calculator application
- Package your application for iOS, Android, Windows, and macOS
This tutorial assumes you’re familiar with object-oriented programming. If you’re not, then check out Object-Oriented Programming (OOP) in Python 3.
Let’s get started!
Understanding the Kivy Framework
Kivy was first released in early 2011. This cross-platform Python framework can be deployed to Windows, Mac, Linux, and Raspberry Pi. It supports multitouch events in addition to regular keyboard and mouse inputs. Kivy even supports GPU acceleration of its graphics, since they’re built using OpenGL ES2. The project uses the MIT license, so you can use this library for free and commercial software.
When you create an application with Kivy, you’re creating a Natural User Interface or NUI. The idea behind a Natural User Interface is that the user can easily learn how to use your software with little to no instruction.
Kivy does not attempt to use native controls or widgets. All of its widgets are custom-drawn. This means that Kivy applications will look the same across all platforms. However, it also means that your app’s look and feel will differ from your user’s native applications. This could be a benefit or a drawback, depending on your audience.
Installing Kivy
Kivy has many dependencies, so it’s recommended that you install it into a Python virtual environment. You can use either Python’s built-in venv library or the virtualenv package. If you’ve never used a Python virtual environment before, then check out Python Virtual Environments: A Primer.
Here’s how you can create a Python virtual environment:
$ python3 -m venv my_kivy_project
This will copy your Python 3 executable into a folder called my_kivy_project and add a few other subfolders to that directory.
To use your virtual environment, you need to activate it. On Mac and Linux, you can do that by executing the following while inside the my_kivy_project folder:
The command for Windows is similar, but the location of the activate script is inside of the Scripts folder instead of bin.
Now that you have an activated Python virtual environment, you can run pip to install Kivy. On Linux and Mac, you’ll run the following command:
$ python -m pip install kivy
On Windows, installation is a bit more complex. Check out the official documentation for how to install Kivy on Windows. (Mac users can also download a dmg file and install Kivy that way.)
If you run into any issues installing Kivy on your platform, then see the Kivy download page for additional instructions.
Working With Kivy Widgets
A widget is an onscreen control that the user will interact with. All graphical user interface toolkits come with a set of widgets. Some common widgets that you may have used include buttons, combo boxes, and tabs. Kivy has many widgets built into its framework.
Running a “Hello, Kivy!” Program
To see how Kivy works, take a look at the following “Hello, World!” application:
from kivy.app import App
from kivy.uix.label import Label

class MainApp(App):
    def build(self):
        label = Label(text='Hello from Kivy',
                      size_hint=(.5, .5),
                      pos_hint={'center_x': .5, 'center_y': .5})

        return label

if __name__ == '__main__':
    app = MainApp()
    app.run()
Every Kivy application needs to subclass App and override build(). This is where you’ll put your UI code or make calls to other functions that define your UI code. In this case, you create a Label widget and pass in its text, size_hint, and pos_hint. These last two arguments are not required.
size_hint tells Kivy the proportions to use when creating the widget. It takes two numbers:
- The first number is the
xsize hint and refers to the width of the control. - The second number is the
ysize hint and refers to the height of the control.
Both of these numbers can be anywhere between 0 and 1. The default value for both hints is 1. You can also use pos_hint to position the widget. In the code block above, you tell Kivy to center the widget on the x and y axes.
To make the application run, you instantiate your MainApp class and then call run(). When you do so, you should see the following on your screen:
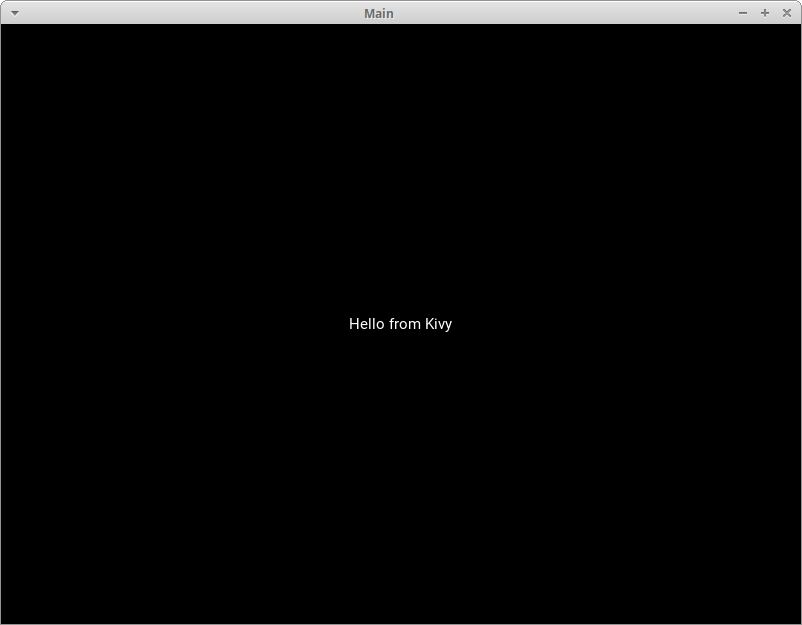
Kivy also outputs a lot of text to stdout:
[INFO   ] [Logger      ] Record log in /home/mdriscoll/.kivy/logs/kivy_19-06-07_2.txt
[INFO   ] [Kivy        ] v1.11.0
[INFO   ] [Kivy        ] Installed at "/home/mdriscoll/code/test/lib/python3.6/site-packages/kivy/__init__.py"
[INFO   ] [Python      ] v3.6.7 (default, Oct 22 2018, 11:32:17)
[GCC 8.2.0]
[INFO   ] [Python      ] Interpreter at "/home/mdriscoll/code/test/bin/python"
[INFO   ] [Factory     ] 184 symbols loaded
[INFO   ] [Image       ] Providers: img_tex, img_dds, img_sdl2, img_gif (img_pil, img_ffpyplayer ignored)
[INFO   ] [Text        ] Provider: sdl2(['text_pango'] ignored)
[INFO   ] [Window      ] Provider: sdl2(['window_egl_rpi'] ignored)
[INFO   ] [GL          ] Using the "OpenGL" graphics system
[INFO   ] [GL          ] Backend used <sdl2>
[INFO   ] [GL          ] OpenGL version <b'4.6.0 NVIDIA 390.116'>
[INFO   ] [GL          ] OpenGL vendor <b'NVIDIA Corporation'>
[INFO   ] [GL          ] OpenGL renderer <b'NVS 310/PCIe/SSE2'>
[INFO   ] [GL          ] OpenGL parsed version: 4, 6
[INFO   ] [GL          ] Shading version <b'4.60 NVIDIA'>
[INFO   ] [GL          ] Texture max size <16384>
[INFO   ] [GL          ] Texture max units <32>
[INFO   ] [Window      ] auto add sdl2 input provider
[INFO   ] [Window      ] virtual keyboard not allowed, single mode, not docked
[INFO   ] [Base        ] Start application main loop
[INFO   ] [GL          ] NPOT texture support is available
This is useful for debugging your application.
Next, you’ll try adding an Image widget and see how that differs from a Label.
Displaying an Image
Kivy has a couple of different image-related widgets to choose from. You can use Image to load local images from your hard drive or AsyncImage to load an image from a URL. For this example, you’ll stick with the standard Image class:
from kivy.app import App
from kivy.uix.image import Image

class MainApp(App):
    def build(self):
        img = Image(source='/path/to/real_python.png',
                    size_hint=(1, .5),
                    pos_hint={'center_x':.5, 'center_y':.5})

        return img

if __name__ == '__main__':
    app = MainApp()
    app.run()
In this code, you import Image from the kivy.uix.image sub-package. The Image class takes a lot of different parameters, but the one that you want to use is source. This tells Kivy which image to load. Here, you pass a fully-qualified path to the image. The rest of the code is the same as what you saw in the previous example.
When you run this code, you’ll see something like the following:
The text from the previous example has been replaced with an image.
Now you’ll learn how to add and arrange multiple widgets in your application.
Laying Out the UI
Each GUI framework that you use has its own method of arranging widgets. For example, in wxPython you’ll use sizers, while in Tkinter you use a layout or geometry manager. With Kivy, you’ll use Layouts. There are several different types of Layouts that you can use. Here are some of the most common ones:
BoxLayoutFloatLayoutGridLayout
You can search Kivy’s documentation for a full list of available Layouts. You can also look in kivy.uix for the actual source code.
Try out the BoxLayout with this code:
import kivy
import random

from kivy.app import App
from kivy.uix.button import Button
from kivy.uix.boxlayout import BoxLayout

red = [1,0,0,1]
green = [0,1,0,1]
blue =  [0,0,1,1]
purple = [1,0,1,1]

class HBoxLayoutExample(App):
    def build(self):
        layout = BoxLayout(padding=10)
        colors = [red, green, blue, purple]

        for i in range(5):
            btn = Button(text="Button #%s" % (i+1),
                         background_color=random.choice(colors)
                         )

            layout.add_widget(btn)
        return layout

if __name__ == "__main__":
    app = HBoxLayoutExample()
    app.run()
Here, you import BoxLayout from kivy.uix.boxlayout and instantiate it. Then you create a list of colors, which are themselves lists of Red-Blue-Green (RGB) colors. Finally, you loop over a range of 5, creating a button btn for each iteration. To make things a bit more fun, you set the background_color of the button to a random color. You then add the button to your layout with layout.add_widget(btn).
When you run this code, you’ll see something like this:
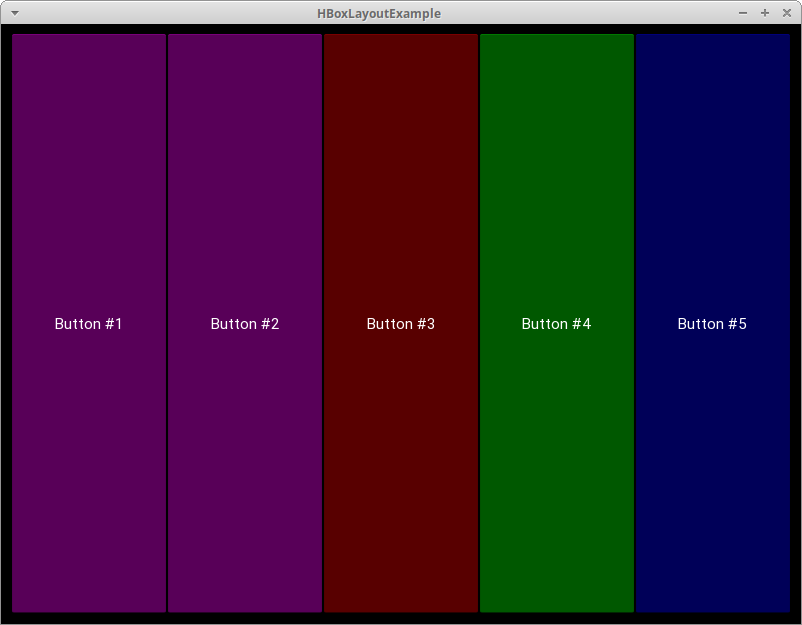
There are 5 randomly-colored buttons, one for each iteration of your for loop.
When you create a layout, there are a few arguments you should know:
padding: You can specify thepaddingin pixels between the layout and its children in one of three ways:- A four-argument list: [
padding_left,padding_top,padding_right,padding_bottom] - A two-argument list: [
padding_horizontal,padding_vertical] - A singular argument:
padding=10
- A four-argument list: [
spacing: You can add space between the children widgets with this argument.orientation: You can change the defaultorientationof theBoxLayoutfrom horizontal to vertical.
Adding Events
Like most GUI toolkits, Kivy is mostly event-based. The framework responds to user keypresses, mouse events, and touch events. Kivy has the concept of a Clock that you can use to schedule function calls for some time in the future.
Kivy also has the concept of Properties, which works with the EventDispatcher. Properties help you do validation checking. They also let you fire events whenever a widget changes its size or position.
Let’s add a button event to your button code from earlier:
from kivy.app import App
from kivy.uix.button import Button

class MainApp(App):
    def build(self):
        button = Button(text='Hello from Kivy',
                        size_hint=(.5, .5),
                        pos_hint={'center_x': .5, 'center_y': .5})
        button.bind(on_press=self.on_press_button)

        return button

    def on_press_button(self, instance):
        print('You pressed the button!')

if __name__ == '__main__':
    app = MainApp()
    app.run()
In this code, you call button.bind() and link the on_press event to MainApp.on_press_button(). This method implicitly takes in the widget instance, which is the button object itself. Finally, a message will print to stdout whenever the user presses your button.
Using the KV Language
Kivy also provides a design language called KV that you can use with your Kivy applications. The KV language lets you separate your interface design from the application’s logic. This follows the separation of concerns principle and is part of the Model-View-Controller architectural pattern. You can update the previous example to use the KV language:
from kivy.app import App
from kivy.uix.button import Button

class ButtonApp(App):
    def build(self):
        return Button()

    def on_press_button(self):
        print('You pressed the button!')

if __name__ == '__main__':
    app = ButtonApp()
    app.run()
This code might look a bit odd at first glance, as it creates a Button without setting any of its attributes or binding it to any events. What’s happening here is that Kivy will automatically look for a file that has the same name as the class in lowercase, without the App part of the class name.
In this case, the class name is ButtonApp, so Kivy will look for a file named button.kv. If that file exists and is properly formatted, then Kivy will use it to load up the UI. Go ahead and create this file and add the following code:
 1<Button>:
 2    text: 'Press me'
 3    size_hint: (.5, .5)
 4    pos_hint: {'center_x': .5, 'center_y': .5}
 5    on_press: app.on_press_button()
Here’s what each line does:
- Line 1 matches the
Buttoncall in your Python code. It tells Kivy to look into the instantiated object for a button definition. - Line 2 sets the button’s
text. - Line 3 sets the width and height with
size_hint. - Line 4 sets the button’s position with
pos_hint. - Line 5 sets the
on_pressevent handler. To tell Kivy where the event handler is, you useapp.on_press_button(). Here, Kivy knows will look in theApplicationclass for a method called.on_press_button().
You can set up all of your widgets and layouts inside one or more KV language files. The KV language also supports importing Python modules in KV, creating dynamic classes, and much more. For full details, check out Kivy’s guide to the KV Language.
Now you’re ready to create a real application!
Creating a Kivy Application
One of the best ways to learn a new skill is by creating something useful. With that in mind, you’ll use Kivy to build a calculator that supports the following operations:
- Addition
- Subtraction
- Multiplication
- Division
For this application, you’ll need a series of buttons in some kind of layout. You’ll also need a box along the top of your app to display the equations and their results. Here’s a sketch of your calculator:
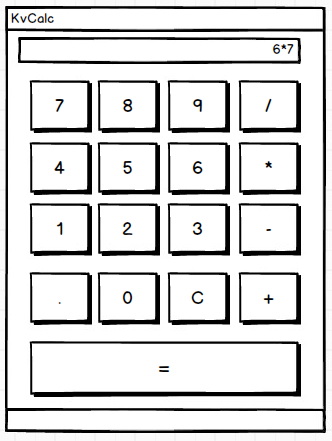
Now that you have a goal for the UI, you can go ahead and write the code:
 1from kivy.app import App
 2from kivy.uix.boxlayout import BoxLayout
 3from kivy.uix.button import Button
 4from kivy.uix.textinput import TextInput
 5
 6class MainApp(App):
 7    def build(self):
 8        self.operators = ["/", "*", "+", "-"]
 9        self.last_was_operator = None
10        self.last_button = None
11        main_layout = BoxLayout(orientation="vertical")
12        self.solution = TextInput(
13            multiline=False, readonly=True, halign="right", font_size=55
14        )
15        main_layout.add_widget(self.solution)
16        buttons = [
17            ["7", "8", "9", "/"],
18            ["4", "5", "6", "*"],
19            ["1", "2", "3", "-"],
20            [".", "0", "C", "+"],
21        ]
22        for row in buttons:
23            h_layout = BoxLayout()
24            for label in row:
25                button = Button(
26                    text=label,
27                    pos_hint={"center_x": 0.5, "center_y": 0.5},
28                )
29                button.bind(on_press=self.on_button_press)
30                h_layout.add_widget(button)
31            main_layout.add_widget(h_layout)
32
33        equals_button = Button(
34            text="=", pos_hint={"center_x": 0.5, "center_y": 0.5}
35        )
36        equals_button.bind(on_press=self.on_solution)
37        main_layout.add_widget(equals_button)
38
39        return main_layout
Here’s how your calculator code works:
- In lines 8 to 10, you create a list of
operatorsand a couple of handy values,last_was_operatorandlast_button, that you’ll use later on. - In lines 11 to 15, you create a top-level layout
main_layoutand add a read-onlyTextInputwidget to it. - In lines 16 to 21, you create a nested list of lists containing most of your
buttonsfor the calculator. - In line 22, you start a
forloop over thosebuttons. For each nested list you’ll do the following:- In line 23, you create a
BoxLayoutwith a horizontal orientation. - In line 24, you start another
forloop over the items in the nested list. - In lines 25 to 39, you create the buttons for the row, bind them to an event handler, and add the buttons to the horizontal
BoxLayoutfrom line 23. - In line 31, you add this layout to
main_layout.
- In line 23, you create a
- In lines 33 to 37, you create the equals button (
=), bind it to an event handler, and add it tomain_layout.
The next step is to create the .on_button_press() event handler. Here’s what that code looks like:
41def on_button_press(self, instance):
42    current = self.solution.text
43    button_text = instance.text
44
45    if button_text == "C":
46        # Clear the solution widget
47        self.solution.text = ""
48    else:
49        if current and (
50            self.last_was_operator and button_text in self.operators):
51            # Don't add two operators right after each other
52            return
53        elif current == "" and button_text in self.operators:
54            # First character cannot be an operator
55            return
56        else:
57            new_text = current + button_text
58            self.solution.text = new_text
59    self.last_button = button_text
60    self.last_was_operator = self.last_button in self.operators
Most of the widgets in your application will call .on_button_press(). Here’s how it works:
-
Line 41 takes the
instanceargument so you can access which widget called the function. -
Lines 42 and 43 extract and store the value of the
solutionand the buttontext. -
Lines 45 to 47 check to see which button was pressed. If the user pressed
C, then you’ll clear thesolution. Otherwise, move on to theelsestatement. -
Line 49 checks if the solution has any pre-existing value.
-
Line 50 to 52 check if the last button pressed was an operator button. If it was, then
solutionwon’t be updated. This is to prevent the user from having two operators in a row. For example,1 */is not a valid statement. -
Lines 53 to 55 check to see if the first character is an operator. If it is, then
solutionwon’t be updated, since the first value can’t be an operator value. -
Lines 56 to 58 drop to the
elseclause. If none of the previous conditions are met, then updatesolution. -
Line 59 sets
last_buttonto the label of the last button pressed. -
Line 60 sets
last_was_operatortoTrueorFalsedepending on whether or not it was an operator character.
The last bit of code to write is .on_solution():
62def on_solution(self, instance):
63    text = self.solution.text
64    if text:
65        solution = str(eval(self.solution.text))
66        self.solution.text = solution
Once again, you grab the current text from solution and use Python’s built-in eval() to execute it. If the user created a formula like 1+2, then eval() will run your code and return the result. Finally, you set the result as the new value for the solution widget.
When you run this code, your application will look like this on a desktop computer:
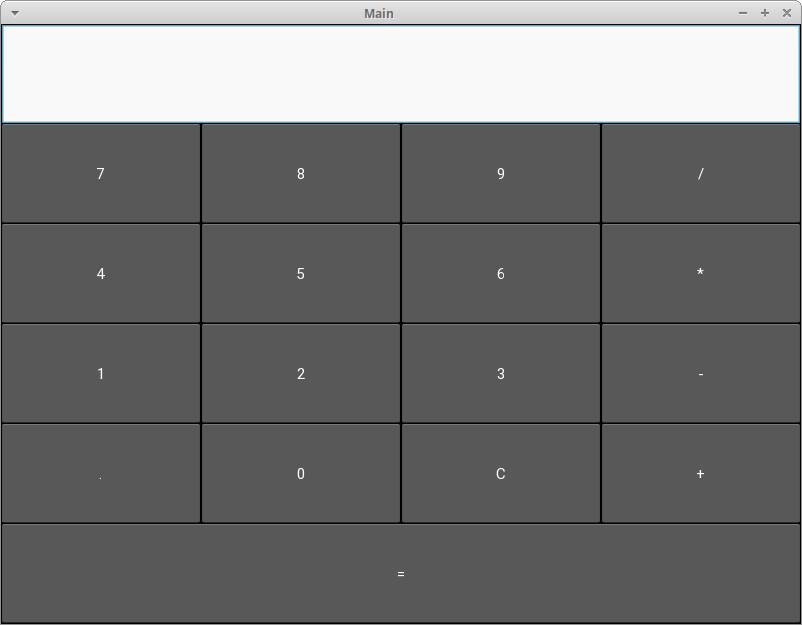
To see the full code for this example, expand the code block below.
Here’s the full code for the calculator:
from kivy.app import App
from kivy.uix.boxlayout import BoxLayout
from kivy.uix.button import Button
from kivy.uix.textinput import TextInput

class MainApp(App):
    def build(self):
        self.operators = ["/", "*", "+", "-"]
        self.last_was_operator = None
        self.last_button = None
        main_layout = BoxLayout(orientation="vertical")
        self.solution = TextInput(
            multiline=False, readonly=True, halign="right", font_size=55
        )
        main_layout.add_widget(self.solution)
        buttons = [
            ["7", "8", "9", "/"],
            ["4", "5", "6", "*"],
            ["1", "2", "3", "-"],
            [".", "0", "C", "+"],
        ]
        for row in buttons:
            h_layout = BoxLayout()
            for label in row:
                button = Button(
                    text=label,
                    pos_hint={"center_x": 0.5, "center_y": 0.5},
                )
                button.bind(on_press=self.on_button_press)
                h_layout.add_widget(button)
            main_layout.add_widget(h_layout)

        equals_button = Button(
            text="=", pos_hint={"center_x": 0.5, "center_y": 0.5}
        )
        equals_button.bind(on_press=self.on_solution)
        main_layout.add_widget(equals_button)

        return main_layout

    def on_button_press(self, instance):
        current = self.solution.text
        button_text = instance.text

        if button_text == "C":
            # Clear the solution widget
            self.solution.text = ""
        else:
            if current and (
                self.last_was_operator and button_text in self.operators):
                # Don't add two operators right after each other
                return
            elif current == "" and button_text in self.operators:
                # First character cannot be an operator
                return
            else:
                new_text = current + button_text
                self.solution.text = new_text
        self.last_button = button_text
        self.last_was_operator = self.last_button in self.operators

    def on_solution(self, instance):
        text = self.solution.text
        if text:
            solution = str(eval(self.solution.text))
            self.solution.text = solution


if __name__ == "__main__":
    app = MainApp()
    app.run()
It’s time to deploy your application!
Packaging Your App for Android
Now that you’ve finished the code for your application, you can share it with others. One great way to do that is to turn your code into an application that can run on your Android phone. To accomplish this, first you’ll need to install a package called buildozer with pip:
Then, create a new folder and navigate to it in your terminal. Once you’re there, you’ll need to run the following command:
This will create a buildozer.spec file that you’ll use to configure your build. For this example, you can edit the first few lines of the spec file as follows:
[app]

# (str) Title of your application
title = KvCalc

# (str) Package name
package.name = kvcalc

# (str) Package domain (needed for android/ios packaging)
package.domain = org.kvcalc
Feel free to browse the rest of the file to see what else you can change.
At this point, you’re almost ready to build your application, but first, you’ll want to install the dependencies for buildozer. Once those are installed, copy your calculator application into your new folder and rename it to main.py. This is required by buildozer. If you don’t have the file named correctly, then the build will fail.
Now you can run the following command:
$ buildozer -v android debug
The build step takes a long time! On my machine, it took 15 to 20 minutes. Depending on your hardware, it may take even longer, so feel free to grab a cup of coffee or go for a run while you wait. Buildozer will download whatever Android SDK pieces it needs during the build process. If everything goes according to plan, then you’ll have a file named something like kvcalc-0.1-debug.apk in your bin folder.
The next step is to connect your Android phone to your computer and copy the apk file to it. Then you can open the file browser on your phone and click on the apk file. Android should ask you if you’d like to install the application. You may see a warning since the app was downloaded from outside Google Play, but you should still be able to install it.
Here’s the calculator running on my Samsung S9:
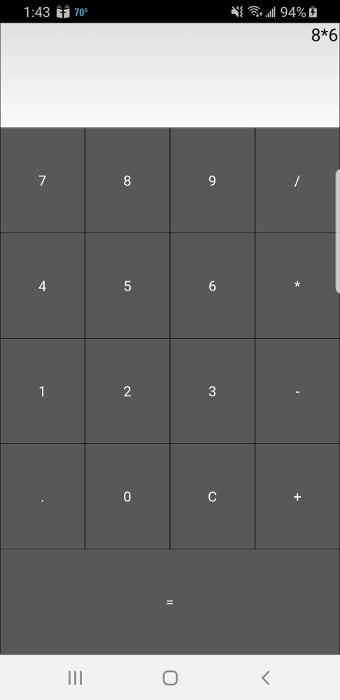
The buildozer tool has several other commands you can use. Check out the documentation to see what else you can do.
You can also package the app using python-for-android if you need more fine-grained control. You won’t cover this here, but if you’re interested, check out the project’s quickstart.
Packaging Your App for iOS
The instructions for building an application for iOS are a bit more complex than Android. For the most up-to-date information, you should always use Kivy’s official packaging documentation. You’ll need to run the following commands before you can package your application for iOS on your Mac:
$ brew install autoconf automake libtool pkg-config
$ brew link libtool
$ sudo easy_install pip
$ sudo pip install Cython==0.29.10
Once those are all installed successfully, you’ll need to compile the distribution using the following commands:
$ git clone git://github.com/kivy/kivy-ios
$ cd kivy-ios
$ ./toolchain.py build python3 kivy
If you get an error that says iphonesimulator can’t be found, then see this StackOverflow answer for ways to solve that issue. Then try running the above commands again.
If you run into SSL errors, then you probably don’t have Python’s OpenSSL setup. This command should fix that:
$ cd /Applications/Python 3.7/
$ ./Install Certificates.command
Now go back and try running the toolchain command again.
Once you’ve run all the previous commands successfully, you can create your Xcode project using the toolchain script. Your main application’s entry point must be named main.py before you create the Xcode project. Here is the command you’ll run:
./toolchain.py create <title> <app_directory>
There should be a directory named title with your Xcode project in it. Now you can open that project in Xcode and work on it from there. Note that if you want to submit your application to the App Store, then you’ll have to create a developer account at developer.apple.com and pay their yearly fee.
Packaging Your App for Windows
You can package your Kivy application for Windows using PyInstaller. If you’ve never used it before, then check out Using PyInstaller to Easily Distribute Python Applications.
You can install PyInstaller using pip:
$ pip install pyinstaller
The following command will package your application:
This command will create a Windows executable and several other files. The -w argument tells PyInstaller that this is a windowed application, rather than a command-line application. If you’d rather have PyInstaller create a single executable file, then you can pass in the --onefile argument in addition to -w.
Packaging Your App for macOS
You can use PyInstaller to create a Mac executable just like you did for Windows. The only requirement is that you run this command on a Mac:
$ pyinstaller main.py -w --onefile
This will create a single file executable in the dist folder. The executable will be the same name as the Python file that you passed to PyInstaller. If you’d like to reduce the file size of the executable, or you’re using GStreamer in your application, then check out Kivy’s packaging page for macOS for more information.
Conclusion
Kivy is a really interesting GUI framework that you can use to create desktop user interfaces and mobile applications on both iOS and Android. Kivy applications will not look like the native apps on any platform. This can be an advantage if you want your application to look and feel different from the competition!
In this tutorial, you learned the basics of Kivy including how to add widgets, hook up events, lay out multiple widgets, and use the KV language. Then you created your first Kivy application and learned how to distribute it on other platforms, including mobile!
There are many widgets and concepts about Kivy that you didn’t cover here, so be sure to check out Kivy’s website for tutorials, sample applications, and much more.
Further Reading
To learn more about Kivy, check out these resources:
- Kivy Programming Guide
- Kivy Packaging Documentation
- Build Desktop GUI Apps Using Python
To see how you might create a desktop application with another Python GUI framework, check out How to Build a Python GUI Application With wxPython.
Watch Now This tutorial has a related video course created by the Real Python team. Watch it together with the written tutorial to deepen your understanding: Build Cross-Platform GUI Apps With Kivy