-
Contents
-
Table of Contents
-
Bookmarks
Quick Links
COMPETENCE E4401-4
Built-In Electric Oven
Operating Instructions
Related Manuals for AEG Electrolux COMPETENCE E4401-4
Summary of Contents for AEG Electrolux COMPETENCE E4401-4
-
Page 1
COMPETENCE E4401-4 Built-In Electric Oven Operating Instructions… -
Page 2: Dear Customer
Dear Customer, Please read these user instructions carefully and keep them to refer to later. Please pass the user instructions on to any future owner of the appli- ance. The following symbols are used in the text: Safety instructions Warning! Information that affects your personal safety. Important! Information that prevents damage to the appliance.
-
Page 3: Table Of Contents
Contents Operating Instructions ……..Safety instructions.
-
Page 4
Cleaning and Care ……….40 Outside of the appliance. -
Page 5: Operating Instructions
Operating Instructions 1 Safety instructions This appliance conforms with the following EU Directives: – 73/23/EEC dated 19.02.1973 Low Voltage Directive – 89/336/EEC dated 03.05.1989 EMC Directive inclusive of Amending Directive 92/31/EEC – 93/68/EEC dated 22.07.1993 CE Marking Directive Electrical safety •…
-
Page 6: How To Avoid Damage To The Appliance
How to avoid damage to the appliance • Do not line the oven with aluminium foil and do not place baking trays, pots, etc. on the oven floor, as the heat that builds up will dam- age the oven enamel. •…
-
Page 7: Disposal
Disposal Packaging material The packaging materials are environmentally friendly and can be recy- cled. The plastic components are identified by markings, e.g. >PE<, >PS<, etc. Please dispose of the packaging materials in the appropriate container at the community waste disposal facilities. Old appliance The symbol on the product or on its packaging indicates that this…
-
Page 8: Description Of The Appliance
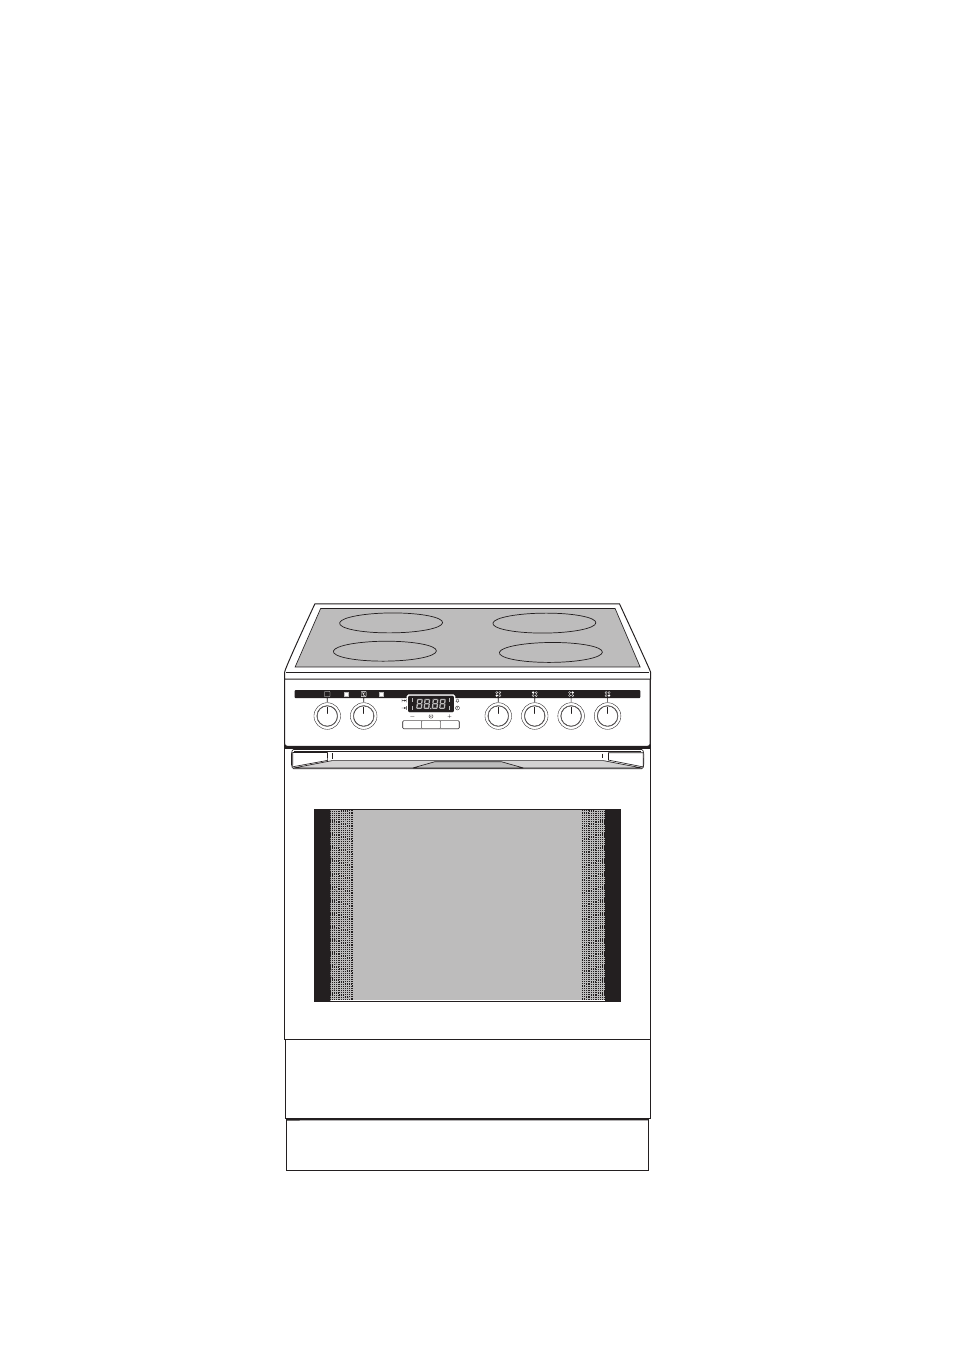
Description of the Appliance General Overview Control panel Door handle Full glass door Control Panel Oven Power Indicator Temperature Pilot Light Temperature / Time Display Selection buttons Oven Functions Temperature selector Hob Cooking Zone Control Hob Cooking Zone Control…
-
Page 9: Oven Features
Oven Features Top heat and heating elements Oven lighting Shelf positions Meat probe socket Fat Filter Fan heating element Bottom Heat Oven shelf runners, removable Oven steam vent The steam from the oven is fed di- rectly upwards via the duct in the rear of the cooking surface.
-
Page 10: Oven Accessories
Oven accessories Oven shelf For cookware, cake tins, roasts and grilled foods. Baking tray For cakes and biscuits. Roasting Pan For baking and roasting or as a pan for collecting fat. Meat probe For determining exactly how far joints of meat are cooked.
-
Page 11: Before Using For The First Time
Before Using for the first time Initial Cleaning Before using the oven for the first time you should clean it thoroughly. Caution: Do not use any caustic, abrasive cleaners! The surface could be damaged. To clean metal fronts use commercially available cleaning agents. 1.
-
Page 12: Using The Rings
Using the Rings Also refer to the operating instructions for your built-in hob. It con- tains important information on ovenware, operation, cleaning and care. Heat settings • You may select the heat settings within the range of settings 1-9. • Intermediate positions may be selected between settings 2 and 7. 1 = lowest heat setting 9 = highest heat setting Switch the cooking zone off approx.
-
Page 13: Setting The Heat Setting
Setting the heat setting 1. Select the heat setting. 2. To end the cooking process, turn back to the Off position. The corresponding ring pilot light is lit while the ring is operating.
-
Page 14: Using The Oven
Using the Oven The oven is equipped with retractable buttons for “Oven functions” and “Temperature selection”. To use, press the relevant button. The button then sticks out. Switching the Oven On and Off Temperature Pilot Light Oven Power Indicator Oven Functions Temperature selector 1.
-
Page 15: Oven Functions
Oven Functions The oven has the following functions: Heating element/ Oven function Application Light Using this function you can light up the oven interior, e.g. for cleaning. Fan-assisted For baking on up to two oven Top heat, bottom- circulation levels. heat, fan Set the oven temperatures 20-40 °C lower than when using Con-…
-
Page 16: Inserting The Oven Shelf, Baking Tray And Roasting Pan
Inserting the Oven Shelf, Baking Tray and Roasting Pan Shelf runner safety and anti-tip device As a shelf runner safety device, all insertable components have a small curved indentation at the bottom on the right and left-hand edge. Always insert insertable components so that this indentation is at the back of the oven interior.
-
Page 17: Inserting/Removing The Grease Filter
Inserting/Removing the Grease Filter Only use the grease filter when roasting to protect the rear heating elements from fat splashes. Inserting the grease filter Hold the grease filter by the grip and insert the two mounts downwards into the opening on the rear wall of theoven (fan opening).
-
Page 18: Additional Functions
Additional functions Either the Countdown or the Meat Temperature / Time Display probe can be set. Countdown Setting the timer. Meat probe Setting the core temperature. Settings buttons General Hints • After a function has been selected, the display flashes for about 5 seconds.
-
Page 19: Countdown
Countdown This function does not affect the operation of the oven. 1. Press any button. «00» will flash in the display. 2. Within 5 seconds, set the desired time period by pressing the buttons. (Maximum: 99 minutes). Within 5 seconds the display will show the time remaining.
-
Page 20: Meat Probe
Meat probe A signal will sound when the set core temperature has been reached. The oven must not be switched off! Two temperatures are to be taken into consideration: – The oven temperature: see Roasting Chart! – Core temperature: see Meat probe Chart! Warning: Only the accompanying meat cooking rod may be used.
-
Page 21
Within approximately 5 seconds the display will show the actual core temperature. A signal will sound as soon as the actual core temperature has reached the set temperature. The signal can be switched off by pressing any button. Warning: The meat skewer is hot! Take special care not to burn your- self when removing the plug and the end point! -
Page 22: Mechanical Door Lock
Mechanical Door Lock When the appliance is delivered, the door lock is deactivated. Activate the door lock Pull the safety catch forwards until it locks in place. Open the oven door: 1. Shut the door. 2. Press the safety catch and keep it depressed.
-
Page 23: Uses, Tables And Tips
Uses, Tables and Tips Cooking table The information given in the following table is for guidance only. Heat Cooking- Cooking set- suitable for Tips/Hints process time ting Residual heat, Off posi- tion Keeping Keeping cooked foods food as required Cover warm warm Hollandaise sauce,…
-
Page 24
We recommend when boiling or searing foods using the highest heat setting at first and then letting foods requiring a longer cooking time finish cooking on the desired heat setting. Overheated fats and oils can ignite quickly. If you are cooking foods in fat or oil (e.g. -
Page 25: Baking
Baking Oven function: Fan-assisted circulation , Fan cooking Conventional Baking tins • For Conventional , dark metal and non-stick tins are suitable. • For Fan-assisted circulation or Fan cooking , bright metal tins are also suitable. Oven levels • Baking with Conventional and Fan-assisted circulation is possi- ble on one oven level.
-
Page 26
General Instructions • Insert the tray with the bevel at the front. • With Conventional or Fan-assisted circulation you can also bake with two tins next to one another on the oven shelf at the same time. This does not significantly increase baking time. When frozen foods are used the trays inserted may distort during cook- ing. -
Page 27: Baking Table
Baking table Time Type of Shelf Tempera- Ovenfunction Hours baking position ture °C mins. Baking in tins Ring cake or brioche Fan-assisted 150-160 0:50-1:10 circulation Madeira cake/Fruitcakes Fan-assisted 140-160 1:10-1:30 circulation Sponge cake Fan-assisted 0:25-0:40 circulation Sponge cake Conventional 0:25-0:40 Flan base — short pastry Conventional 180-200…
-
Page 28
Time Type of Shelf Tempera- Ovenfunction Hours baking position ture °C mins. Fruit flans (made with yeast Fan-assisted 0:35-0:50 dough/sponge mixture) circulation Fruit flans (made with yeast Conventional 0:35-0:50 dough/sponge mixture) Fruit flans made with short Conventional 170-190 0:40-1:20 pastry Yeast cakes with delicate Conventional 160-180… -
Page 29
Time Type of Shelf Tempera- Ovenfunction Hours baking position ture °C mins. Rolls Fan-assisted 0:20-0:35 circulation Rolls Conventional 0:20-0:35 Small cakes (20per tray) Fan-assisted 0:20-0:30 circulation Small cakes (20per tray) Fan-assisted 1 / 4 0:25-0:40 circulation Small cakes (20per tray) Conventional 0:20-0:30 1) Pre-heat the oven… -
Page 30: Tips On Baking
Tips on Baking Baking results Possible cause Remedy The cake is not Wrong oven level Place cake lower browned enough un- derneath The cake sinks (be- Oven temperature too high Use a slightly lower setting comes soggy, lumpy, Baking time too short Set a longer baking time streaky) Baking times cannot be re-…
-
Page 31: Table For Bakes And Gratins
Table for Bakes and Gratins Tempera- Time Shelf Dish Oven function ture Hours position °C mins. Pasta bake Conventional 180-200 0:45-1:00 Lasagne Conventional 180-200 0:25-0:40 Vegetables au gratin Rotitherm 160-170 0:15-0:30 Baguettes topped with Rotitherm 160-170 0:15-0:30 melted cheese Sweet bakes Conventional 180-200 0:40-0:60…
-
Page 32: Roasting
Roasting Oven function: Conventional or Rotitherm Insert the grease filter when roasting! Roasting dishes • Any heat-resistant ovenware is suitable to use for roasting (please read the manufacturer’s instructions). • Large roasting joints can be roasted directly in the roasting tray or on the oven shelf with the roasting tray placed below it.
-
Page 33: Roasting Table
Roasting table Temper- Time Shelf Type of meat Quantity Ovenfunction ature Hours position °C mins. Beef Conven- Pot roast 1-1.5 kg 200-250 2:00-2:30 tional per cm. of Roast beef or fillet thickness per cm. 190- — rare Rotitherm 0:05-0:06 of thickness per cm.
-
Page 34
Temper- Time Shelf Type of meat Quantity Ovenfunction ature Hours position °C mins. Poultry 200-250g Poultry portions Rotitherm 200-220 0:35-0:50 each 400-500g Half chicken Rotitherm 190-210 0:35-0:50 each Chicken, poulard 1-1.5 kg Rotitherm 190-210 0:45-1:15 Duck 1.5-2 kg Rotitherm 180-200 1:15-1:45 Goose 3.5-5 kg Rotitherm… -
Page 35: Meat Probe Table
Meat probe Table Food to be Cooked Meat Core Temperature Beef Rib steak or fillet steak rare 45 — 50 °C medium 60 — 65 °C well done 75 — 80 °C Pork Shoulder of pork, ham joint, neck 80 — 82 °C Chop (saddle), smoked pork loin 75 — 80 °C Meat loaf…
-
Page 36: Grill Sizes
Grill Sizes Oven function: Grill or Dual gril with maximum temperature setting Important: Always grill with the oven door closed. The empty oven should always be pre-heated with the grill functions for 5 minutes. • For grilling, place the shelf in the recommended shelf position. •…
-
Page 37: Defrosting
Defrosting Oven function: Defrost (no temperature setting) • Unwrap the food and place it on a plate on the oven shelf. • Do not cover with a plate or bowl, as these can substantially lengthen the defrosting time. • For defrosting, place the shelf in the 1st oven level from the bot- tom.
-
Page 38: Making Preserves
Making Preserves Oven function: Bottom heat • For preserving, use only commercially available preserve jars of the same size. • Jars with twist-off or bayonet type lids and metal tins are not suitable. • When making preserves, the first shelf position from the bottom is the one most used.
-
Page 39: Preserves Table
Preserves table The times and temperatures for making preserves are for guidance only. Cooking time Continue to Temperature Preserve until simmering cook at 100°C in°C in mins. in mins. Soft fruit Strawberries, blueberries, 160-170 35-45 raspberries, ripe gooseberries Unripe gooseberries 160-170 35-45 10-15…
-
Page 40: Cleaning And Care
Cleaning and Care Warning: For cleaning, the appliance must be switched off and cooled down. Warning: For safety reasons, do not clean the appliance with steam jet or high-pressure cleaning equipment. Attention: Do not use any scouring agents, sharp cleaning tools or scourers.
-
Page 41: Shelf Support Rails
Shelf Support Rails The shelf support rails on the left and right hand sides of the oven can be removed for cleaning the side walls. Removing the shelf support rails First pull the front of the rail away from the oven wall (1) and then un- hitch at the back (2).
-
Page 42: Oven Lighting
Oven Lighting Warning: There is a danger of electric shock! Prior to changing the oven light bulb: – Switch off the oven! – Remove the fuses in the fuse box or switch off the circuit breaker. Place a cloth on the oven floor to protect the oven light and glass cov- Replacing the oven light bulb/ cleaning the glass cover 1.
-
Page 43: Oven Ceiling
Oven Ceiling The upper heating element can be folded down to make it easier to clean the oven ceiling. Folding down the heating ele- ment Warning: Only fold down the heat- ing element when the oven is switched off and there is no risk of being burnt! 1.
-
Page 44: Oven Door
Oven door For easier cleaning of the oven interior the oven door of your appliance can be taken off its hinges. Removing the oven door from its hinges 1. Open the oven door as far as it will 2. Undo the clamping levers (A) on both door hinges fully.
-
Page 45
Hanging the oven door back on its hinges 1. From the handle side take hold of the oven door with a hand on each side and hold at an angle of approx. 45°. Position the recesses on the bottom of the oven door on the hinges on the oven. -
Page 46: Oven Door Glass
Oven door glass The oven door is fitted with three panels of glass mounted one behind the other.The inner panels can be removed for cleaning. Important! Rough handling, especially around the edges of the front panel, can cause the glass to break. Removing the door glass panels 1.
-
Page 47
5. Take hold of the door glass panels on their upper edge one after the other and take them out of the guide by pulling them upwards.. Cleaning the door glass panels Clean the door glass panels thoroughly with a solution of water and washing up liquid. -
Page 48
On the open side of the door trim (B) there is a guide bar (C). This must be pushedThis must be pushed between the outer door panel and the guide corner (D). The clip seal (E) must be snapped in. 3. -
Page 49: What To Do If
What to do if … Problem Possible cause Remedy The cooking zones are not Consult the instruction manual for the built-in range working The oven does not heat The oven has not been Switch the oven on switched on The required settings have Check the settings not been made The domestic electrical…
-
Page 51: Service
Service In the event of technical faults, please first check whether you can remedy the problem yourself with the help of the operating instruc- tions (section “What to do if…”). If you were not able to remedy the problem yourself, please contact the Customer Care Department or one of our service partners.
-
Page 52
USD 14 billion in more than 150 countries around the world. AEG Hausgeräte GmbH Postfach 1036 D-90327 Nürnberg http://www.aeg-electrolux.de © Copyright by AEG 822 927 521-A-100206-01 Subject to change without notice…
-
Contents
-
Table of Contents
-
Bookmarks
Quick Links
COMPETENCE E1100-4
Built-In Electric Oven
Operating Instructions
Related Manuals for AEG COMPETENCE E1100-4
Summary of Contents for AEG COMPETENCE E1100-4
-
Page 1
COMPETENCE E1100-4 Built-In Electric Oven Operating Instructions… -
Page 2: Dear Customer
Dear Customer, Please read these user instructions carefully and keep them to refer to later. Please pass the user instructions on to any future owner of the appli- ance. The following symbols are used in the text: Safety instructions Warning! Information that affects your personal safety. Important! Information that prevents damage to the appliance.
-
Page 3: Table Of Contents
Contents Operating Instructions ……..Safety instructions.
-
Page 4
Cleaning and Care ……….32 Outside of the appliance. -
Page 5: Operating Instructions
Operating Instructions 1 Safety instructions This appliance conforms with the following EU Directives: – 73/23/EEC dated 19.02.1973 Low Voltage Directive – 89/336/EEC dated 03.05.1989 EMC Directive inclusive of Amending Directive 92/31/EEC – 93/68/EEC dated 22.07.1993 CE Marking Directive Electrical safety •…
-
Page 6: Disposal
How to avoid damage to the appliance • Do not line the oven with aluminium foil and do not place baking trays, pots, etc. on the oven floor, as the heat that builds up will dam- age the oven enamel. •…
-
Page 7: Description Of The Appliance
Description of the Appliance General Overview Control panel Door handle Full glass door Control Panel Temperature Pilot Light Time display Clock function buttons Temperature selector Oven Functions Hob Cooking Zone Control Knobs…
-
Page 8: Oven Features
Oven Features Top heat and heating elements Oven lighting Shelf positions Bottom Heat Oven shelf runners, removable Oven steam vent The steam from the oven is fed di- rectly upwards via the duct in the rear of the cooking surface. Oven accessories Combination shelf For dishes, cake tins, items for…
-
Page 9: Before Using For The First Time
Before Using for the first time Setting and changing the time The oven only operates when the time has been set. When the appliance has been con- nected to the electrical supply or when there has been a power cut, the function indicator Time flashes automatically.
-
Page 10: Initial Cleaning
Initial Cleaning Before using the oven for the first time you should clean it thoroughly. Caution: Do not use any caustic, abrasive cleaners! The surface could be damaged. To clean metal fronts use commercially available cleaning agents. 1. Turn the oven function switch to oven lighting 2.
-
Page 11: Using The Rings
Using the Rings Also refer to the operating instructions for your built-in hob. It con- tains important information on ovenware, operation, cleaning and care. Heat settings • You may select the heat settings within the range of settings 1-9. • Intermediate positions may be selected between settings 2 and 7. 1 = lowest heat setting 9 = highest heat setting Switch the cooking zone off approx.
-
Page 12: Setting The Heat Setting
Setting the heat setting 1. Select the heat setting. 2. To end the cooking process, turn back to the Off position.
-
Page 13: Using The Oven
Using the Oven Switching the Oven On and Off Temperature Pilot Light Temperature selector Oven Functions 1. Turn the oven functions dial to the desired function. 2. Turn the temperature selector to the desired temperature. The temperature pilot light is lit as long as the oven is heating up. 3.
-
Page 14: Oven Functions
Oven Functions The oven has the following functions: Heating element/ Oven function Application Light Using this function you can light up the oven interior, e.g. for cleaning. Conventional For baking and roasting on one Top heat, oven level. bottomheat Top heat For browning bread, cakes and Top heat pastries and for bakes.
-
Page 15: Inserting The Shelf And Tray
Inserting the Shelf and Tray Anti-tip device All slide-in units have a small bulge on the left and right. This bulge is an anti-tip device and must always point to the rear of the oven. Inserting tray: The anti-tip device must point to- wards the rear of the oven.
-
Page 16: Clock Functions
Clock Functions Function Indicators Time display Function Indicators Selector Button Button Button Countdown To set a countdown. A signal sounds after the time has elapsed. This function does not affect the functioning of the oven. Cook time To set how long the oven is to be in use. End time To set when the oven is to switch off again.
-
Page 17: Switching Off The Time Display
How to use the clock functions • After a function has been selected, the corresponding function indi- cator flashes for about 5 seconds. During this period, the desired times can be set using the button. • When the desired time has been set, the function indicator continues to flash for approx.
-
Page 18
Countdown 1. Press the Selection button re- peatedly until the function indica- tor Countdown flashes. 2. Using the button set the desired Countdown (max. 2 hours 30 minutes). After approx. 5 seconds the display shows the time remaining. The function indicator Countdown lights up. -
Page 19
Cook time 1. Press the Selection button re- peatedly until the function indica- tor Cook time flashes. 2. Using the button set the desired cooking time. After approx. 5 seconds the display returns to showing the current time. The function indicator Cook time lights up. -
Page 20
End time 1. Press the Selection button re- peatedly until the function indica- tor End time flashes. 2. Using the button set the desired switch-off time. After approx. 5 seconds the display returns to showing the current time. The function indicator End time lights up. -
Page 21
Cook time and End time combined Cook time and End time can be used simultaneously, if the oven is to be switched on and off automatically at a later time. 1. Using the Cook time function, set the time required for cooking the dish. -
Page 22: Uses, Tables And Tips
Uses, Tables and Tips Cooking table The information given in the following table is for guidance only. Heat Cooking- Cooking set- suitable for Tips/Hints process time ting Residual heat, Off posi- tion Keeping Keeping cooked foods food as required Cover warm warm Hollandaise sauce,…
-
Page 23: Baking
We recommend when boiling or searing foods using the highest heat setting at first and then letting foods requiring a longer cooking time finish cooking on the desired heat setting. Overheated fats and oils can ignite quickly. If you are cooking foods in fat or oil (e.g.
-
Page 24: Baking Table
How to use the Baking Tables The tables give the required temperature settings, baking times and oven shelf levels for a selection of typical dishes. • Temperatures and baking times are for guidance only, as these will depend on the consistency of the pastry, mixture or dough and the number and the type of baking tin.
-
Page 25
Oven Temperature Type of baking Time level ºC Cakes/pastries/breads on baking trays Plaited bread/bread crown 170-190 0:30-0:40 Christmas stollen 160-180 0:40-1:00 Bread (rye bread) first of all 0:20 ……..then 160-180 0:30-1:00 Cream puffs, eclairs 190-210 0:25-0:40 Swiss roll 180-200 0:10-0:20 Dry streusel cake 160-180 0:20-0:40… -
Page 26: Tips On Baking
Tips on baking Baking results Possible cause Remedy The cake is not Wrong oven level Place cake lower in the oven browned enough at the bottom The cake sinks (be- Oven temperature too high Use a slightly lower setting comes soggy, lumpy, Baking time too short Set a longer baking time streaky)
-
Page 27: Roasting
Roasting Oven function: Conventional Roasting dishes • Any heat-resistant ovenware is suitable to use for roasting (please read the manufacturer’s instructions). • Large roasting joints can be roasted directly in the roasting tray or on the oven shelf with the roasting tray placed below it. •…
-
Page 28
Tempera- Amount Time Type of meat Oven level ture Weight Hr.:Min. ºC Pork Shoulder, neck, ham joint, 1-1.5 kg 210-220 1:30-2:00 Chop, spare rib 1-1.5 kg 180-190 1:00-1:30 Meat loaf 750 g-1 kg 170-180 0:45-1:00 Knuckles of pork (pre- 750 g-1 kg 210-220 1:30-2:00 cooked) -
Page 29: Grill Sizes
Grill Sizes Oven function: Grill or Dual grill with maximum temperature setting Important: Always grill with the oven door closed. • The empty oven should always be pre-heated with the grill func- tions for 5 minutes. • For grilling, use both the oven shelf and the roasting tray together. •…
-
Page 30: Making Preserves
Making Preserves Oven function: Bottom heat • For preserving, use only commercially available preserve jars of the same size. • Jars with twist-off or bayonet type lids and metal tins are not suitable. • When making preserves, the first shelf position from the bottom is the one most used.
-
Page 31
Cooking time Continue to Temperature Preserve until simmering cook at 100°C in°C in mins. in mins. Vegetables Carrots 160-170 50-60 5-10 Mushrooms 160-170 40-60 10-15 Cucumbers 160-170 50-60 Mixed pickles 160-170 50-60 Kohlrabi, peas, asparagus 160-170 50-60 15-20 Beans 160-170 50-60 1) Leave standing in oven when switched off… -
Page 32: Cleaning And Care
Cleaning and Care Warning: For cleaning, the appliance must be switched off and cooled down. Warning: For safety reasons, do not clean the appliance with steam jet or high-pressure cleaning equipment. Attention: Do not use any scouring agents, sharp cleaning tools or scourers.
-
Page 33: Shelf Support Rails
Shelf Support Rails The shelf support rails on the left and right hand sides of the oven can be removed for cleaning the side walls. Removing the shelf support rails First pull the front of the rail away from the oven wall (1) and then un- hitch at the back (2).
-
Page 34: Oven Lighting
Oven Lighting Warning: Risk of electric shock! Prior to changing the oven light bulb: – Switch off the oven! – Disconnect from the electricity supply. Place a cloth on the oven floor to protect the oven light and glass cov- Changing the oven light bulb/ cleaning the glass cover 1.
-
Page 35: Oven Ceiling
Oven Ceiling The upper heating element can be folded down to make it easier to clean the oven ceiling. Folding down the heating ele- ment Warning: Only fold down the heat- ing element when the oven is switched off and there is no risk of being burnt! 1.
-
Page 36: Oven Door
Oven door To take off the oven door 1. Open the oven door completely. 2. Undo the brass coloured clamping levers on both door hinges fully. 3. Take hold of the oven door on the sides with both hands and close it about 3/4 of the way through the point of resistance.
-
Page 37: Oven Door Glass
Oven door glass The oven door has two glass plates, set next to each other. The inner plate can be removed for cleaning. Caution: the following steps must be performed only with the oven door removed! If the glass is removed while the door is attached, the lighter weight may cause it to spring up and cause injury.
-
Page 38: What To Do If
What to do if … Problem Possible cause The cooking zones are not Consult the operating instructions for the built-in cook- functioning ing surface The oven does not heat up The oven is not switched Switch the oven on The clock is not set Set the current time on the clock The required settings have…
-
Page 39: Service
Service In the event of technical faults, please first check whether you can remedy the problem yourself with the help of the operating instruc- tions (section “What to do if…”). If you were not able to remedy the problem yourself, please contact the Customer Care Department or one of our service partners.
-
Page 40
From the Electrolux Group. The world´s No.1 choice. The Electrolux Group is the world´s largest producer of powered appliances for kitchen, cleaning and outdoor use. More than 55 million Electrolux Group products (such as refrigerators, cookers, washing machines, vacuum cleaners, chain saws and lawn mowers) are sold each year to a value of approx. USD 14 billion in more than 150 countries around the world.
 02:04
02:04
AEG Competence 41016 VH-WN tűzhely Márkabolt
 03:33
03:33
Электроплита стеклокерамическая AEG 47056 VS-WN
 02:09
02:09
AEG Competence 41056 VH-MN tűzhely Márkabolt
 03:41
03:41
AEG C 41056 VH-MN tűzhely Márkabolt
 01:30
01:30
AEG C 47005 GR-MN tűzhely Márkabolt
 03:34
03:34
AEG 47395GMMN tűzhely Márkabolt
 00:34
00:34
Снятие стекл в духовках AEG
 01:13
01:13
AEG 47036IU-MN схема подключения к сети
VH Отдельно стоящая электроплита Инструкция по установке и э…
Плиты AEG
- Изображение
- Текст
COMPETENCE 41056VH
Отдельно стоящая электроплита
Инструкция по установке и эксплуатации

2
Уважаемая покупательница, уважаемый
покупатель,
Пожалуйста, внимательно прочитайте настоящую инструкцию по
эксплуатации и сохраните ее для получения необходимых
справочных сведений в будущем.
Если прибор перейдет к другому хозяину, передайте ему,
пожалуйста, и эту инструкцию.
В тексте используются следующие символы:
1
Указания по технике безопасности
Предупреждение! Указания, направленные на обеспечение
Вашей личной безопасности.
Внимание! Указания, направленные на предотвращение
повреждений прибора.
3
Рекомендации и практические советы
2
Информация по охране окружающей среды

3
Содержание
Инструкция по эксплуатации
. . . . . . . . . . . . . . . . . . . . . . .
5
Правила техники безопасности . . . . . . . . . . . . . . . . . . . . . . . . . . . .
5
Утилизация . . . . . . . . . . . . . . . . . . . . . . . . . . . . . . . . . . . . . . . . . . . . .
8
Описание прибора. . . . . . . . . . . . . . . . . . . . . . . . . . . . . . . . . . . . . . .
9
Общий вид . . . . . . . . . . . . . . . . . . . . . . . . . . . . . . . . . . . . . . . . . . . . .
9
Регулировочная панель. . . . . . . . . . . . . . . . . . . . . . . . . . . . . . . . . . . . 10
Варочная поверхность . . . . . . . . . . . . . . . . . . . . . . . . . . . . . . . . . . . . 10
Основное оснащение духового шкафа . . . . . . . . . . . . . . . . . . . . . . . 11
Принадлежности духового шкафа . . . . . . . . . . . . . . . . . . . . . . . . . . . 11
Перед первым использованием . . . . . . . . . . . . . . . . . . . . . . . . . . . 12
Установка и изменение времени суток . . . . . . . . . . . . . . . . . . . . . . . 12
Первое мытье . . . . . . . . . . . . . . . . . . . . . . . . . . . . . . . . . . . . . . . . . . . 13
Управление конфорками . . . . . . . . . . . . . . . . . . . . . . . . . . . . . . . . . 14
Установка ступени нагрева. . . . . . . . . . . . . . . . . . . . . . . . . . . . . . . . . 15
Как включить двухконтурную конфорку . . . . . . . . . . . . . . . . . . . . . . . 15
Индикатор остаточного тепла . . . . . . . . . . . . . . . . . . . . . . . . . . . . 15
Управление духовым шкафом . . . . . . . . . . . . . . . . . . . . . . . . . . . . . 16
Включение и выключение духового шкафа . . . . . . . . . . . . . . . . . . . . 16
Функции духового шкафа . . . . . . . . . . . . . . . . . . . . . . . . . . . . . . . . . . 17
Установка реш¸тки, противня и универсального противня в духовку 19
Установка и снятие жирового фильтра . . . . . . . . . . . . . . . . . . . . . . . 20
Функции часов. . . . . . . . . . . . . . . . . . . . . . . . . . . . . . . . . . . . . . . . . . . 21
Отключение индикации времени. . . . . . . . . . . . . . . . . . . . . . . . . . 22
Практические советы и таблицы. . . . . . . . . . . . . . . . . . . . . . . . . . . 27
Посуда для варки . . . . . . . . . . . . . . . . . . . . . . . . . . . . . . . . . . . . . . . . 27
Кулинарная таблица. . . . . . . . . . . . . . . . . . . . . . . . . . . . . . . . . . . . . . . 28
Выпекание . . . . . . . . . . . . . . . . . . . . . . . . . . . . . . . . . . . . . . . . . . . . . . 30
Таблица для выпекания . . . . . . . . . . . . . . . . . . . . . . . . . . . . . . . . . 32
Таблица “Запеканки и запеченные блюда” . . . . . . . . . . . . . . . . . . 38
“Быстрозамороженные готовые блюда” . . . . . . . . . . . . . . . . . . . 39
Жарка . . . . . . . . . . . . . . . . . . . . . . . . . . . . . . . . . . . . . . . . . . . . . . . . . 40
Таблица “Жарка” . . . . . . . . . . . . . . . . . . . . . . . . . . . . . . . . . . . . . . 41
Плоскостное грилирование . . . . . . . . . . . . . . . . . . . . . . . . . . . . . . . . 43
Таблица “Грилирование” . . . . . . . . . . . . . . . . . . . . . . . . . . . . . . . . 43
Размораживание . . . . . . . . . . . . . . . . . . . . . . . . . . . . . . . . . . . . . . . . . 44
Таблица “Размораживание”. . . . . . . . . . . . . . . . . . . . . . . . . . . . . . 44
Подсушивание. . . . . . . . . . . . . . . . . . . . . . . . . . . . . . . . . . . . . . . . . . . 45
Консервирование . . . . . . . . . . . . . . . . . . . . . . . . . . . . . . . . . . . . . . . . 46

4
Мытье и уход . . . . . . . . . . . . . . . . . . . . . . . . . . . . . . . . . . . . . . . . . . . 48
Наружные части духового шкафа. . . . . . . . . . . . . . . . . . . . . . . . . . . . 48
Варочная поверхность . . . . . . . . . . . . . . . . . . . . . . . . . . . . . . . . . . . . 48
Рама варочной поверхности . . . . . . . . . . . . . . . . . . . . . . . . . . . . . . . 49
Камера духового шкафа. . . . . . . . . . . . . . . . . . . . . . . . . . . . . . . . . . . 50
Оснащение . . . . . . . . . . . . . . . . . . . . . . . . . . . . . . . . . . . . . . . . . . . . . 50
Жировой фильтр . . . . . . . . . . . . . . . . . . . . . . . . . . . . . . . . . . . . . . . . . 50
Устройство для выдвигания принадлежностей духового шкафа . . . 51
Очистка телескопических направляющих . . . . . . . . . . . . . . . . . . . . . 52
Подсветка духового шкафа . . . . . . . . . . . . . . . . . . . . . . . . . . . . . . . . 52
Мытье духового шкафа. . . . . . . . . . . . . . . . . . . . . . . . . . . . . . . . . . . . 53
Дверца духового шкафа. . . . . . . . . . . . . . . . . . . . . . . . . . . . . . . . . . . 55
Стекло дверцы духового шкафа . . . . . . . . . . . . . . . . . . . . . . . . . . . . 56
Выдвижной ящик для посуды. . . . . . . . . . . . . . . . . . . . . . . . . . . . . . . 57
Что делать, если … . . . . . . . . . . . . . . . . . . . . . . . . . . . . . . . . . . . . . . 58
Инструкция по установке
. . . . . . . . . . . . . . . . . . . . . . . . . . . 59
Установка . . . . . . . . . . . . . . . . . . . . . . . . . . . . . . . . . . . . . . . . . . . . . . 59
Выравнивание положения прибора . . . . . . . . . . . . . . . . . . . . . . . . . . 59
Правила техники безопасности для специалиста, производящего
установку . . . . . . . . . . . . . . . . . . . . . . . . . . . . . . . . . . . . . . . . . . . . . . . 60
Сервисная поддержка
. . . . . . . . . . . . . . . . . . . . . . . . . . . . . . 63

Электробезопасность, Меры по обеспечению безопасности детей
Страница 5
- Изображение
- Текст
5
Инструкция по эксплуатации
1 Правила техники безопасности
5
Данный прибор соответствует следующим предписаниям ЕС:
–
73/23/EWG от 19.02.1973 “Предписания по низкому
напряжению”
–
89/336/EWG от 03.05.1989 “Предписания по
электромагнитной совместимости”, включая поправки к
предписаниям 92/31/EWG
–
93/68/EWG от 22.07.1993 “Предписания об
идентификационных обозначениях СЕ”
Электробезопасность
•
Подключать прибор имеет право только квалифицированный
специалист.
•
В случае возникновения неполадок в работе прибора и при
обнаружении изъянов на стеклокерамической панели (сколов,
разрывов или трещин), прибор необходимо выключить и во
избежание поражения током отсоединить от электросети.
•
Ремонт прибора разрешается выполнять только
квалифицированным специалистам. Непрофессиональный
ремонт может повлечь за собой очень опасные последствия.
В случае необходимости провести ремонт обращайтесь в
нашу сервисную службу или специализированный магазин, в
котором Вы приобрели прибор.
Меры по обеспечению безопасности детей
•
Никогда не оставляйте детей без присмотра во время работы
прибора.

6
Техника безопасности при пользовании
прибором
•
Данный прибор разрешается использовать только для
приготовления пищи путем варки, жаренья и выпекания в
домашних условиях.
•
Не используйте варочную поверхность для обогрева
помещения.
•
Перегретые жиры и растительные масла быстро
воспламеняются. При приготовлении пищевых блюд
(например, картофеля фри) на жире или растительном масле,
необходимо наблюдать за кулинарным процессом.
•
При использовании кулинарной посуды с длинной ручкой,
поверните ручку таким образом, чтобы она не нависала над
конфоркой. При этом следите, чтобы ручка не находилась над
горячей или теплой конфоркой.
•
Соблюдайте осторожность при включении электроприборов в
розетку вблизи прибора. Соединительные шнуры прибора не
должны попадать в горячие зоны нагрева или защемляться
горячей дверцей духовки.
•
После каждого использования прибора выключайте конфорки.
•
Предупреждение: Опасность ожога! Во время работы
камера духового шкафа сильно нагревается.
•
Во время приготовления блюд с добавлением алкоголя в
духовом шкафу может образоваться легковоспламенимая
спирто-воздушная смесь. В этом случае осторожно откройте
дверцу. Не манипулируйте при этом раскаленными
материалами, искрами или огнем.
3
Замечание касательно акриламида
Согласно результатам новейших научных исследований
интенсивная тепловая обработка пищевых продуктов с целью
получения румяной коричневой корочки опасна для здоровья
человека из-за вредного воздействия акриламида. В
особенности это относится к продуктам, в которых содержится
крахмал. Поэтому мы рекомендуем готовить пищу при
возможно более низкой температуре и не зарумянивать
продукты слишком сильно.

7
Как избежать повреждений прибора
•
Прибор нельзя использовать в качестве рабочей поверхности
или подставки.
•
Не эксплуатируйте конфорки с пустой посудой или без посуды.
•
Следите за тем, чтобы на раму варочной поверхности не
попадали кислотосодержащие жидкости, такие как уксус,
лимонный сок или средства для удаления накипи — после них
остаются матовые пятна.
•
Острые и твердые предметы при попадании на варочную
панель могут ее повредить.
•
Удаляйте от стеклокерамической панели все плавящиеся
предметы и материалы, например пластмассу, алюминиевую
фольгу или пленку для кухонных плит. Если на
стеклокерамической панели все-таки что-то расплавилось, это
вещество или предмет также необходимо сразу удалить
скребком.
•
Не выстилайте духовой шкаф алюминиевой фольгой, и не
ставьте на дно духового шкафа противни, кастрюли и т.п.,
иначе эмалевое покрытие духового шкафа будет повреждено
из-за высокой концентрации тепла в этом месте.
•
Капающие с противней фруктовые соки оставляют не
поддающиеся удалению пятна. Для приготовления пирогов, в
которых содержится много влаги, пользуйтесь глубоким
противнем.
•
Не отягощайте открытую дверцу духового шкафа никакими
грузами.
•
Никогда не лейте воду прямо в духовой шкаф. Это может
привести к повреждению эмали и изменению цвета
поверхностей.
•
При сильном надавливании на края переднего стекла оно
может треснуть.
•
Не храните в духовом шкафу горючие материалы. При
включениии прибора они могут воспламениться.
•
Не храните в духовом шкафу продукты питания, в которых
содержится влага. Это может привести к повреждению эмали.

8
Утилизация
2
Упаковочные материалы
Упаковочные материалы экологически безопасны и пригодны
для вторичного использования. Синтетические части снабжены
специальной маркировкой, например: >PE< для полиэтилена,
>PS< для полистирола и др. Помещайте упаковочные материалы
в соответствии с маркировкой в специальные контейнеры для
сбора утиля, установленные местной коммунальной службой.
2
Старый прибор
Символ
W
на изделии или на его упаковке указывает, что оно
не подлежит утилизации в качестве бытовых отходов.
Вместо этого его следует сдать в соответствующий пункт
приемки электронного и электрооборудования для
последующей утилизации.
Соблюдая правила утилизации изделия, Вы поможете
предотвратить причинение окружающей среде и здоровью
людей потенциального ущерба, который возможен, в противном
случае, вследствие неподобающего обращения с подобными
отходами.
За более подробной информацией об утилизации этого изделия
просьба обращаться к местным властям, в службу по вывозу и
утилизации отходов или в магазин, в котором Вы приобрели
изделие.
1
Предупреждение: Чтобы отслуживший прибор далее не мог
представлять никакой опасности, перед утилизацией приведите
его в негодное для эксплуатации состояние.
Для этого отключите прибор от электросети и удалите с
него шнур питания.

9
Описание прибора
Общий вид
Стеклянная
дверца
Ручка дверцы
Панель
управления
Выдвижной
ящик для
посуды

10
Регулировочная панель
Варочная поверхность
Контрольный индикатор температуры
Функции духового шкафа
Выбор температуры
Выключатели конфорок
Контрольный индикатор рабочего режима
Кнопки функций часов
Индикация времени
Двухконтурная конфорка
2200Вт
Одноконтурная
конфорка
1200Вт
Одноконтурная
конфорка
1800Вт
Индикация остаточного
тепла
Одноконтурная
конфорка
1200Вт
Отверстие для выхода пара из
духового шкафа

Комментарии
COMPETENCE 41056VH
Отдельно стоящая электроплита
Инструкция по установке и эксплуатации
-
Инструкции
-
Духовые шкафы
- AEG

Инструкция к AEG KSR892220M
PDF, 686.55 Кб
Информация о приборе
PDF, 523.29 Кб
Схема встраивания
PNG, 193.69 Кб

Инструкция к AEG BER455120B
PDF, 479.69 Кб
Технические данные
PDF, 320.84 Кб
Класс энергопотребления
PDF, 592.34 Кб
Схема встраивания
JPG, 65.41 Кб

Инструкция к AEG bem455120m
PDF, 468.39 Кб
Схема встраивания
JPG, 65.91 Кб

Инструкция к AEG BER451110B
PDF, 489.58 Кб
Информация о приборе
PDF, 571.33 Кб
Схема встраивания
PNG, 231.51 Кб

Схема встраивания
JPG, 65.8 Кб
Инструкция к AEG BCR546350B
PDF, 526.31 Кб

Инструкция к AEG BCR542350B
PDF, 540.05 Кб
Информация о приборе
PDF, 537.76 Кб
Схема встраивания
PNG, 200.41 Кб

Инструкция к AEG KMK768080M
PDF, 516.81 Кб
Схема встраивания с размерами
JPG, 104.32 Кб

Инструкция к AEG BCR542350W
PDF, 540.05 Кб
Информация о приборе
PDF, 509.54 Кб
Схема встраивания
PNG, 200.41 Кб

Схема встраивания
JPG, 65.43 Кб
Инструкция к AEG BCR546350W
PDF, 526.3 Кб

Инструкция к духовому шкафу AEG BPK748380B
PDF, 888.83 Кб
Схема встраивания
JPG, 70.72 Кб

Инструкция к духовому шкафу AEG BPK748380M
PDF, 888.84 Кб
Схема встраивания
JPG, 68.55 Кб

Инструкция по эксплуатации
PDF, 682.95 Кб
Схема с размерами
JPG, 75.34 Кб
Схема встраивания
JPG, 73.63 Кб

Инструкция к AEG KME768080M
PDF, 516.81 Кб
Схема встраивания с размерами
JPG, 104.32 Кб

Инструкция по эксплуатации
PDF, 220.47 Кб
Схема встраивания
JPG, 125.2 Кб

Инструкция по эксплуатации
PDF, 512.74 Кб

Инструкция по эксплуатации
PDF, 751.55 Кб
Схема встраивания
JPG, 105.66 Кб
Посмотреть инструкция для AEG Competence бесплатно. Руководство относится к категории Печи, 136 человек(а) дали ему среднюю оценку 8.3. Руководство доступно на следующих языках: английский. У вас есть вопрос о AEG Competence или вам нужна помощь? Задайте свой вопрос здесь
Не можете найти ответ на свой вопрос в руководстве? Вы можете найти ответ на свой вопрос ниже, в разделе часто задаваемых вопросов о AEG Competence.
Правильно ли, что вентилятор продолжает работать, когда духовка уже выключена?
Что происходит при использовании функции «гриль»?
Обязательно ли предварительно разогревать духовку AEG?
Как очистить духовку от пригоревшего жира?
Какой способ лучше всего подходит для очистки решетки в духовке?
Инструкция AEG Competence доступно в русский?
Не нашли свой вопрос? Задайте свой вопрос здесь
COMPETENCE 41056VH
Отдельно стоящая электроплита
Инструкция по установке и эксплуатации
Посмотреть инструкция для AEG Competence бесплатно. Руководство относится к категории Печи, 136 человек(а) дали ему среднюю оценку 8.3. Руководство доступно на следующих языках: английский. У вас есть вопрос о AEG Competence или вам нужна помощь? Задайте свой вопрос здесь
Не можете найти ответ на свой вопрос в руководстве? Вы можете найти ответ на свой вопрос ниже, в разделе часто задаваемых вопросов о AEG Competence.
Правильно ли, что вентилятор продолжает работать, когда духовка уже выключена?
Что происходит при использовании функции «гриль»?
Обязательно ли предварительно разогревать духовку AEG?
Как очистить духовку от пригоревшего жира?
Какой способ лучше всего подходит для очистки решетки в духовке?
Инструкция AEG Competence доступно в русский?
Не нашли свой вопрос? Задайте свой вопрос здесь
02:04
AEG Competence 41016 VH-WN tűzhely Márkabolt
03:33
Электроплита стеклокерамическая AEG 47056 VS-WN
02:09
AEG Competence 41056 VH-MN tűzhely Márkabolt
03:41
AEG C 41056 VH-MN tűzhely Márkabolt
01:30
AEG C 47005 GR-MN tűzhely Márkabolt
03:34
AEG 47395GMMN tűzhely Márkabolt
00:34
Снятие стекл в духовках AEG
01:13
AEG 47036IU-MN схема подключения к сети
VH Отдельно стоящая электроплита Инструкция по установке и э…
Плиты AEG
- Изображение
- Текст
COMPETENCE 41056VH
Отдельно стоящая электроплита
Инструкция по установке и эксплуатации
2
Уважаемая покупательница, уважаемый
покупатель,
Пожалуйста, внимательно прочитайте настоящую инструкцию по
эксплуатации и сохраните ее для получения необходимых
справочных сведений в будущем.
Если прибор перейдет к другому хозяину, передайте ему,
пожалуйста, и эту инструкцию.
В тексте используются следующие символы:
1
Указания по технике безопасности
Предупреждение! Указания, направленные на обеспечение
Вашей личной безопасности.
Внимание! Указания, направленные на предотвращение
повреждений прибора.
3
Рекомендации и практические советы
2
Информация по охране окружающей среды
3
Содержание
Инструкция по эксплуатации
. . . . . . . . . . . . . . . . . . . . . . .
5
Правила техники безопасности . . . . . . . . . . . . . . . . . . . . . . . . . . . .
5
Утилизация . . . . . . . . . . . . . . . . . . . . . . . . . . . . . . . . . . . . . . . . . . . . .
8
Описание прибора. . . . . . . . . . . . . . . . . . . . . . . . . . . . . . . . . . . . . . .
9
Общий вид . . . . . . . . . . . . . . . . . . . . . . . . . . . . . . . . . . . . . . . . . . . . .
9
Регулировочная панель. . . . . . . . . . . . . . . . . . . . . . . . . . . . . . . . . . . . 10
Варочная поверхность . . . . . . . . . . . . . . . . . . . . . . . . . . . . . . . . . . . . 10
Основное оснащение духового шкафа . . . . . . . . . . . . . . . . . . . . . . . 11
Принадлежности духового шкафа . . . . . . . . . . . . . . . . . . . . . . . . . . . 11
Перед первым использованием . . . . . . . . . . . . . . . . . . . . . . . . . . . 12
Установка и изменение времени суток . . . . . . . . . . . . . . . . . . . . . . . 12
Первое мытье . . . . . . . . . . . . . . . . . . . . . . . . . . . . . . . . . . . . . . . . . . . 13
Управление конфорками . . . . . . . . . . . . . . . . . . . . . . . . . . . . . . . . . 14
Установка ступени нагрева. . . . . . . . . . . . . . . . . . . . . . . . . . . . . . . . . 15
Как включить двухконтурную конфорку . . . . . . . . . . . . . . . . . . . . . . . 15
Индикатор остаточного тепла . . . . . . . . . . . . . . . . . . . . . . . . . . . . 15
Управление духовым шкафом . . . . . . . . . . . . . . . . . . . . . . . . . . . . . 16
Включение и выключение духового шкафа . . . . . . . . . . . . . . . . . . . . 16
Функции духового шкафа . . . . . . . . . . . . . . . . . . . . . . . . . . . . . . . . . . 17
Установка реш¸тки, противня и универсального противня в духовку 19
Установка и снятие жирового фильтра . . . . . . . . . . . . . . . . . . . . . . . 20
Функции часов. . . . . . . . . . . . . . . . . . . . . . . . . . . . . . . . . . . . . . . . . . . 21
Отключение индикации времени. . . . . . . . . . . . . . . . . . . . . . . . . . 22
Практические советы и таблицы. . . . . . . . . . . . . . . . . . . . . . . . . . . 27
Посуда для варки . . . . . . . . . . . . . . . . . . . . . . . . . . . . . . . . . . . . . . . . 27
Кулинарная таблица. . . . . . . . . . . . . . . . . . . . . . . . . . . . . . . . . . . . . . . 28
Выпекание . . . . . . . . . . . . . . . . . . . . . . . . . . . . . . . . . . . . . . . . . . . . . . 30
Таблица для выпекания . . . . . . . . . . . . . . . . . . . . . . . . . . . . . . . . . 32
Таблица “Запеканки и запеченные блюда” . . . . . . . . . . . . . . . . . . 38
“Быстрозамороженные готовые блюда” . . . . . . . . . . . . . . . . . . . 39
Жарка . . . . . . . . . . . . . . . . . . . . . . . . . . . . . . . . . . . . . . . . . . . . . . . . . 40
Таблица “Жарка” . . . . . . . . . . . . . . . . . . . . . . . . . . . . . . . . . . . . . . 41
Плоскостное грилирование . . . . . . . . . . . . . . . . . . . . . . . . . . . . . . . . 43
Таблица “Грилирование” . . . . . . . . . . . . . . . . . . . . . . . . . . . . . . . . 43
Размораживание . . . . . . . . . . . . . . . . . . . . . . . . . . . . . . . . . . . . . . . . . 44
Таблица “Размораживание”. . . . . . . . . . . . . . . . . . . . . . . . . . . . . . 44
Подсушивание. . . . . . . . . . . . . . . . . . . . . . . . . . . . . . . . . . . . . . . . . . . 45
Консервирование . . . . . . . . . . . . . . . . . . . . . . . . . . . . . . . . . . . . . . . . 46
4
Мытье и уход . . . . . . . . . . . . . . . . . . . . . . . . . . . . . . . . . . . . . . . . . . . 48
Наружные части духового шкафа. . . . . . . . . . . . . . . . . . . . . . . . . . . . 48
Варочная поверхность . . . . . . . . . . . . . . . . . . . . . . . . . . . . . . . . . . . . 48
Рама варочной поверхности . . . . . . . . . . . . . . . . . . . . . . . . . . . . . . . 49
Камера духового шкафа. . . . . . . . . . . . . . . . . . . . . . . . . . . . . . . . . . . 50
Оснащение . . . . . . . . . . . . . . . . . . . . . . . . . . . . . . . . . . . . . . . . . . . . . 50
Жировой фильтр . . . . . . . . . . . . . . . . . . . . . . . . . . . . . . . . . . . . . . . . . 50
Устройство для выдвигания принадлежностей духового шкафа . . . 51
Очистка телескопических направляющих . . . . . . . . . . . . . . . . . . . . . 52
Подсветка духового шкафа . . . . . . . . . . . . . . . . . . . . . . . . . . . . . . . . 52
Мытье духового шкафа. . . . . . . . . . . . . . . . . . . . . . . . . . . . . . . . . . . . 53
Дверца духового шкафа. . . . . . . . . . . . . . . . . . . . . . . . . . . . . . . . . . . 55
Стекло дверцы духового шкафа . . . . . . . . . . . . . . . . . . . . . . . . . . . . 56
Выдвижной ящик для посуды. . . . . . . . . . . . . . . . . . . . . . . . . . . . . . . 57
Что делать, если … . . . . . . . . . . . . . . . . . . . . . . . . . . . . . . . . . . . . . . 58
Инструкция по установке
. . . . . . . . . . . . . . . . . . . . . . . . . . . 59
Установка . . . . . . . . . . . . . . . . . . . . . . . . . . . . . . . . . . . . . . . . . . . . . . 59
Выравнивание положения прибора . . . . . . . . . . . . . . . . . . . . . . . . . . 59
Правила техники безопасности для специалиста, производящего
установку . . . . . . . . . . . . . . . . . . . . . . . . . . . . . . . . . . . . . . . . . . . . . . . 60
Сервисная поддержка
. . . . . . . . . . . . . . . . . . . . . . . . . . . . . . 63
Электробезопасность, Меры по обеспечению безопасности детей
Страница 5
- Изображение
- Текст
5
Инструкция по эксплуатации
1 Правила техники безопасности
5
Данный прибор соответствует следующим предписаниям ЕС:
–
73/23/EWG от 19.02.1973 “Предписания по низкому
напряжению”
–
89/336/EWG от 03.05.1989 “Предписания по
электромагнитной совместимости”, включая поправки к
предписаниям 92/31/EWG
–
93/68/EWG от 22.07.1993 “Предписания об
идентификационных обозначениях СЕ”
Электробезопасность
•
Подключать прибор имеет право только квалифицированный
специалист.
•
В случае возникновения неполадок в работе прибора и при
обнаружении изъянов на стеклокерамической панели (сколов,
разрывов или трещин), прибор необходимо выключить и во
избежание поражения током отсоединить от электросети.
•
Ремонт прибора разрешается выполнять только
квалифицированным специалистам. Непрофессиональный
ремонт может повлечь за собой очень опасные последствия.
В случае необходимости провести ремонт обращайтесь в
нашу сервисную службу или специализированный магазин, в
котором Вы приобрели прибор.
Меры по обеспечению безопасности детей
•
Никогда не оставляйте детей без присмотра во время работы
прибора.
6
Техника безопасности при пользовании
прибором
•
Данный прибор разрешается использовать только для
приготовления пищи путем варки, жаренья и выпекания в
домашних условиях.
•
Не используйте варочную поверхность для обогрева
помещения.
•
Перегретые жиры и растительные масла быстро
воспламеняются. При приготовлении пищевых блюд
(например, картофеля фри) на жире или растительном масле,
необходимо наблюдать за кулинарным процессом.
•
При использовании кулинарной посуды с длинной ручкой,
поверните ручку таким образом, чтобы она не нависала над
конфоркой. При этом следите, чтобы ручка не находилась над
горячей или теплой конфоркой.
•
Соблюдайте осторожность при включении электроприборов в
розетку вблизи прибора. Соединительные шнуры прибора не
должны попадать в горячие зоны нагрева или защемляться
горячей дверцей духовки.
•
После каждого использования прибора выключайте конфорки.
•
Предупреждение: Опасность ожога! Во время работы
камера духового шкафа сильно нагревается.
•
Во время приготовления блюд с добавлением алкоголя в
духовом шкафу может образоваться легковоспламенимая
спирто-воздушная смесь. В этом случае осторожно откройте
дверцу. Не манипулируйте при этом раскаленными
материалами, искрами или огнем.
3
Замечание касательно акриламида
Согласно результатам новейших научных исследований
интенсивная тепловая обработка пищевых продуктов с целью
получения румяной коричневой корочки опасна для здоровья
человека из-за вредного воздействия акриламида. В
особенности это относится к продуктам, в которых содержится
крахмал. Поэтому мы рекомендуем готовить пищу при
возможно более низкой температуре и не зарумянивать
продукты слишком сильно.
7
Как избежать повреждений прибора
•
Прибор нельзя использовать в качестве рабочей поверхности
или подставки.
•
Не эксплуатируйте конфорки с пустой посудой или без посуды.
•
Следите за тем, чтобы на раму варочной поверхности не
попадали кислотосодержащие жидкости, такие как уксус,
лимонный сок или средства для удаления накипи — после них
остаются матовые пятна.
•
Острые и твердые предметы при попадании на варочную
панель могут ее повредить.
•
Удаляйте от стеклокерамической панели все плавящиеся
предметы и материалы, например пластмассу, алюминиевую
фольгу или пленку для кухонных плит. Если на
стеклокерамической панели все-таки что-то расплавилось, это
вещество или предмет также необходимо сразу удалить
скребком.
•
Не выстилайте духовой шкаф алюминиевой фольгой, и не
ставьте на дно духового шкафа противни, кастрюли и т.п.,
иначе эмалевое покрытие духового шкафа будет повреждено
из-за высокой концентрации тепла в этом месте.
•
Капающие с противней фруктовые соки оставляют не
поддающиеся удалению пятна. Для приготовления пирогов, в
которых содержится много влаги, пользуйтесь глубоким
противнем.
•
Не отягощайте открытую дверцу духового шкафа никакими
грузами.
•
Никогда не лейте воду прямо в духовой шкаф. Это может
привести к повреждению эмали и изменению цвета
поверхностей.
•
При сильном надавливании на края переднего стекла оно
может треснуть.
•
Не храните в духовом шкафу горючие материалы. При
включениии прибора они могут воспламениться.
•
Не храните в духовом шкафу продукты питания, в которых
содержится влага. Это может привести к повреждению эмали.
8
Утилизация
2
Упаковочные материалы
Упаковочные материалы экологически безопасны и пригодны
для вторичного использования. Синтетические части снабжены
специальной маркировкой, например: >PE< для полиэтилена,
>PS< для полистирола и др. Помещайте упаковочные материалы
в соответствии с маркировкой в специальные контейнеры для
сбора утиля, установленные местной коммунальной службой.
2
Старый прибор
Символ
W
на изделии или на его упаковке указывает, что оно
не подлежит утилизации в качестве бытовых отходов.
Вместо этого его следует сдать в соответствующий пункт
приемки электронного и электрооборудования для
последующей утилизации.
Соблюдая правила утилизации изделия, Вы поможете
предотвратить причинение окружающей среде и здоровью
людей потенциального ущерба, который возможен, в противном
случае, вследствие неподобающего обращения с подобными
отходами.
За более подробной информацией об утилизации этого изделия
просьба обращаться к местным властям, в службу по вывозу и
утилизации отходов или в магазин, в котором Вы приобрели
изделие.
1
Предупреждение: Чтобы отслуживший прибор далее не мог
представлять никакой опасности, перед утилизацией приведите
его в негодное для эксплуатации состояние.
Для этого отключите прибор от электросети и удалите с
него шнур питания.
9
Описание прибора
Общий вид
Стеклянная
дверца
Ручка дверцы
Панель
управления
Выдвижной
ящик для
посуды
10
Регулировочная панель
Варочная поверхность
Контрольный индикатор температуры
Функции духового шкафа
Выбор температуры
Выключатели конфорок
Контрольный индикатор рабочего режима
Кнопки функций часов
Индикация времени
Двухконтурная конфорка
2200Вт
Одноконтурная
конфорка
1200Вт
Одноконтурная
конфорка
1800Вт
Индикация остаточного
тепла
Одноконтурная
конфорка
1200Вт
Отверстие для выхода пара из
духового шкафа