- Manuals
- Brands
- Martel Manuals
- Test Equipment
- BETAGAUGE 330
- Reference manual
-
Contents
-
Table of Contents
-
Bookmarks
Quick Links
BETAGAUGE 330
Reference Manual
Related Manuals for Martel BETAGAUGE 330
Summary of Contents for Martel BETAGAUGE 330
-
Page 1
BETAGAUGE 330 Reference Manual… -
Page 2: Table Of Contents
1.1 Contacting Martel / Beta ……..1…
-
Page 3: Introduction
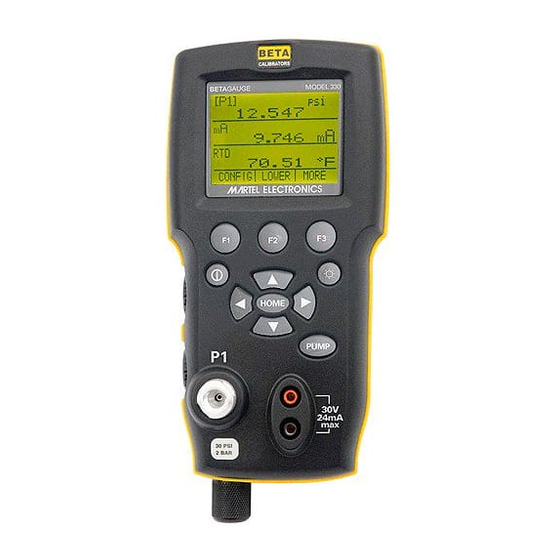
1. Introduction The BetaGauge 330 is designed to be a simple to use yet very versatile pressure calibrator. Its internal pressure sensor combined with an innovative electrically powered pump along with inputs for mA, voltage, switch contacts and an RTD probe allow the 330 to calibrate virtually any pressure device.
-
Page 4
Symbol Description Electric Shock Fuse PE Ground Hot Surface (Burn Hazard) Read the User’s Manual (Important Information) Canadian Standards Association The following definitions apply to the terms “Warning” and “Caution”. • “Warning” identifies conditions and actions that may pose hazards to the user. •… -
Page 5
• Do not use the calibrator if it operates abnormally. Protection may be impaired. When in doubt, have the calibrator serviced. • Do not operate the calibrator around explosive gas, vapor, or dust. • When measuring pressure, make sure the process pressure line is shut off and depressurized before you connect it or disconnect it from the pressure module. -
Page 6: Calibrator Interface
2. Calibrator Interface Figure 1 shows the location of the pressure controls, connection port and electrical inputs. Figure 1…
-
Page 7
Figures 2A and 2B show the location of the keys. Table 2 describes the function of each key. Figure 2A Keypad (Electric Pump Versions) Table 2 Key Functions Name Description Function Keys These are soft keys used to configure the calibrator ON/OFF Key This key is used to turn the calibrator on and off ZERO Key… -
Page 8: Calibrator Display
2.1 Calibrator Display The Calibrator Display consists of two regions: The menu bar (located along the bottom of the screen) is used to access a menu system. The main display (the rest) consists of up to three process measurement sub-regions. These sub-regions will henceforth be referred to as the UPPER, MIDDLE and LOWER displays.
-
Page 9
2.1.2.1 Setting the Active Display The active display is indicated by the center option on the Main Menu, pressing the F2 key will toggle the active display. 2.1.2.2 Setting Active Display Parameters To set the parameters of the active display use the CONFIG option to get to the Display Configuration Menu. -
Page 10: Using The Backlight
Table 4 Mode Concurrency CURRENT DISPLAY P[1] [EXT] P[1] [EXT] Volts Loop P[1] [EXT] P[1]ST [EXT]ST mA Loop Volts X = Not a valid mode 2.1.1.3 Accessing Other Menus Use the MORE option on the Main Menu to access the other menu functions. 2.2 Using the Backlight The backlight is controlled by the LIGHT softkey on the main menu on the models with electric pump.
-
Page 11: Other Menu Controlled Functions
2.4 Other Menu Controlled Functions There are 12 ‘sub-main’ menus that can be accessed through the MORE option of the Main Menu. A ‘sub-main’ menu contains three options. The first option is unique to the function. The second and third options of a ‘sub-main’ menu are always the same. The NEXT option leads to the next ‘sub-main’…
-
Page 12
Figure 4 Menu Map… -
Page 13
If SAVE or RECALL is selected use the arrow keys to select the set-up location. Then use the save option to store the current set-up into the selected location or the recall option to recall the set-up stored in the selected location. The display menu will automatically go home. -
Page 14: Initial Setup And Basic Pressure Generation
When in this mode use the arrow keys to set the maximum pressure. 2.4.9 HART™ Resistor An internal 250 ohm HART Resistor can be enabled when the BetaGauge 330 is operated in the “mA Measure-24V” mode. This allows a HART Communicator to be connected across the mA terminals and eliminates the need for adding an external resistor.
-
Page 15
3.1 Electric Pump Considerations The BetaGauge 330-30 and 330-150 incorporate a small, lightweight, battery powered pneumatic pump that allows the user, in the case of the 330-150 to build relatively high pressure up to 150psi (10Bar) quickly and with good control. -
Page 16: Measuring Pressure
See section 2.3. 4.1 Media Compatibility The BetaGauge 330 feature a unique user accessible valve cleaning port to facilitate servicing the pump. Section 16.3 shows how to clean these valves. Even though servicing the pump is easy, care should be taken to only expose the calibrator to clean, dry gases.
-
Page 17: Measuring Current
Figure 6 5. Measuring and Generating Current (4 to 20 mA) 1. To measure current use the input terminals in the front of the calibrator. Select the mA function on the lower display. Current is measured in mA and percentage of range. The range on the calibrator is set to 0% at 4 mA and 100% at 20 mA.
-
Page 18
Figure 7-1 Figure 7-2 Figure 7-3 Figure 7-4… -
Page 19: Measuring Voltage
1/4” diameter stainless steel sheath. Note: The factory default type is PT100-385 so if the 330 is being used with the Martel Model LPT100A probe you do not have to set the probe type. Simply plug the probe into the 330 and configure the display to read temperature.
-
Page 20: Performing A Pressure Switch Test
Figure 9 8. Performing a Pressure Switch Test Figure 10 To perform a switch test, follow these steps: 1. Change the setup to Setup 4 (default switch test). Setup 4: The upper display is set to [P1] ST, all other displays are off. Important NOTE: The pressure Switch Test can be performed with the following functions[P1] ST, or EXT ST.
-
Page 21
3. Make sure the vent on the pump is open. Zero the calibrator if necessary. Close the vent after zeroing the calibrator. 4. The top of the display will read “CLOSE”. 5. Apply pressure with the pump slowly until the switch opens. Important NOTE: In the switch test mode the display update rate is increased to help capture changing pressure inputs. -
Page 22: Calibrating Transmitters
9. Press the “NEW TEST” option to clear the data and perform another test. 10. Press the “DONE” option to end the test and return to the standard pressure setting. Example: [P1] ST will return to [P1]. Important NOTE: The previous example uses a normally closed switch. The basic procedure is still the same for a normally open switch, the display will just read “OPEN”…
-
Page 23: Calibrating A Pressure-To-Current Transmitter
9.2 Calibrating a Pressure-to-Current Transmitter To calibrate a pressure-to-current transmitter (P/I), perform the following steps: 1. Connect the calibrator and the pump to the transmitter. 2. Apply pressure with the pump. 3. Measure the current output of the transmitter. 4. Ensure the reading is correct. If not, adjust the transmitter as necessary. Figure 11.
-
Page 24: Percent Error Function
9.3 Percent Error Function The calibrator features a unique function which can calculate pressure vs. milliamp error as a percentage of the 4 to 20 mA loop span. The percent error mode uses all 3 screens and has a unique menu structure. It simultaneously displays pressure, mA and percent error.
-
Page 25
4. LOOP POWER can be toggled on/off, select NEXT when done. 5. Use SELECT to toggle through the UNIT options, and select NEXT to move on. 6. Use the arrow keys to set the 100% point of the desired pressure range, select DONE SET when finished. -
Page 26: Minimum And Maximum Storage Capability
Note: The 0% and 100% point will be saved in non-volatile memory until they are changed again by the user for the internal sensors, and external pressure modules. When using an external module the 0% and 100% are set to low and full scale of the module until the user changes it, or if it was previously saved.
-
Page 27: Factory Setups
11. Factory Setups The Calibrator is loaded with five factory commonly used setups. These setups are shown below. Note: Any of these setups can be changed and saved by the user. Setup 1: The upper display is set to [P1] mode and the lower is set to mA, middle is off. Setup 2: The upper display is set to [P1] mode and the lower is set to RTD, middle is off.
-
Page 28: Custody Transfer / Flow Calibration
NOTE: To use the remote control option a custom RS-232 cable must be purchased from Martel (LEM232). To contact Martel refer to Section 1.1 of this manual. With this connection the user can write programs on the…
-
Page 29: Setting Up The Rs-232 Port For Remote Control
terminal, such as Hyper Terminal, to enter single commands. Typical RS-232 remote configurations are shown in Figure 13. Figure 13. Calibrator-to-Computer Connection 13.2 Setting up the RS-232 Port for Remote Control Note: The RS-232 connection cable should not exceed 15m unless the load capacitance measured at connection points is less than 2500pF.
-
Page 30: Changing Between Remote And Local Operation
5. Select ASCII setup from File/Properties/Settings and mark these choices: Echo typed characters locally Wrap lines that exceed terminal width 6. Select Ok 7. To see if the port works enter *IDN?. This command will return information on the calibrator. 13.3 Changing Between Remote and Local Operation There are three modes of operation of the calibrator, Local, Remote, and Remote with Lockout.
-
Page 31
Compound Commands Commands that contain more than one command on one line. For example; RTD_TYPE PT385_100;RTD_TYPE? Sets the calibrator to RTD type PT385_100 and queries it to verify. It will return: PT385_100 13.4.2 Character Processing The data entered into the calibrator is processed as follows: •… -
Page 32
13.4.4 Calibrator Status Error Queue If an error occurs due to invalid input or buffer overflow, its error code is sent to the error queue. The error code can be read from the queue with the command FAULT?. The error queue holds 15 error codes. -
Page 33: Remote Commands And Error Codes
13.5 Remote Commands and Error Codes The following tables list all commands, and their descriptions, that are accepted by the calibrator. Table 5: Common Commands Command Description *CLS (Clear status.) Clears the error queue. *IDN? Identification query. Returns the manufacturer, model number, and firmware revision level of the Calibrator.
-
Page 34
IO_STATE Set the calibrator’s mA state. IO_STATE? Return the calibrator’s mA state. LOCAL Returns user to manual operation of the calibrator LOCKOUT Locks out the keypad of the calibrator in remote operation LO_ERR Sets the 0% of span limit for percent error mode LO_ERR Returns the 0% of span limit for percent error mode MOTOR_ON… -
Page 35
LOWER Designates Lower display Milliamps of current MEASURE Measure state MEAS_LOOP Measure with loop power state MIDDLE Designates Middle display Resistance in ohms PCT_ERR Percent Error PERCENT Percent PT385_100 100 Ohm 385 Platinum RTD type PT392_100 100 Ohm 392 Platinum RTD type PTJIS_100 100 Ohm JIS Platinum RTD type P1 pressure measurement function… -
Page 36: Entering Commands
13.6 Entering Commands Commands for the calibrator may be entered in upper or lower case. There is at least one space required between the command and parameter, all other spaces are optional. Almost all commands for the calibrator are sequential; any overlapped commands will be indicated as such.
-
Page 37
CPRT_COEFC This command is used for entering a custom RTD into the calibrator. The numeric value entered after the command will be set as the first coefficient of the polynomial used by the custom RTD. For example: CPRT_COEFC –4.183000E-12 enters –4.183000E-12 as coefficient C. CPRT_COEFC? Returns the number that was entered for the third coefficient of the polynomial used in the custom RTD. -
Page 38
If you send DISPLAY? It will return ON, ON, ON if the all the displays are on. FAULT? Returns the error code number of an error that has occurred. The command may be entered when the previous command did not do what it was meant to do. For example, if a value for current output is entered that is bigger than the supported range (0-24mA) FAULT? Would return: 103 which is the code number for an entry over range. -
Page 39
If you send ERROR _PORT?, it will return P1 if the pressure port in percent error is [P1]. FUNC Sets the display indicated in argument one to the function indicated in argument 2. For example: To set the lower display to RTD mode send FUNC LOWER,RTD. FUNC? Returns the current mode of all displays. -
Page 40
IO_STATE? Returns the input/output/simulate state of the mA function of the calibrator. For example: If the calibrator was in mA simulate mode IO_STATE? Would return SIM. LOCAL Restores the calibrator to local operation if it was in remote mode. Also clears LOCKOUT if the calibrator was in lockout mode. -
Page 41
For example: If when measuring a P100-385 at 0 degrees cel sending OHMS? would return 1.000000E+02, OHM . This command also switches the calibrator into mA output mode. A number and a unit must be entered after the command. For example: OUT 5 MA sets the current output at 5 mA OUT? Returns the output of the calibrator. -
Page 42
PT385_100; PT392_100; PTJIS_100; CUSTOM; For Example: RTD_TYPE PT385_100 sets RTD type to PT100-385 RTD_TYPE? Returns the RTD type. For Example: If the RTD type is PT385_100, RTD_TYPE? Will return PT100_385. Sets the output for current simulation. This command also switches the calibrator into mA simulation mode. -
Page 43
TEMP_UNIT? Returns the temperature unit, (CEL or FAR) used when measuring RTDs for each of the 3 displays. VAL? Returns the value of any measurement taking place on the upper and lower display. For example, if the upper display is measuring 5mA, and the lower display is measuring 10V, then VAL? will return: 5.000000E-03, A, 1.000000E+01, V ZERO_MEAS… -
Page 44: Specifications
14. Specifications (15 °C to 35 °C unless otherwise noted.) General Instrument Setup Recall 5; last used on power-up Environmental Operating Temperature -10 °C to +50 °C Storage Temperature -20 °C to +60 °C Power Requirements 12 VDC Battery Eight (8) AA alkaline, Lithium or NiMh cells Physical Dimensions 8”…
-
Page 45: Warranty
You can also call 1-800-821-0023 to have a form faxed. Martel will not be responsible for damage as a result of poor return packaging. Out of warranty repairs and recalibration will be subject to specific charges.
-
Page 46: Service Center Calibration Or Repair
6. Clean the o-ring assembly and the o-ring on the retention caps with IPA and inspect the o-rings closely for any damage or excessive wear. Replacements are included in the repair kit, if needed. 7. Inspect the springs for wear or loss of tension. They should be approximately 8.6 mm long in the relaxed state.
-
Page 47
BetaGauge 330 Ranges and Resolutions Range (PSI) 30 PSI / 2.0 Bar 150 PSI / 10 Bar 300 PSI / 20 Bar Burst Pressure (PSI) 2000 Proof Pressure (PSI) Engineering Unit Factor 30.000 150.00 300.00 0.06894757 2.0684 10.3421 20.684 mbar 68.94757… -
Page 48
Tel: (603) 434-1433 800-821-0023 Fax: (603) 434-1653 Martel Electronics 3 Corporate Park Dr. Derry, NH 03038 8/10 Rev E 0219782…
Specifications:
|
Accompanying Data:
Martel BETAGAUGE 330 Test Equipment PDF Reference Manual (Updated: Saturday 8th of October 2022 12:57:31 AM)
Rating: 4.1 (rated by 52 users)
Compatible devices: MC1000, TC100, BetaGauge II, MC1210, 3001, LC-110, PSC4010, T120.
Recommended Documentation:
Martel BETAGAUGE 330: Text of Reference Manual
(Ocr-Read Version Summary of Contents, UPD: 08 October 2022)
-
44, 14. Specifications (15 °C to 35 °C unless otherwise noted.) General Instrument Setup Recall 5; last used on power-up Environmental Operating Temperature -10 °C to +50 °C Storage Temperature -20 °C to +60 °C Power Requirements 12 VDC Battery Eight (8) AA alkaline, Lithium or NiMh cells Physical Dimensions 8” H x 4” W x 2.375” D Weight 2.5 lbs. (1.2 kg) EMI/RFI…
-
11, 2.4 Other Menu Controlled Functions There are 12 ‘sub-main’ menus that can be accessed through the MORE option of the Main Menu. A ‘sub-main’ menu contains three options. The first option is unique to the function. The second and third options of a ‘sub-main’ menu are always the same. The NEXT option leads to the next ‘sub-main’ menu and the DONE option returns home . For th…
-
23, 21 9.2 Calibrating a Pressure-to-Current Transmitter To calibrate a pressure-to-current transmitter (P/I), perform the following steps: 1. Connect the calibrator and the pump to the transmitter. 2. Apply pressure with the pump. 3. Measure the current output of the transmitter. 4. Ensure the reading is correct. If not, adjust the transmitter as necessary. Figure 11.
… -
17, 15 Figure 6 5. Measuring and Generating Current (4 to 20 mA) 1. To measure current use the input terminals in the front of the calibrator. Select the mA function on the lower display. Current is measured in mA and percentage of range. The range on the calibrator is set to 0% at 4 mA and 100% at 20 mA. For example: If the current measured is displayed as 75% then the mA va…
-
45, 15. Warranty Martel Electronics Corporation warrants all products against material defects and workmanship for a period of twelve (12) months after the date of shipment. Problems or defects that arise from misuse or abuse of the instrument are not covered. If any product is to be returned, a “Return Material Authorization” form can be obtained from our website www.mar…
-
42, 40 PT385_100; PT392_100; PTJIS_100; CUSTOM; For Example: RTD_TYPE PT385_100 sets RTD type to PT100-385 RTD_TYPE? Returns the RTD type. For Example: If the RTD type is PT385_100, RTD_TYPE? Will return PT100_385. SIM Sets the output for current simulation. This command also switches the calibrator into mA simulation mode. A number and a unit must be entered…
-
33, 13.5 Remote Commands and Error Codes The following tables list all commands, and their descriptions, that are accepted by the calibrator. Table 5: Common Commands Command Description *CLS (Clear status.) Clears the error queue. *IDN? Identification query. Returns the manufacturer, model number, and firmware revision level of the Calibrator. *RST Resets the calibrator…
-
4, Symbol Description Electric Shock Fuse PE Ground Hot Surface (Burn Hazard) Read the User’s Manual (Important Information) Off On Canadian Standards Association The following definitions apply to the terms “Warning” and “Caution”. • “Warning” identifies conditions and actions that may pose hazards to the user. • “Caution” identifies conditions and actions that may…
-
2, BETAGauge 330 Reference Manual 1. Introduction . . . . . . . . . . . . . . . . . . . . . . . . . . . . . . . . . . . . . . . . . . . .1 1.1 Contacting Martel / Beta . . . . . . . . . . . . . . . . . . . . . . . . . . . . . . . . . . . .1 1.2 Standard Equipment . . . . . . . . . . . . . . . . . . . . . . . . . . . . . . . . . . . . . . .1 1.3 Safety Information . . . .…
-
13, 11 If SAVE or RECALL is selected use the arrow keys to select the set-up location. Then use the save option to store the current set-up into the selected location or the recall option to recall the set-up stored in the selected location. The display menu will automatically go home. 2.4.4 Setting AutoShut-off Parameters The calibrator can be set to automatically shut-off after a selec…
-
48, 8/10 Rev E 0219782 www.martelcorp.com e-mail: [email protected] Tel: (603) 434-1433 800-821-0023 Fax: (603) 434-1653 Martel Electronics 3 Corporate Park Dr. Derry, NH 03038
… -
37, CPRT_COEFC This command is used for entering a custom RTD into the calibrator. The numeric value entered after the command will be set as the first coefficient of the polynomial used by the custom RTD. For example: CPRT_COEFC –4.183000E-12 enters –4.183000E-12 as coefficient C. CPRT_COEFC? Returns the number that was entered for the third coefficient of the polynomial used in the custom RTD. U…
-
27, 25 11. Factory Setups The Calibrator is loaded with five factory commonly used setups. These setups are shown below. Note: Any of these setups can be changed and saved by the user. Setup 1: The upper display is set to [P1] mode and the lower is set to mA, middle is off. Setup 2: The upper display is set to [P1] mode and the lower is set to RTD, middle is off. Setup 3: The upper…
-
15, 13 2. Before generating pressure make sure you have the 330 configured for your application. If needed review section 2 of the manual again to select the proper configuration. 3. Make sure that the pressure vacuum knob is set for the function you want to perform (+ for pressure and – for vacuum). 4. Close the vent knob. 5. Press the pump key (or manually st…
-
9, 2.1.2.1 Setting the Active Display The active display is indicated by the center option on the Main Menu, pressing the F2 key will toggle the active display. 2.1.2.2 Setting Active Display Parameters To set the parameters of the active display use the CONFIG option to get to the Display Configuration Menu. Here the SELECT option will toggle through the choices f…
Martel BETAGAUGE 330: Recommended Instructions
L20WD800, IBCD2817DP, GBIC, LAVA 8255-PIO, PS4000


-
Nova-Strobe vbxVibration Battery x StrobeMONARCH INSTRUMENT Instruction ManualPrinted in the U.S.A.Copyright 2009 Monarch Instrument, all rights reserved1071-4220-110R0209www.GlobalTestSupply.comFind Quality Products Online at: [email protected] …
Nova-Strobe bbx 18
-
(217) 352-9330 | [email protected] | artisantg.com-~ ARTISAN® ~I TECHNOLOGY GROUP Your definitive source for quality pre-owned equipment. Artisan Technology Group Full-service, independent repair center with experienced engineers and technicians on staff. We buy your excess, underutilized, and idle equipment along with credit for buybacks and trade-ins. Cust …
GTS1063 120
-
January 2019 © 2019 Fluke Corporation. All rights reserved. Specifications are subject to change without notice. All product names are trademarks of their respective companies. 5322A Multifunction Electrical Tester Calibrator Operators Manual …
5322A 216
-
Quick Card T-BERD 5800 Network Tester SONET Bit Error Rate Testing (BERT) This quick card describes how to configure and run a SONET Bit Error Rate Test at the full concatenated line rate. Please note that the T-BERD can also test channelized payloads (DS1, VT1.5, and STS-n). Please refer to the T-BERD 5800 User’s Guide for more information. Equipment Require …
T-BERD 5800 4
-
MaintenanceCALIBRATIONPROCEDURESGC/GLC030VX, GC/GLC035VX, GC/GLC040SVX [C809];GLP/GDP16VX, GLP/GDP18VX, GLP/GDP20SVX (GP/GLP/GDP030VX, GP/GLP/GDP035VX, GP/GLP/GDP040SVX) [C810];GLC20-35VX (GC/GLC040-070VX, GC/GLC055SVX) [A910, B910];GLP/GDP20-35VX (GP/GLP/GDP040-070VX) [B875, C875];GLC40, 45, 55VX; GLC55SVX (GC/GLC080, 100, 120VX; GC/GLC080, 100VXBCS; GC/GLC120SVX; GC/GLC120VXPRS) [E81 …
GC030VX 64
-
1 PM5A2 PM5A2 5kV Insulation Tester User’s Manual Phenix Technologies, Inc 75 Speicher Drive Accident, Maryland 21520 Tel: 1 (301) 746-8118 Fax: 1 (301) 895-5570 E-mail: [email protected] Rev 3/2017 (GU-1547RB) © 2016 Phenix Technologies, Inc. All rights reserved. …
PM5A2 24
-
Page 1 of 39 Fluidized Calibration Bath Model 875 Iss.06 – 09/13 FLUIDISED CALIBRATION BATH MODEL 875 User Maintenance Manual/Handbook Isothermal Technology Limited, Pine Grove, Southport, PR9 9AG, England Tel: +44 (0)1704 543830 Fa …
875 39
-
Copyright © 2017 Barfield Inc. All Rights Reserved. DPS1000 RVSM Pitot-Static Test Set USER INSTRUCTION MANUAL M/N DPS1000, P/N: 101-01175 Doc. P/N: 56-101-01175 Revision H May 12, 2017 ____________________________________ …
DPS1000 121
Additional Information:
Popular Right Now:
Operating Impressions, Questions and Answers:
Download Reference manual of Martel BETAGAUGE 330 Test Equipment for Free or View it Online on All-Guides.com.

1

2

3

4

5

6

7

8

9

10

11

12

13

14

15

16

17

18

19

20

21

22

23

24

25

26

27

28

29

30

31

32

33

34

35

36

37

38

39

40

41

42

43

44

45

46

47

48

BETAGAUGE 330
Reference Manual
2.1.2.1 Setting the Active Display
The active display is indicated by the center option on the Main Menu, pressing the F2
key will toggle the active display.
2.1.2.2 Setting Active Display Parameters
To set the parameters of the active display use the CONFIG option to get to the Display
Configuration Menu.
Here the SELECT option will toggle through the choices for each parameter. The first
parameter is MODE. Since voltage, current and switch test modes all use the same
jacks, two of these functions cannot be used concurrently. The ability to select certain
functions is limited based on what is already selected in another display. The NEXT
option is used to change to the second parameter. Only RTD and Pressure modes have
a second parameter, RTDs can be read in Celsius or Fahrenheit and Pressures can be
read in 11 engineering units.
With a single display the following modes are available:
P[1] = Pressure internal sensor.
[EXT] = Pressure with external pressure module.
P[1] ST = Switch Test with left side sensor.
[EXT] ST = Switch Test with external pressure module.
Note: mA functions are only available on the Lower Display.
mA measure = Milliamps measure without loop power.
mA w/24V = Milliamps measure with loop power.
mA source = Milliamps source.
mA sim = Milliamps simulate using an external supply from the UUT.
VOLTS = Voltage Measure.
RTD = RTD Temperature Measurement (if a probe is connected).
The following table shows which functions are available concurrently.
An X in a column indicates that the mode in the active display will not be available for
selection if the mode in that row is in use in any other display.
7
 |
[Page 1] Martel BETAGAUGE 330 BETAGAUGE 330 Reference Manual |
 |
[Page 2] Martel BETAGAUGE 330 BETAGauge 330 Reference Manual 1. Introduction . . . . . . . . . . . . . . . . . . . . . . . . . . . . . . . . . . . . . . . . . . . .1 1.1 Contacting Martel / Beta . . . . . . . . . . . . . . . . . . . . . . . . . . . . . . . . . . . .1 1.2 Stan… |
 |
[Page 3] Martel BETAGAUGE 330 1. Introduction The BetaGauge 330 is designed to be a simple to use yet very versatile pressure calibrator. Its internal pressure sensor combined with an innovative electrically powered pump along with inputs for mA, voltage, switch contacts and an R… |
 |
[Page 4] Martel BETAGAUGE 330 Symbol Description Electric Shock Fuse PE Ground Hot Surface (Burn Hazard) Read the User’s Manual (Important Information) Off On Canadian Standards Association The following definitions apply to the terms “Warning” and “Caution”. • “War… |
 |
[Page 5] Martel BETAGAUGE 330 3 • Do not use the calibrator if it operates abnormally. Protection may be impaired. When in doubt, have the calibrator serviced. • Do not operate the calibrator around explosive gas, vapor, or dust. • When measuring pressure, make sure the pro… |
 |
[Page 6] Martel BETAGAUGE 330 2. Calibrator Interface Figure 1 shows the location of the pressure controls, connection port and electrical inputs. Figure 1 4 |
 |
[Page 7] Martel BETAGAUGE 330 Figures 2A and 2B show the location of the keys. Table 2 describes the function of each key. Figure 2A Keypad (Electric Pump Versions) Table 2 Key Functions No. Name Description 1 Function Keys These are soft keys used to configure the calibrato… |
 |
[Page 8] Martel BETAGAUGE 330 6 2.1 Calibrator Display The Calibrator Display consists of two regions: The menu bar (located along the bottom of the screen) is used to access a menu system. The main display (the rest) consists of up to three process measurement sub-regions. Thes… |
 |
[Page 9] Martel BETAGAUGE 330 2.1.2.1 Setting the Active Display The active display is indicated by the center option on the Main Menu, pressing the F2 key will toggle the active display. 2.1.2.2 Setting Active Display Parameters To set the parameters of the active display use t… |
 |
[Page 10] Martel BETAGAUGE 330 Table 4 Mode Concurrency CURRENT DISPLAY P[1] [EXT] P[1] [EXT] mA mA Volts RTD ST ST Loop P[1] [EXT] P[1]ST X X X X X [EXT]ST X X X X X mA X X X X mA Loop X X X X Volts … |
 |
[Page 11] Martel BETAGAUGE 330 2.4 Other Menu Controlled Functions There are 12 ‘sub-main’ menus that can be accessed through the MORE option of the Main Menu. A ‘sub-main’ menu contains three options. The first option is unique to the function. The second and third opt… |
 |
[Page 12] Martel BETAGAUGE 330 10 Figure 4 Menu Map |
 |
[Page 13] Martel BETAGAUGE 330 11 If SAVE or RECALL is selected use the arrow keys to select the set-up location. Then use the save option to store the current set-up into the selected location or the recall option to recall the set-up stored in the selected location. The displa… |
 |
[Page 14] Martel BETAGAUGE 330 12 checked against the configurations of the other currently active displays, if the configurations are in conflict the recalled display’s configuration is modified to avoid the conflict. If all three displays are deactivated the LOWER display wil… |
 |
[Page 15] Martel BETAGAUGE 330 13 2. Before generating pressure make sure you have the 330 configured for your application. If needed review section 2 of the manual again to select the proper configuration. 3. Make sure that the pressure vacuum knob is set for the function you wan… |
 |
[Page 16] Martel BETAGAUGE 330 4. Measuring Pressure To measure pressure, connect the calibrator using an appropriate fitting. Choose a pressure setting for the display being used. The calibrator is equipped with one internal sensors and many optional external sensors (EPMs) are… |
 |
[Page 17] Martel BETAGAUGE 330 15 Figure 6 5. Measuring and Generating Current (4 to 20 mA) 1. To measure current use the input terminals in the front of the calibrator. Select the mA function on the lower display. Current is measured in mA and percentage of range. The range on … |
 |
[Page 18] Martel BETAGAUGE 330 Figure 7-1 Figure 7-2 Figure 7-3 Figure 7-4 16 |
 |
[Page 19] Martel BETAGAUGE 330 6. Measuring Voltage To measure voltage use the input terminals in the front of the calibrator. Select the Volts function on one of the displays. The calibrator can measure up to 30V. Note: The display will indicate “OL” when the measured volta… |
 |
[Page 20] Martel BETAGAUGE 330 18 Figure 9 8. Performing a Pressure Switch Test Figure 10 To perform a switch test, follow these steps: 1. Change the setup to Setup 4 (default switch test). Setup 4: The upper display is set to [P1] ST, all other displays are off. Important NOTE… |
 |
[Page 21] Martel BETAGAUGE 330 19 3. Make sure the vent on the pump is open. Zero the calibrator if necessary. Close the vent after zeroing the calibrator. 4. The top of the display will read “CLOSE”. 5. Apply pressure with the pump slowly until the switch opens. Impor… |
 |
[Page 22] Martel BETAGAUGE 330 20 9. Press the “NEW TEST” option to clear the data and perform another test. 10. Press the “DONE” option to end the test and return to the standard pressure setting. Example: [P1] ST will return to [P1]. Important NOTE: The previous exampl… |
 |
[Page 23] Martel BETAGAUGE 330 21 9.2 Calibrating a Pressure-to-Current Transmitter To calibrate a pressure-to-current transmitter (P/I), perform the following steps: 1. Connect the calibrator and the pump to the transmitter. 2. Apply pressure with the pump. 3. Measure the current… |
 |
[Page 24] Martel BETAGAUGE 330 22 9.3 Percent Error Function The calibrator features a unique function which can calculate pressure vs. milliamp error as a percentage of the 4 to 20 mA loop span. The percent error mode uses all 3 screens and has a unique menu structure. It simul… |
 |
[Page 25] Martel BETAGAUGE 330 4. LOOP POWER can be toggled on/off, select NEXT when done. 5. Use SELECT to toggle through the UNIT options, and select NEXT to move on. 6. Use the arrow keys to set the 100% point of the desired pressure range, select DONE SET when finished. 7. Ag… |
 |
[Page 26] Martel BETAGAUGE 330 24 Note: The 0% and 100% point will be saved in non-volatile memory until they are changed again by the user for the internal sensors, and external pressure modules. When using an external module the 0% and 100% are set to low and full scale of the m… |
 |
[Page 27] Martel BETAGAUGE 330 25 11. Factory Setups The Calibrator is loaded with five factory commonly used setups. These setups are shown below. Note: Any of these setups can be changed and saved by the user. Setup 1: The upper display is set to [P1] mode and the lower is set … |
 |
[Page 28] Martel BETAGAUGE 330 26 Setup 4: The lower display is set to [P1] switch test, the other displays are off. Setup 5: The upper display is set to [P1], the middle display is set to [EXT] and the lower display is set to RTD. 12. Custody Transfer / Flow Calibration The Model… |
 |
[Page 29] Martel BETAGAUGE 330 27 terminal, such as Hyper Terminal, to enter single commands. Typical RS-232 remote configurations are shown in Figure 13. Figure 13. Calibrator-to-Computer Connection 13.2 Setting up the RS-232 Port for Remote Control Note: The RS-232 connection ca… |
 |
[Page 30] Martel BETAGAUGE 330 5. Select ASCII setup from File/Properties/Settings and mark these choices: Echo typed characters locally Wrap lines that exceed terminal width 6. Select Ok 7. To see if the port works enter *IDN?. This command will return information on the calibrat… |
 |
[Page 31] Martel BETAGAUGE 330 Compound Commands Commands that contain more than one command on one line. For example; RTD_TYPE PT385_100;RTD_TYPE? Sets the calibrator to RTD type PT385_100 and queries it to verify. It will return: PT385_100 13.4.2 Character Processing The data … |
 |
[Page 32] Martel BETAGAUGE 330 30 13.4.4 Calibrator Status Error Queue If an error occurs due to invalid input or buffer overflow, its error code is sent to the error queue. The error code can be read from the queue with the command FAULT?. The error queue holds 15 error codes. Wh… |
 |
[Page 33] Martel BETAGAUGE 330 13.5 Remote Commands and Error Codes The following tables list all commands, and their descriptions, that are accepted by the calibrator. Table 5: Common Commands Command Description *CLS (Clear status.) Clears the error queue. *IDN? Identificati… |
 |
[Page 34] Martel BETAGAUGE 330 IO_STATE Set the calibrator’s mA state. IO_STATE? Return the calibrator’s mA state. LOCAL Returns user to manual operation of the calibrator LOCKOUT Locks out the keypad of the calibrator in remote operation LO_ERR Sets the 0% of span… |
 |
[Page 35] Martel BETAGAUGE 330 LOWER Designates Lower display MA Milliamps of current MEASURE Measure state MEAS_LOOP Measure with loop power state MIDDLE Designates Middle display OHM Resistance in ohms PCT_ERR Percent Error PERCENT Percent PT385_100 100 Ohm 385 Platinum RTD type… |
 |
[Page 36] Martel BETAGAUGE 330 13.6 Entering Commands Commands for the calibrator may be entered in upper or lower case. There is at least one space required between the command and parameter, all other spaces are optional. Almost all commands for the calibrator are sequential; a… |
 |
[Page 37] Martel BETAGAUGE 330 CPRT_COEFC This command is used for entering a custom RTD into the calibrator. The numeric value entered after the command will be set as the first coefficient of the polynomial used by the custom RTD. For example: CPRT_COEFC –4.183000E-12 enters �… |
 |
[Page 38] Martel BETAGAUGE 330 If you send DISPLAY? It will return ON, ON, ON if the all the displays are on. FAULT? Returns the error code number of an error that has occurred. The command may be entered when the previous command did not do what it was meant to do. For example,… |
 |
[Page 39] Martel BETAGAUGE 330 If you send ERROR _PORT?, it will return P1 if the pressure port in percent error is [P1]. FUNC Sets the display indicated in argument one to the function indicated in argument 2. For example: To set the lower display to RTD mode send FUNC LOWER,RTD…. |
 |
[Page 40] Martel BETAGAUGE 330 38 IO_STATE? Returns the input/output/simulate state of the mA function of the calibrator. For example: If the calibrator was in mA simulate mode IO_STATE? Would return SIM. LOCAL Restores the calibrator to local operation if it was in remote mode…. |
 |
[Page 41] Martel BETAGAUGE 330 For example: If when measuring a P100-385 at 0 degrees cel sending OHMS? would return 1.000000E+02, OHM . OUT This command also switches the calibrator into mA output mode. A number and a unit must be entered after the command. For example: OUT 5 MA… |
 |
[Page 42] Martel BETAGAUGE 330 40 PT385_100; PT392_100; PTJIS_100; CUSTOM; For Example: RTD_TYPE PT385_100 sets RTD type to PT100-385 RTD_TYPE? Returns the RTD type. For Example: If the RTD type is PT385_100, RTD_TYPE? Will return PT100_385. SIM Sets the output for current simu… |
 |
[Page 43] Martel BETAGAUGE 330 TEMP_UNIT? Returns the temperature unit, (CEL or FAR) used when measuring RTDs for each of the 3 displays. VAL? Returns the value of any measurement taking place on the upper and lower display. For example, if the upper display is measuring 5mA, and … |
 |
[Page 44] Martel BETAGAUGE 330 14. Specifications (15 °C to 35 °C unless otherwise noted.) General Instrument Setup Recall 5; last used on power-up Environmental Operating Temperature -10 °C to +50 °C Storage Temperature -20 °C to +60 °C Power Requirements 12 VDC Battery… |
 |
[Page 45] Martel BETAGAUGE 330 15. Warranty Martel Electronics Corporation warrants all products against material defects and workmanship for a period of twelve (12) months after the date of shipment. Problems or defects that arise from misuse or abuse of the instrument are not co… |
 |
[Page 46] Martel BETAGAUGE 330 6. Clean the o-ring assembly and the o-ring on the retention caps with IPA and inspect the o-rings closely for any damage or excessive wear. Replacements are included in the repair kit, if needed. 7. Inspect the springs for wear or loss of tensio… |
 |
[Page 47] Martel BETAGAUGE 330 BetaGauge 330 Ranges and Resolutions Range (PSI) 30 PSI / 2.0 Bar 150 PSI / 10 Bar 300 PSI / 20 Bar Burst Pressure (PSI) 300 300 2000 Proof Pressure (PSI) 60 200 600 Engineering Unit Factor Psi 1 30.000 150.00 300.00 bar 0.06894757 2.0684 10.3421 … |
 |
[Page 48] Martel BETAGAUGE 330 8/10 Rev E 0219782 www.martelcorp.com e-mail: [email protected] Tel: (603) 434-1433 800-821-0023 Fax: (603) 434-1653 Martel Electronics 3 Corporate Park Dr. Derry, NH 03038 |